|
Overview

DXtreme
Station Log 15
Version 15.0
—
Our
Multimedia
Logging
Program
For Amateur Radio Operators
|
Like other logging programs on the market
today, DXtreme Station Log 15™ lets you log your contacts.
But what makes DXtreme Station Log 15 special are its multimedia and
advanced features, which work together to enhance your
Amateur Radio operating and logging experience.
This data sheet describes all of the features and functions of the program.
It'll take a while to read it. Alternatively, you can click the Topic Links
on the left to jump to a desired topic.
So go grab yourself a cool 807 from the fridge ...
and then come back and read on.
A search glass appears ...
where screenshots are available for viewing.
Don't forget to:
|
|
Features

DX
Spot Checker
|
Station Log 15 comes with a DX Spot Checker™ that
receives DX spot announcements from Telnet-based, DX Cluster servers.1
It has two presentation modes: Rich Site Feed and Grid Feed.
Rich Site Feed
When selected via the Rich Site Feed tab, the Rich Site Feed displays the
actual, continuous feed from the Telnet server. It also lets you interact with the server to set options
like filters and to perform queries.
Grid Feed
When selected via the Grid Feed tab, the Grid Feed displays 10 to 50 rows (your choice) of
DX spots in a structured, resizable, alternating-color grid. It can be activated and deactivated, if
necessary, via the DX Spot Checker toolbar:
 Activates Activates
 Deactivates Deactivates

Grid-Feed spots can be displayed on a rotating basis (erase all then continue) or
on an overwriting basis (gradually overwrite just the oldest spots) as selected via the DX Spot Checker toolbar:
 When selected, the grid erases completely after a
spot displays on the last row. The last spot is then repeated on the first row, and subsequent spots display
in succeeding rows as expected. When selected, the grid erases completely after a
spot displays on the last row. The last spot is then repeated on the first row, and subsequent spots display
in succeeding rows as expected.
 When selected, the grid overwrites old spots with
new ones from the top down. When selected, the grid overwrites old spots with
new ones from the top down.
You can select the number of rows to display, change the height and width of the window, and adjust the
widths of the columns. The window must be sized so all rows are visible.
You can use the Properties dialog box of the
Last Log Entries grid to set the font attributes (font size within reason) and
foreground and background colors of the Grid Feed's heading and data rows —
one format for odd data rows, and another format for even data rows. Font attribute and color
changes take effect upon grid refresh.
Heading font attributes and colors are also applied to the
Bearing and Status text boxes on the window with font sizes limited to those of data rows
(up to a maximum of 12 for optimal display).
Resizable Window
You can resize the DX Spot Checker window vertically and
horizontally. The window cannot be resized smaller than the minimum required to see
the controls on the Rich Site Feed display. Window sizes for Rich Site Feed and
Grid Feed are retained when switching between the two displays.
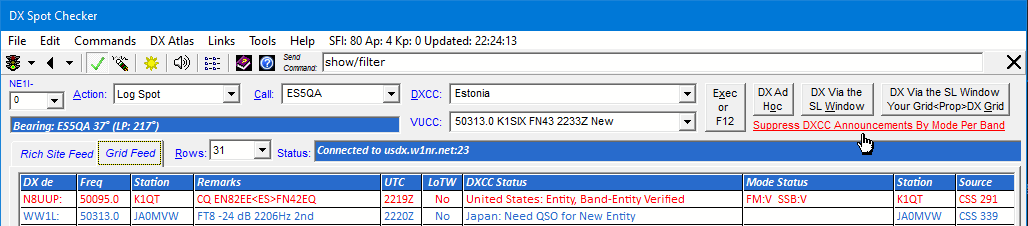
DXCC Indications
Depending on how you've configured Entity Announcements and
Spot Display Filtering on the Services tab in DX Spot Checker Options, as each
spot arrives, the Rich Site Feed is embellished with rich, DXtreme-added indications of whether
you need to work stations for a new or verified DXCC entity,
band-entity, and mode-entity.
And the Grid Feed displays this same information in DXCC Status
and Mode Status columns, and in pop-up windows like this one:
Audio announcements of your DXCC status per spot can also be activated, and are
useful when you can't see the DX Spot Checker window — like when
you're busy working on a project in the shack and you're not watching your monitor.
The announcements ensure that you won't miss the DXCC entities you need. But when you crave silence,
a button on the DX Spot Checker toolbar lets you turn the
audio off.
Important: For best results, DXtreme Software recommends activating
QRZ XML Logbook Data or HamQTH.com while using the DX Spot Checker because
those call sign subscription services return the DXCC Entity Code for each
station most often, thereby increasing the accuracy of DXCC status indications.
If the entity number is not returned, the DX Spot Checker uses the Entities,
Prefix Cross-Reference, and Call Sign Cross-Reference tables to determine entity-needed
status. The Source column on the Grid Feed displays CSS ### when
the call sign subscription service returns the DXCC Entity Code, and Table
when the aforementioned tables were used. DXtreme Software is not responsible
for the accuracy of information a call sign subscription service provides.
LoTW Indications
The Rich Site Feed uses the font attributes you set in DX Spot Checker
Options to render spots of LoTW users. The default is a text color of
Green.
The Grid Feed has a LoTW column which indicates status as Yes or No
per spot; and for stations clicked on the grid, a Status box which also includes the date and
time the spotted LoTW user last uploaded logs to his or her account.
Pop-up Windows for Spot Recall and DXCC Information also display the date
and time a spotted LoTW user last uploaded logs to his or her account.
VUCC Indications
If a call sign subscription service is active on your system and automatic or manual
VUCC Status Checking is activated on the Services tab in
DX Spot Checker Options, the DX Spot Checker indicates whether
you should work stations for a new or verified grid when the Maidenhead, 4-character grid
locator is known to the call sign subscription service.

Display of Short- and Long-Path Bearings
When the latitude and longitude of a spotted station are known to
Station Log, short- and long-path bearings from your QTH to the
station spotted appear on the DX Spot Checker window whenever you perform
the following actions:
- Show Ham CAP LP/SP Prediction (if you own a copy of Ham CAP2)
- Recall Spot
- Mail Spot
- Web Lookup Spot
- Tune to Frequency
- Log Spot
And when the latitude and longitude of a spotted station are not known, you
can always obtain the short- and long-path bearings from your QTH to the entity
selected in the DXCC box.
Send Command Box
The Send Command box lets you type server commands, such as configuration, filter,
and query commands. Pressing Enter on your keyboard sends the commands to the server. You must
click the Rich Site Feed tab to see the response from the server.

Links to on-line documentation for AR-Cluster, CC Cluster, and DXSpider server commands are
present (by default) in the Links menu.
DX Announcement Command Buttons
Buttons labeled DX Ad Hoc, DX Via the SL Window,
and DX Via the SL Window - Your Grid<Prop>DX Grid appear on the
DX Spot Checker window. Clicking them inserts a DX
announcement template into the Send Command box.
You edit the template, supplying the desired information, and then press Enter
on your keyboard to send the announcement to the server.
- As its name implies, clicking DX Ad Hoc inserts a generic template:
DX <call> <freq> <remarks>
Overwrite the <call>, <freq>, and <remarks> placeholders with the desired
information. Then press Enter to send the DX announcement to the server.
- As its name implies, clicking DX Via the SL Window inserts a more specific
template into the Send Command box, one that includes information from the
Station Log window (assuming you've already started a log entry for the station you're
reporting):
DX KH1/KH7Z 14090.0 FT8 <remarks>
Overwrite the <remarks> placeholder with the desired information. Then
press Enter to send the announcement to the server.
- And as its name implies, clicking DX Via the SL Window - Your Grid<Prop>DX Grid
inserts an even more specific template into the Send Command box, one that
includes grid and propagation information from the Station Log window (assuming you've already started a log entry
that includes such information for the station being reported):
DX KF6A 144150 MSK144 FN42gr<MS>EN73pj <remarks>
Overwrite the <remarks> placeholder with the desired information. Then
press Enter to send the announcement to the server.
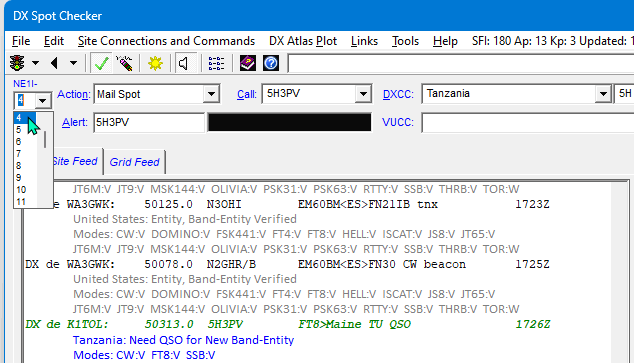
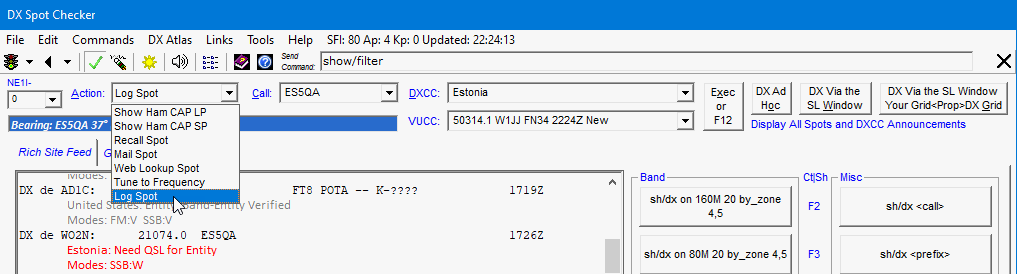
DX Query Command Buttons
DX Query Command Buttons appear on the right side of the DX Spot Checker
window when Rich Site Feed is selected. There's one button for each command defined on the Additional Commands tab of
DX Spot Checker Options.
Right-clicking a button displays a shortcut menu, whereupon clicking Define
brings you to the text box where you can define the command.
Thereafter, depending on the definition of a command, left-clicking a button sends
its command to the server immediately, or inserts a DX announcement
template into the Send Command box for editing before sending.
During definition, the Send check box, next to each text box, lets you send the command to the
server immediately whenever the button is clicked. Otherwise, the command assigned to the button
appears in the Send Command box for editing.

After editing in the Send Command box, press Enter on your keyboard to send the command to the server.
(Function keys are also assigned to each button.)
To help you define your commands, links to on-line user guides for AR-Cluster, CC Cluster, and
DXSpider servers are present (by default) in the Links menu of the
DX Spot Checker Options window.
Two text boxes labeled Group 1 and Group 2 are
also included to let you customize the caption of each button group.
List Commands Box and Module
The List Commands box contains a list of pre-configured commands you
can send to the cluster server immediately. By default, DXtreme Station
Log 15 ships with list commands that query the cluster server for recent
FT8 Fox/Hound activity.
Simply click the desired list item:

Then the arrow button:

And the results appear on the Rich Site Feed display.
You can define, edit, and delete any list commands you want using the
Define List Commands Module window, which is accessible by
double-clicking List Commands — Double-Click Here to Define
Commands:


The numbers 10, 11, 12, and so on in the Order Description column sort
the list in the desired order.
Propagation Predictions: Integration With Afreet Ham CAP
You can perform propagation predictions within the DX Spot Checker for
the paths between your station and spotted stations if you have Afreet Omni-Rig and
Afreet Ham CAP2, an HF propagation prediction program, installed on your PC. You can obtain Omni-Rig
and Ham CAP free (at the time of this writing) from Afreet Software, Inc.
Ham CAP offers two graphical displays:
- Chart — Shows the signal-to-noise-ratio prediction
by time and frequency for the path between your station and a spotted station.
- Map — Shows, atop a Mercator projection,
the current propagation prediction for the path between your station and a spotted station
for the frequency reported (if the station was spotted on the 80-, 40-, 30-, 20-, 17-, 15-,
12-, or 10-Meter band). You can, if desired, change the time and band on the Ham CAP interface
to see when it would be best to work the station.
You activate Ham CAP within the DX Spot Checker by invoking a short- or
long-path prediction on the double-clicked frequency of a spotted station on the Rich Site Feed display,
or on a clicked row of a spotted station on the Grid Feed display.

Ham CAP's Chart appears ...
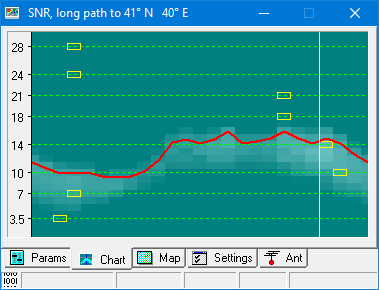
Or
Ham CAP's Map appears ...
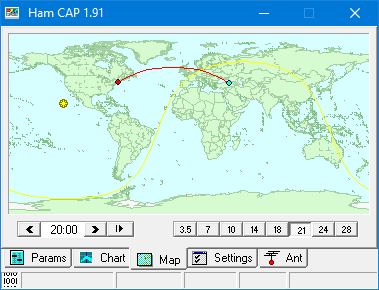
Depending on the initial display tab selected in Preferences.
You can, of course, click Chart or Map on the Ham CAP interface to
switch between the displays.
Your coordinates must be present in Preferences and a subscription to
Buckmaster HamCall, QRZ XML Logbook Data, or HamQTH.com is required to obtain the specific
coordinates of the spotted station. If you don't subscribe to one of those lookup services,
or if the station's coordinates are not available from the service, the default coordinates
of the station's DXCC entity are used. The call sign of the spotted station appears on the
Chart when the default coordinates of the entity are used; otherwise, the
actual coordinates of the spotted station appear.
The Ham CAP tab in Preferences lets you enable Ham CAP and
set desired properties.

Properties such as:
- Initial Display Tab — The initial display of Chart or
Map.
- Average Power — The average power you're running.
- Bearing and Distance Preference — Whether double-clicking the
B+Dx caption on the Station Log window invokes Ham CAP Short Path,
Ham CAP Long Path, or a DX Atlas plot (if installed and configured on your PC).
- Map Style — Color,
Gray, or Pseudo to suit your taste.
- Map Resolution — High,
Medium, or Low to suit your taste.
- Default Band — The band to select when the frequency of a spotted
or logged station is outside the 80-, 40-, 30-, 20-, 17-, 15-, 12-, or 10-Meter band or you invoked
Ham CAP from the action bar of the DX Spot Checker or from the Entities module.
You can, of course, change the band on the Ham CAP interface.
- Show Sun — Whether to show sun position on the Map display.
- Plot Path — Whether to plot the path on the Map display.
- Plot MUF — Whether to plot the maximum usable frequency on the
Chart display.
Note
To use Ham CAP effectively, users must configure other parameters and settings on the Ham CAP
interface. (As stated above, home and DX coordinates are supplied by DXtreme Station Log 15.)
Further, we encourage users to read the Ham CAP on-line documentation, which is available on the Ham CAP web page.
Other Functions
The DX Spot Checker also lets you:
- Tune your radio to the last-reported frequency and mode of a desired spot or
VUCC item4
- Recall spots in a separate window so you can view the history of spots for a
single station in one place.
- Send spot announcements to others by e-mail.
- Perform Web-based, call sign lookups on stations spotted, including VUCC items.
- Start a log entry for a desired spot or VUCC item.
- Select a unique Service Set Identifier (SSID) when
logging on to the same cluster server on multiple devices at your site.
The Service Set Identifier box is labeled with your
call sign and a trailing hyphen. No more being forcibly logged off
the server.
Most functions can be invoked via the Action bar ...
Or the shortcut menu on the Rich Site Feed display.
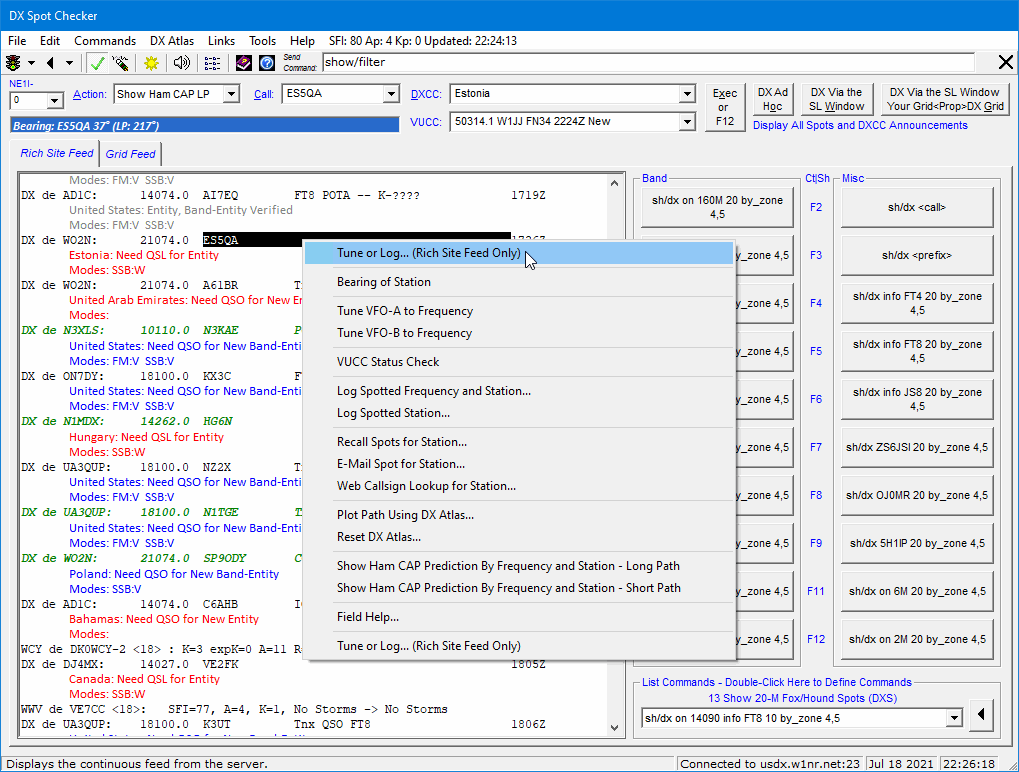
Or the shortcut menu on the Grid Feed display.
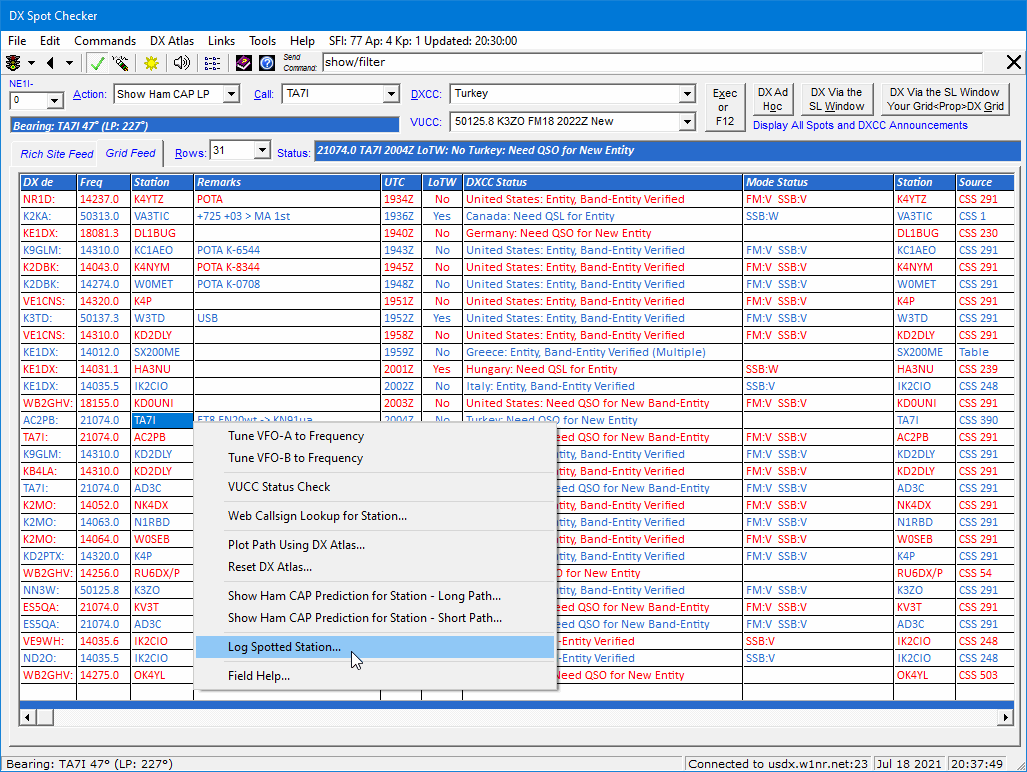
In Options, you can define default functions for the first and last
items on the shortcut menu.
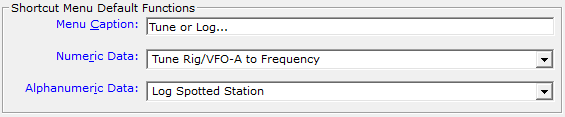
Default functions appear twice on the shortcut menu of the Rich Site Feed display — once at the top,
once at the bottom — so they're always right next to your mouse cursor for
quick activation.
DX Atlas Integration
If you own a copy of Afreet DX Atlas5, you can perform a DX Atlas azimuth plot from
your location to that of a spotted station via the menu bar or shortcut menus.
Plot colors and fonts are configurable in Preferences.

Your coordinates must be present in Preferences and a subscription to
either HamQTH.com, Buckmaster HamCall, or QRZ XML Logbook Data is required to obtain the
specific coordinates of the destination station. Whether the station's coordinates
exist in the call sign subscription service is not guaranteed by DXtreme Software.
If you don't subscribe to a call sign subscription service, or if the station's
coordinates are not available from the service you chose, you can perform an azimuth
plot based on the default coordinates of the station's DXCC entity. These coordinates
exist in the Entities module of Station Log.
In this context, a subscription to DX Atlas is the only requirement.
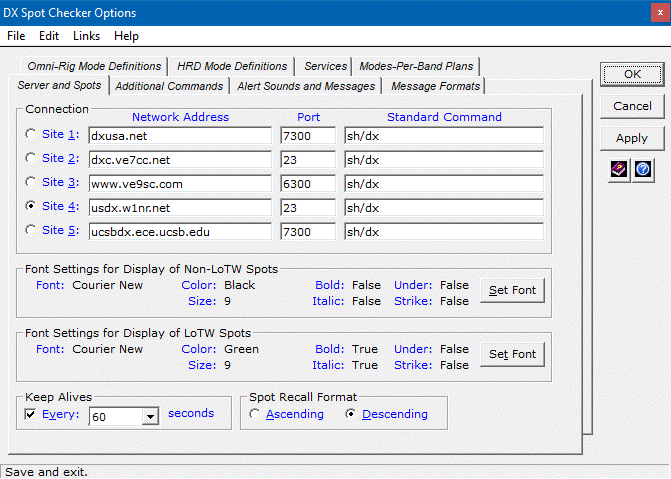
DX Spot Checker Options
The DX Spot Checker has a separate Options dialog box
that lets you specify server addresses; server commands; DXCC alert sounds, message font attributes, and
message format text; rig-control mode definitions; shortcut menu default functions;
spot display filtering services; and band plans for filtering spots by mode per band.
You can customize the rich-text messages and audio announcements
for each DXCC status category so the messages and announcements look and sound the way
you want them to. You can even assign different font colors
to each DXCC status message that appears in the Rich Site Feed. We like
red for spots representing new DXCC entities,
blue for new band-entities, and
gray for entities we don't need.
Reminder: For the Grid Feed, you use the Properties dialog box of the
Last Log Entries grid to set the font attributes and foreground and background colors.
Important: Using servers that display rapid-fire, Skimmer-type spots can overwhelm the
DX Spot Checker. When using any server, especially during contests, we suggest filtering
be applied at the server level to control the flow rate, and that Services within
DX Spot Checker Options be set as appropriate. By default, sites in the Links menu provide
access to server documentation.
Services
Services are available to control spot display.
VUCC Status Checking
The following VUCC status checking services are available:
- Automatic VUCC Status Checking — To
to have the DX Spot Checker perform automatic
VUCC status checks on incoming spots. When this check box is cleared, you
can still make VUCC checks manually.
- Suppress Display of Verified VUCC History — To
suppress the listing of Verified VUCC history items.
VUCC status checks require a subscription to
QRZ XML Logbook Data, Buckmaster HamCall (500 lookups per day), or HamQTH.com.
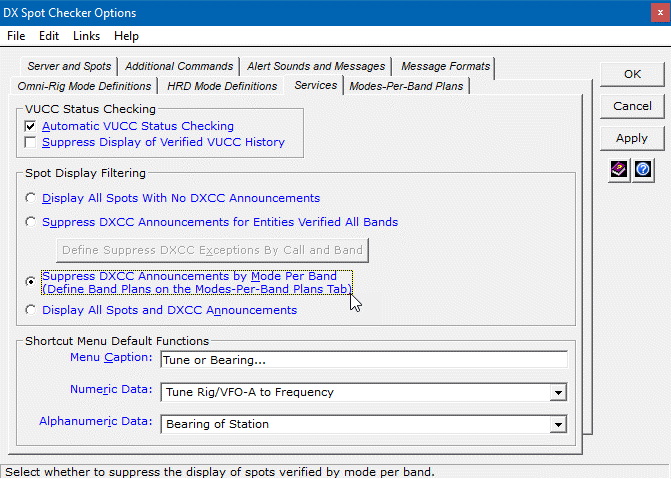
Spot Display Filtering
The following spot display filtering services are available:
- Display All Spots With No DXCC Announcements — To display spots
only with no no DXCC announcements. This option does not cancel filters applied
at the server level.
- Suppress DXCC Announcements for Entities
Verified All Bands — To suppress the display of spots for entities already
verified on all bands. Only the spots needed for new entities — overall or on one or more bands —
appear. This option may not display spots needed for mode-entities, IOTAs, gridsquares, etc.,
and the call signs of spots for verified entities will not appear in the Call
list box on the DX Spot Checker window. The entities of all spots will continue to
appear, however, in the DXCC list box. If desired, an exception list of call signs and bands
can be maintained to force spot display when Suppress DXCC Announcements for Entities Verified
All Bands is activated.
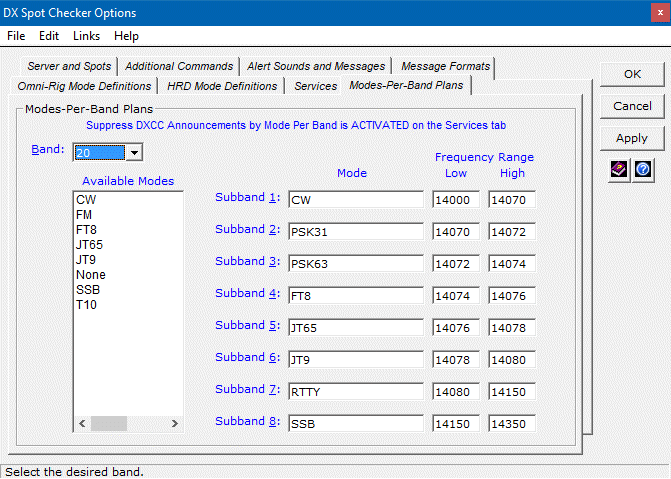
- Suppress DXCC Announcements by Mode Per Band — To suppress the
display of spots for modes verified within the band-portions defined on the Modes-Per-Band Plans
tab. Once defined and activated, only the spots needed for mode-entities not worked and not verified within
the defined portions will appear (with the understanding that you cannot overlap mode definitions per
band-portion). Call signs and entities of all spots will continue to appear in the Call and DXCC
list boxes.
- Display All Spots and DXCC Announcements — To display all spots
and DXCC announcements.
The selected Spot Display Filtering Option is indicated on the DX Spot Checker
window. Double-clicking it provides quick access the Services tab.
1 — Requires an Internet connection.
2 — A subscription to HamQTH.com (free at the time of this writing),
Buckmaster™ HamCall™, or QRZ XML Logbook Data are required for specific path
coordinates, and you must have software licenses for and have installed and enabled Afreet Ham CAP
and Afreet Omni-Rig on your PC. Afreet Ham CAP and Afreet Omni-Rig are both free at the
time of this writing.
3 —A software license for Afreet IonoProbe is required only if you want to use IonoProbe. You can obtain a license from
Afreet Software, Inc.
4 — Requires installation and configuration of Afreet Omni-Rig. Refer to
"Rig Control in Station Log" later on this page for more information.
5 — A subscription to HamQTH.com, Buckmaster HamCall,
or QRZ XML Logbook Data are required for specific path coordinates, and a software license
for Afreet DX Atlas is required only if you want to use DX Atlas.
You can acquire Afreet Software packages from Afreet Software, Inc.
at http://www.dxatlas.com/.
|

Band Master
Integration
|
If you own a license for Afreet Band Master1, you can invoke
it via the Tools menu on the Station Log window by choosing the
Needed Lists format you want.
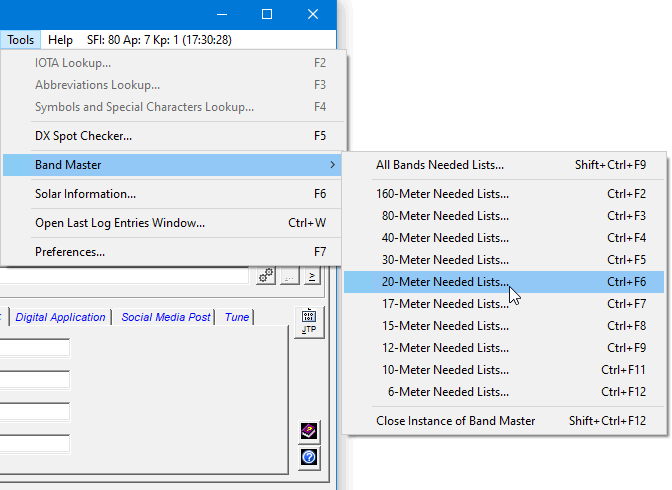
Band Master opens with the appropriate needed lists loaded.
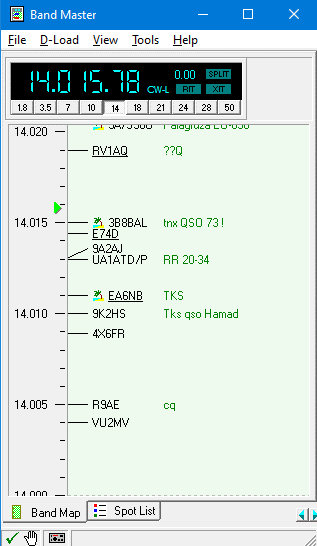
The needed lists, which include Entities and IOTAs, are based on your
Station Log database, and Band Master uses these lists to indicate the
entities and IOTAs you need. You can select needed lists for all bands and individually for
the 160- through 6-Meter bands.
The needed lists do not refresh automatically, but you can re-click a Needed Lists format
to rebuild them any time you want.
Band Master integration offers a graphical alternative to the included
DX Spot Checker, and both clients offer features that the other client lacks.
For example, the DX Spot Checker is tightly integrated with Station Log functions and
provides robust reporting of needed DXCC entities and VUCC grid squares. Plus it provides a way to
send commands to the Telnet server.
Band Master offers an attractive band display, IOTA reporting,
and the ability to connect to Web clusters.
Both Band Master and the DX Spot Checker
can be used simultaneously, as long as they are not connected to the same Telnet server.
A delay setting in Preferences allows the needed lists to build prior to displaying
Band Master.
1 — A software license for Band Master is required only if you want to use
Band Master. You can obtain a license from Afreet Software, Inc.
2 — Requires an Internet connection.
|

Station Log
Window
|
The Station Log window has six tabs that organize and
provide access to the fields of your electronic logbook.
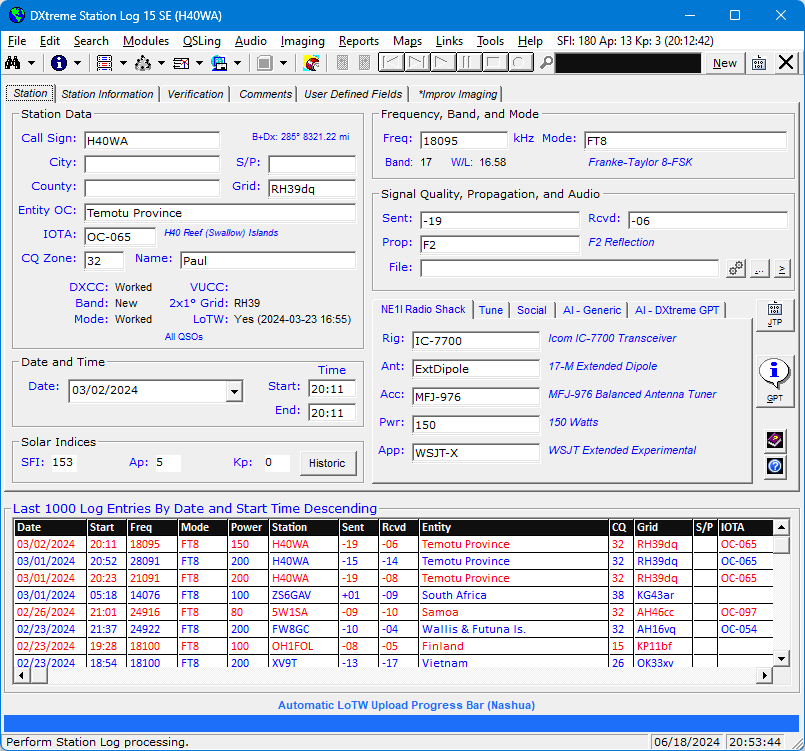
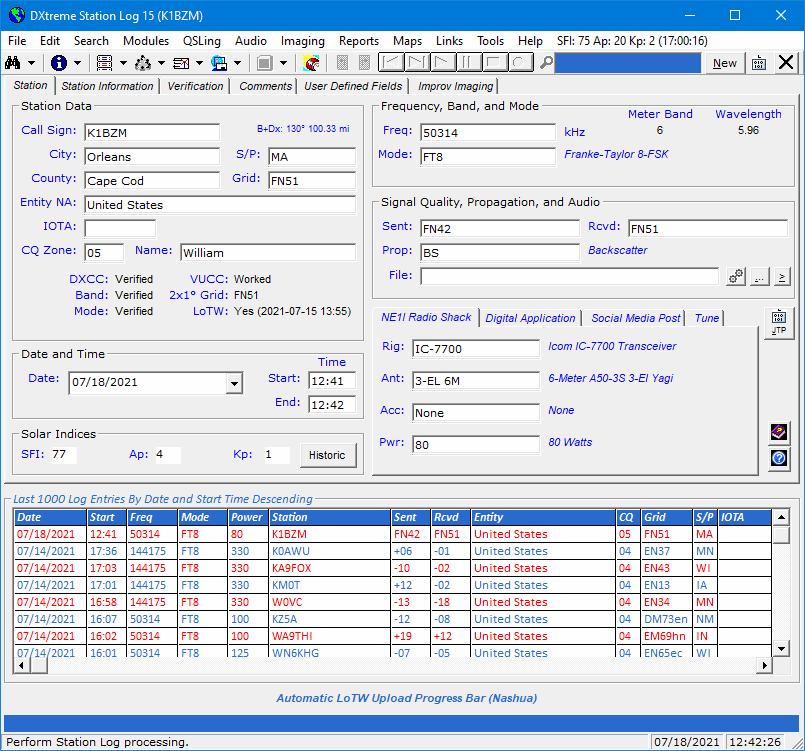
Station Log Tab
The Station Log tab lets you enter information about the
contact, such as the:
- Call sign and location of the station.
- Name of the ham radio operator.
- Date and time of the contact.
- Frequency and mode of transmission.
Note: When Afreet Omni-Rig is installed and configured on your
computer, Station Log enters the frequency and mode from your transceiver in the
Frequency and Mode fields. Refer
to "Rig Control" for more information.
- Signal quality and propagation mode.
- Equipment you used to work the station. (Defaults for which can be set
per band within the Bands module.)
The Station Log tab can also display information,
such as:
- Bearing and distance.
When the latitude and longitude of a station are known to
Station Log, bearing and distance from your QTH to the
station logged appears.
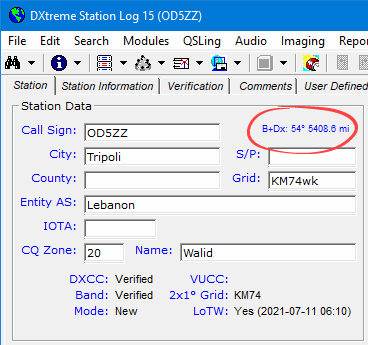
The short-path bearing appears continuously; the long-path
bearing appears as a pop-up when you mouse-over the field. Clicking the field displays a DX Atlas
azimuth plot or Ham CAP propagation prediction depending on the default setting made in
Preferences.
- Whether the amateur radio operator you worked is a user of Logbook of The
World (LoTW), and the date and time the user last uploaded log entries to his or her account.2
- DXCC and VUCC status information.
DXCC, Band, and Mode fields display
DXCC entity status information when the entity, band, and mode are known to Station Log.
The entity status information that can appear includes New, Worked,
and Verified.
Important: For best results, DXtreme Software recommends activating
QRZ XML Logbook Data or HamQTH.com while using Station Log 15 because
those call sign subscription services return the DXCC Entity Code for each
station most often, thereby increasing the accuracy of DXCC status indications.
If the entity number is not returned, the DX Spot Checker uses the Entities,
Prefix Cross-Reference, and Call Sign Cross-Reference tables to determine entity-needed
status. DXtreme Software is not responsible for the accuracy of information a call sign subscription
service provides.
The VUCC field, for a different station, displays grid status by band
when the Maidenhead grid locator and band are known to Station Log. The
VUCC status information that can appear includes New,
Worked, and Verified.
The scope of and captions for VUCC status are determined by
the settings you make in Preferences, as described earlier in
the "DX Spot Checker Facility" section.
DXCC status appears immediately after entering a valid call sign
when Station Log has been configured to work with rig control.
VUCC status appears immediately as soon as the grid locator is known.
If you have not configured rig control, DXCC and
VUCC status appears after you type a frequency and select a mode.
The Station Log tab can also be used to:
- Drag-and-drop dynamically prepared Social Media Posts to your favorite
social media sites to share your DX conquests with others.
Note: Refer to "Social Media Posts" for important information.
- Change the frequency and mode of your radio directly.
Note: Refer to "Rig Control" for important information.
1 — Requires an Internet connection. DXtreme Software does not
guarantee the availability of information from NOAA.
2 — The LoTW Users Update module helps you keep
LoTW user data up-to-date by importing the LoTW users file from the ARRL.
Station Information Tab
The Station Information tab lets you enter the postal address of the station
you worked or its QSL manager. It also lets you enter or obtain the coordinates, Web, and
e-mail address of the station. You only have to enter this information
once because Station Log can recall it every time you work the station.
If desired, you can drag and drop address information from a Web call sign lookup page
or any compatible Windows program. You can click the Call
field at any time to perform a Web call sign lookup.
When you subscribe to HamQTH.com, Buckmaster HamCall™ or QRZ XML Logbook Data,
Station Log fills the location and address fields automatically when you enter a log
entry — if the information is provided by the call sign subscription service.
If a QSL manager is defined in the call sign subscription service, Station Log displays a
dialog box that lets you confirm the call sign of the manager. Once confirmed, Station Log
queries the call sign subscription service for the address of the QSL manager and
enters that address in the fields of the Station Information tab. If
the call sign subscription service doesn't know the identity of a QSL manager but you
do, you can type the call sign and have HamQTH.com, Buckmaster, or QRZ XML Logbook Data
populate the address fields for you.

The address information on the Station Information tab appears in the
Create Direct Print QSL Labels window and the Create Word Template QSL
Labels window so you can create address labels for your outgoing QSLs.
Station Log uses the coordinates to calculate the bearing and distance between your QTH
and that of the station you contacted. Bearing and distance appears
on the Station Log tab, and distance appears in Stations reports.
A Click for Street Map hyperlink lets you display a street or
satellite map of the station you worked based on the coordinates, which are sent
to the mapping web site specified in Preferences. The web page url must
accommodate the coordinates passed.

Clicking the Web caption on the tab displays the Web page of the station
using the general-purpose Web browser designated in Preferences; clicking
the E-Mail caption displays a pre-addressed Message
window in Microsoft Windows Live Mail, Windows Mail, Outlook Express, Mozilla Thunderbird, or
Microsoft Office Outlook (Win32-based, desktop e-mail clients only).
The name of the audio archive file appears on this tab as well.
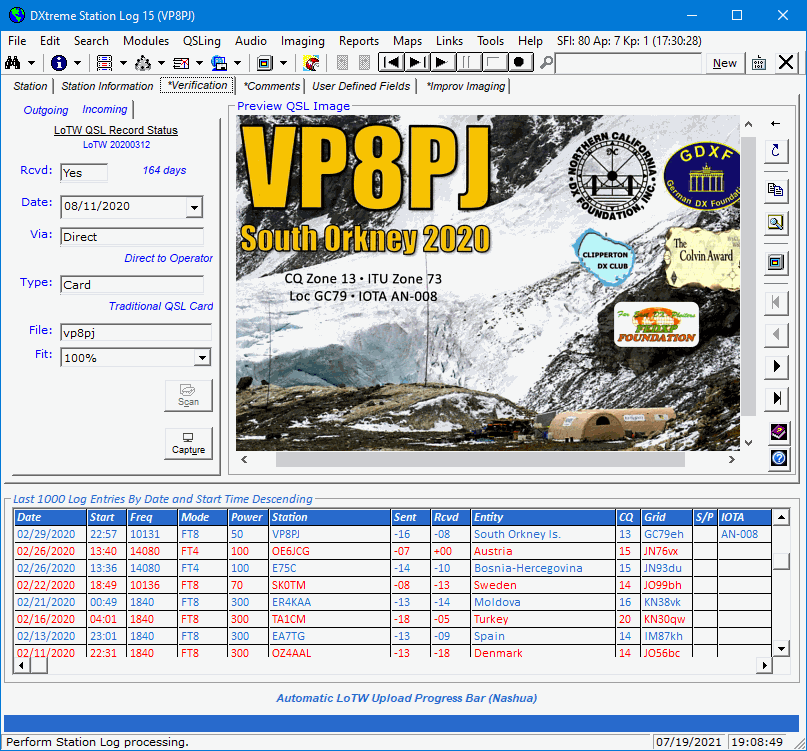
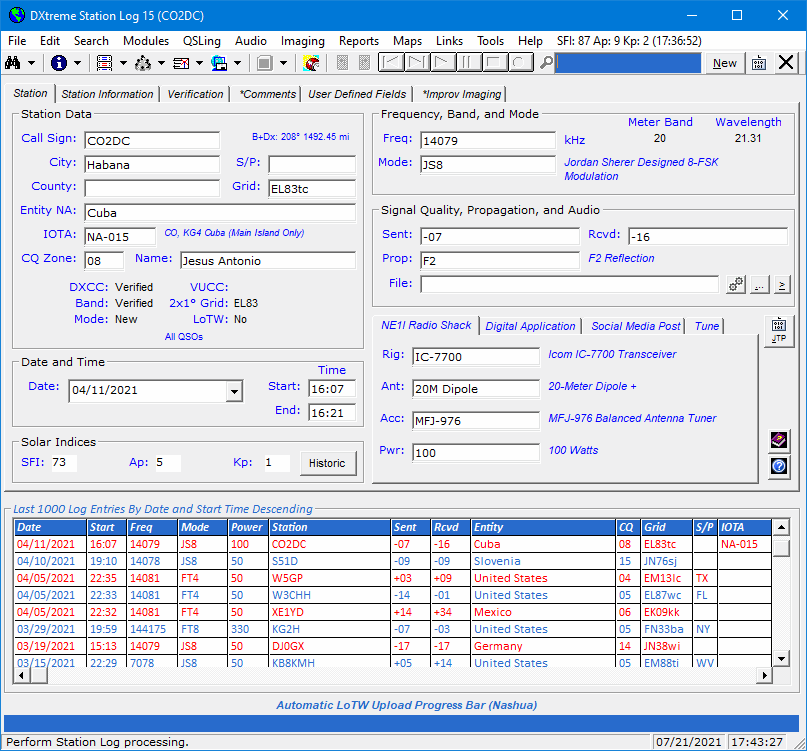
Verification TabThe Verification tab lets you specify information regarding
outgoing and incoming QSLs.
- For Outgoing QSLs — You can specify:
- Whether you're sending a QSL.
- Date you're sending the QSL.
- Return postage you're sending with the QSL.
- Type of QSL you're sending (Card, LoTW, eQSL.cc).
- Entity to whom you're sending the QSL (bureau, QSL manager, etc.).
- For Incoming QSLs — You can specify:
- Whether you have received a QSL.
- Date you received the QSL.
- Entity from whom you received the QSL (bureau, QSL manager, etc.).
- Type of QSL you received (Card, LoTW, eQSL.cc).
- Name of the QSL image file.
The Verification tab also displays information.
On the Outgoing tab, it displays:
- DXCC and VUCC QSL Recommendations.
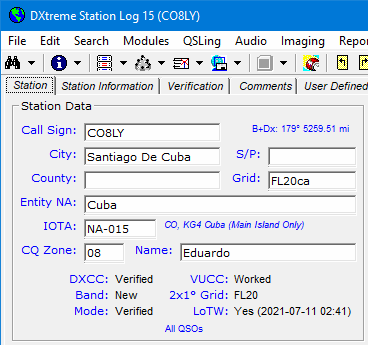
In the above illustration for a contact with South Orkney Is., the
DXCC field on the Outgoing tab indicates while
South Orkney Is. is not an All Time New One, it is
unverified by a QSL. And the Band and
Mode fields indicate South Orkney Is. is a new
band- and mode-entity. These fields unanimously recommended a
QSL be sent on 02/29/2020!
In the below illustration for a VHF contact with Cuba, the VUCC field indicates that while the Cuban grid of
FL20 is not new on 6 meters, it is not verified. Hence the recommendation to QSL.
- LoTW QSO Record Status.
Whether the log entry, if uploaded, was received by the LoTW Server okay.
On the Incoming tab, it displays:
- LoTW QSL Record Status.
Whether our South Orkney Is. log entry was verified by a
LoTW QSL record, even if it was already — and
Officially — confirmed by a paper QSL.
The Verification tab is also where you can associate QSL images with log entries. Once scanned or
captured, the Preview QSL Image display lets you preview images and access the
resizable QSL Imaging application to see the images full-size. Refer to "QSL Imaging" for
more information.
Comments Tab
The Comments tab has two memo fields that let you enter comments
about the station and/or QSO.
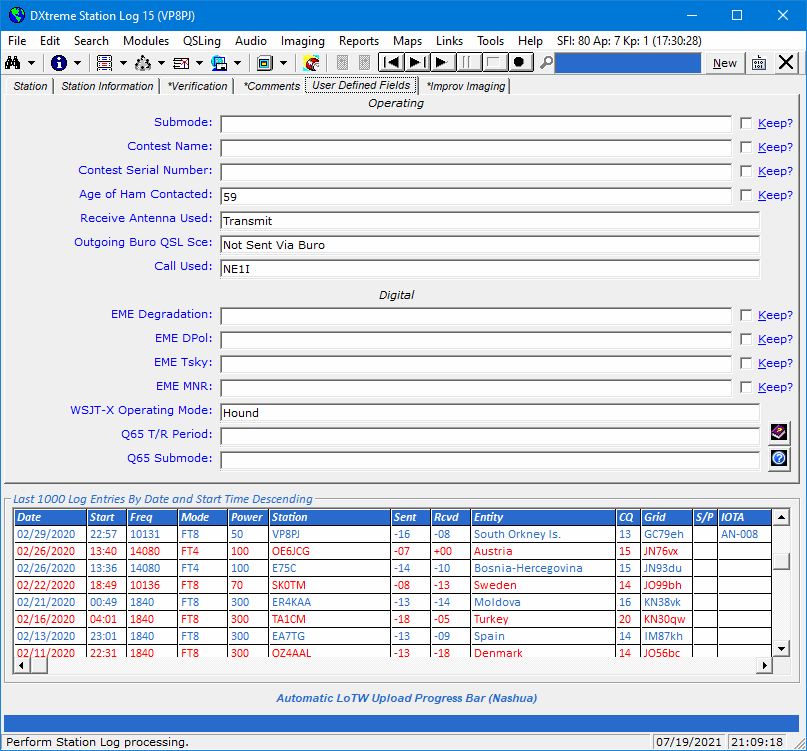
User Defined Fields Tab
The User Defined Fields tab has 14 fields that you can define and then
use to enter and track information important to you.
There are two kinds of user defined fields (UDFs): Text Box Fields and
List Box Fields.
- Text Box Fields — Station Log's eight text box fields let you
type the information you desire. (The information you enter can be retained over several
log entries by selecting the adjacent Retain check box.)
- List Box Fields — Station Log's six list box fields let you
select the information you desire from a list of items that you also define.
You define the UDFs in Station Log's Preferences window (described
later). Defining UDFs involves:
- Labeling two sections (each contains 7 UDFs).
- Labeling each field.
- Entering the list items you want to appear in each
list box field.
- Setting the field order by field type across
two sections on the User Defined Fields tab of the Station Log window.
For example, you could define and use UDFs
this way:
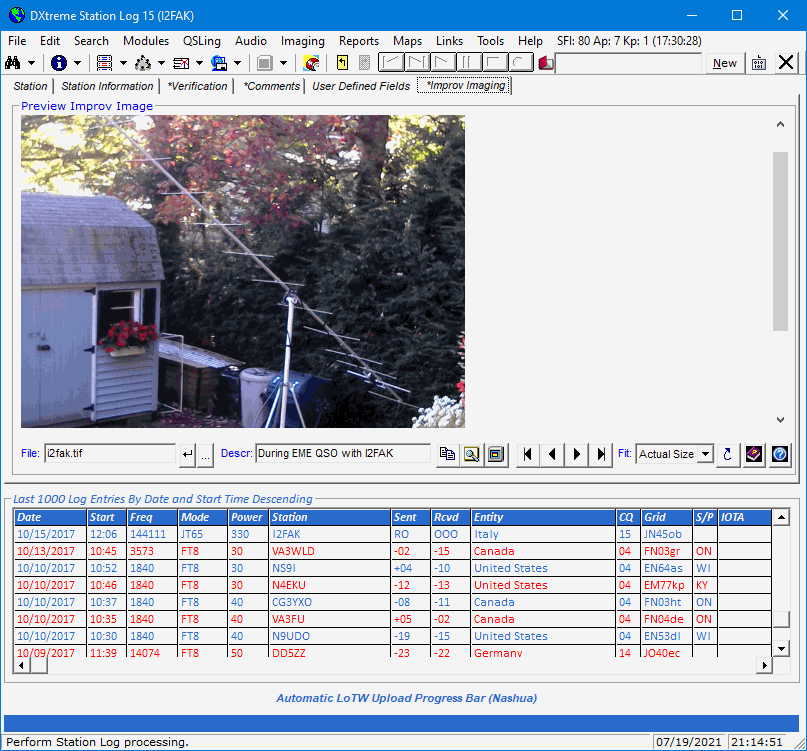
Improv Imaging Tab
The Improv Imaging tab is also where you can associate Improv images
with log entries, like the single Yagi in the backyard you used for a moonbounce contact. Once scanned or
captured, the Preview Improv Image display lets you preview images and access the
resizable Improv Imaging application to see the images full-size whenever you want to.
Refer to "Improv Imaging" for more information.
Last Log Entries Grid
If desired, you can display a grid on the Station Log window that shows
up to 5000 of the most recent log entries you've added.
The grid can be placed above the tabbed set of fields.
Or below the tabbed set of fields.
Double-clicking a row in the grid displays its log entry in the
Station Log window. And the grid's shortcut menu
lets you sort its records in a variety of ways. A menu selection
provides access to a Properties dialog box ...
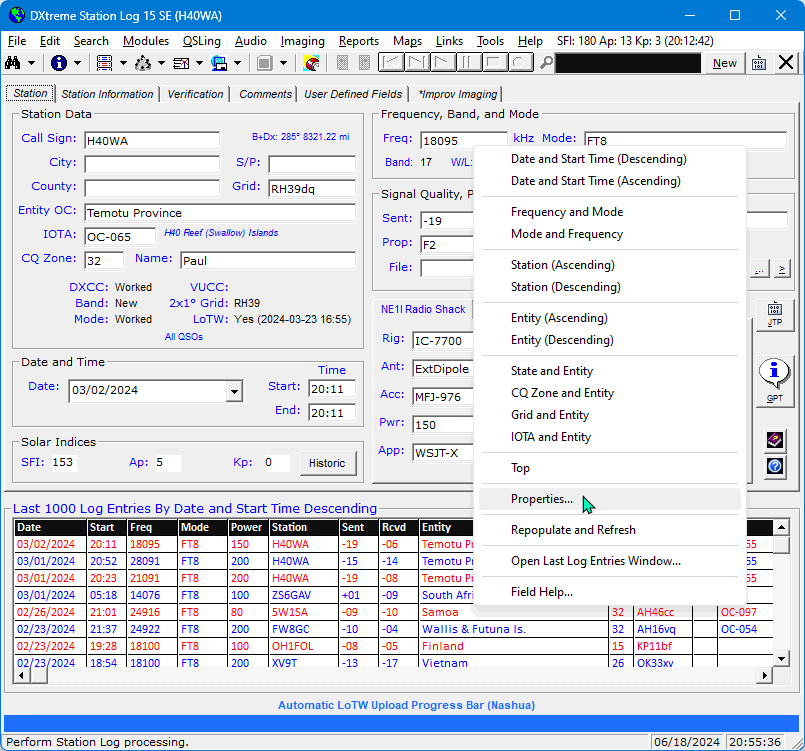

Where you can:
- Change the order of columns.
- Set the maximum number of last log entries displayed (from 7 to 5000).
- Add or remove a border.
- Set font attributes for the grid's frame plus heading and data rows —
one format for odd data rows, and another format for even data rows — throughout the
program, not just for the Last Log Entries grid, but all grids in the system plus the
Quick Find box.
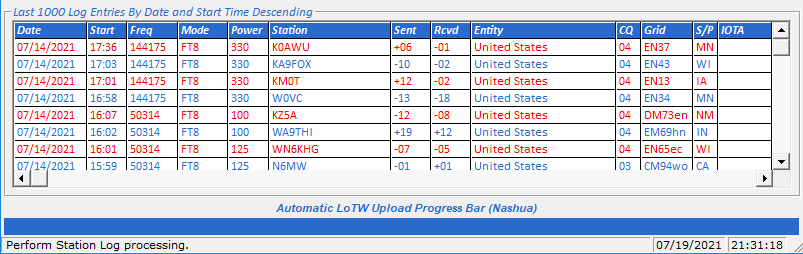
This image shows alternating red and blue foreground colors over white backgrounds:
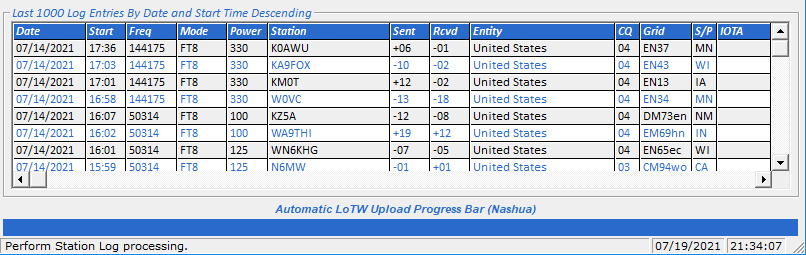
While this image shows alternating black and blue foreground colors over
alternating silver and white backgrounds:
You can resize the Station Log window
to make the Automatic LoTW Upload Progress Bar and Last Log Entries grid disappear and reappear
any time you want. And you can specify 0 in the Max# field of the Properties window if
you want to turn the feature off.
Last Log Entries Window
Even though you can scroll the Last Log Entries grid vertically and horizontally,
sometimes you need more room to display all of the columns and their data. To say nothing
of displaying additional rows.
For time like those, you can open the resizable Last Log Entries window.
The Last Log Entries window has all of the functions of the
Last Log Entries grid, but it can be set wider and
longer. You can display the grid and window together, or separately.
Fields and Maintenance Modules
Most of the fields on the Station Log window are drop-down
list box fields that make entering consistent data easy. These
fields are populated with list items that you can maintain
in Station Log's maintenance modules (described later).
Menu Bar and Toolbar
Station Log's menu bar lets you access the other functions of Station Log. These
functions let you access the DX Spot Checker and Band Master
(if you own a copy), search for log entries, perform maintenance functions,
manage QSLing, perform audio processing, perform QSL imaging, run performance reports,
display maps — including azimuthal plot maps and
propagation predictions if you own a copy of DX Atlas or Ham CAP respectively — and more.
Station Log's toolbar lets you quickly and conveniently access the functions you use most often.
Contest Duplicate QSO Checking
You can set Station Log so it flags duplicate contacts (dupes) per band and mode
when you attempt to log them. A message box appears, giving you the option of whether to
continue logging.
Dupe checking begins at the date and time you specify in Preferences,
and continues until you turn it off.
You specify the name of the contest in Preferences, linking the name to
one of your text-based user-defined fields (UDFs) if desired. At your option,
you can also request the generation of incremental serial numbers, linking
the numbers to another of your text-based UDFs. A provision to reset the serial number is provided.
This feature is intended for casual contest operators only. There is no output to Cabrillo due the
number of different QSO templates required. Serious contesters should use a contest logging program, and then
import their logs into DXtreme Station Log.
|

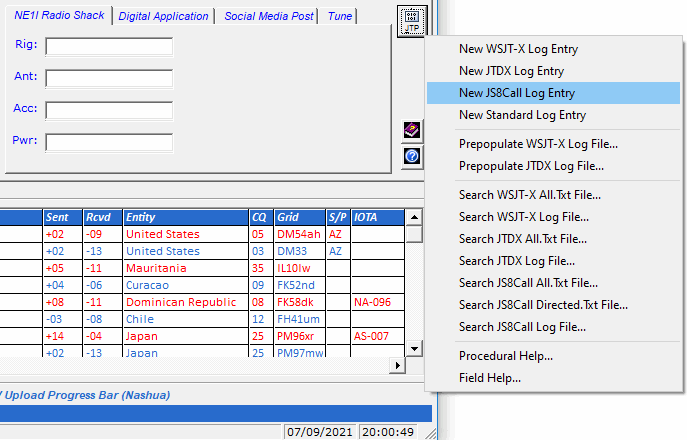
JT
Log Entry
Processing
|
JT Log Entry Processing: How Station Log 15 manages interaction with
the WSJT-X, JTDX, and JS8Call digital-mode applications.
WSJT-X and JTDX
The WSJT-X and JTDX worked-before features have the benefit of
displaying worked-before status indications natively, letting you
keep your eyes glued to the WSJT-X or JTDX interface while operating —
which we consider important, especially when using quick modes like
FT8, FT4, MSK144, and others.
As such, our approach to JT Log Entry Processing is unique; whereby
DXtreme Station Log 15 manages the prepopulation of
WSJT-X and JTDX log files and the addition of comprehensive log
entries while WSJT-X and JTDX display worked-before status
indications as you operate. No other software is required.
Prepopulation
WSJT-X and JTDX can be set so they distinguish between bands and modes
when displaying worked-before status. Station Log 15 provides a
prepopulation function that needs to be run only once (usually)
to prepopulate the WSJT-X or JTDX log file with contacts made in
multiple bands and all supported JT modes. You don't have to prepopulate again unless
you use a different digital application to work JT-mode stations (not including
JS8Call for JS8 contacts).
You do the following:
-
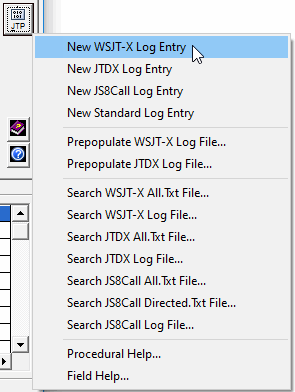
Whenever necessary, click the JT Processing button ...

and then click Prepopulate
WSJT-X Log File or Prepopulate JTDX Log File (as appropriate) to
prepopulate the respective log file with previous contacts made
in the bands and JT modes you are about to use, thereby enabling
WSJT-X or JTDX to determine worked-before status (provided you have enabled such
status on their Settings window).
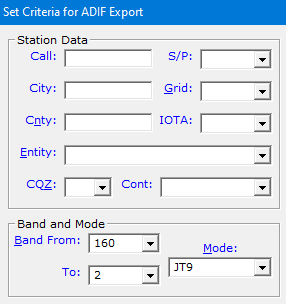
- On the Set Criteria for ADIF Export window,
click the desired Range of Bands and the first JT Mode.
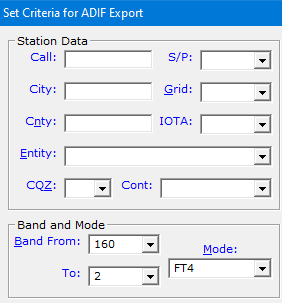
- Click Run.
- If desired, on the Set Criteria for ADIF Export window,
click the second JT Mode.
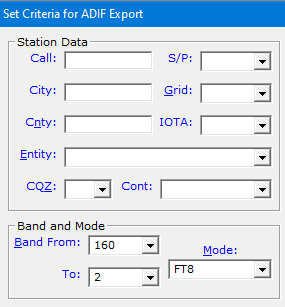
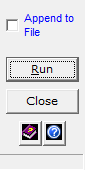
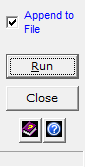
- The Append to File box is selected automatically.
Click Run.
- If desired, on the Set Criteria for ADIF Export window,
click the third JT Mode.
- The Append to File box is selected automatically.
Click Run. (We're stopping at three JT modes, but you can continue
prepopulating with more modes, if desired.)
- WSJT-X and JTDX import the updated log file the
next time you restart them, but only WSJT-X can import its log file
right away if you press F2 and click the Colors tab,
the Rescan ADIF Log button, and OK.
If you're using JTDX, you'll need to close Station Log 15,
restart JTDX, and start Station Log 15 again whenever you
prepopulate.
- If this is the first time you've prepopulated WSJT-X,
on its Settings window, click the Reporting tab and select
Prompt me to log QSO. Click OK. If this is the first time
you've prepopulated JTDX, on its Settings window, click the
Reporting tab and select Enable automatic logging of QSO.
Click OK.
Now you're ready to make and log contacts made in the prepopulated
band range and JT modes on the desired application.
Logging
- Work the station in WSJT-X or JTDX.
- If you're using JTDX with Enable automatic logging
of QSO selected, skip Step 3. JTDX writes a bare-bones log
record to its wsjtx_log.adi
file automatically.
- When the WSJT-X Log window appears,
perform a quick click of its OK button to write a bare-bones log
record to its wsjtx_log.adi
file. Don't change any of the data on the window unless you want to.
- In DXtreme Station Log 15, click the
JT Processing button
And then New WSJT-X Log Entry or New JTDX Log Entry to pre-fill the
Station Log window with information from the bare-bones log
record.
Note: Only your most recent WSJT-X or JTDX contact can be logged
using this method. If desired, you can start a log entry, begin a
contact with another station, and finish logging the
previous contact before the new QSO ends. For rapid-fire and contest operations,
you might want to log in WSJT-X or JTDX and use Station Log's Import ADIF
Utility to import log entries after you've finished. The
Station Log 15 Help System explains how.
- Finish the log entry by specifying the appropriate information in
the remaining fields on the Station Log window and clicking OK.
That's it. Contact information is in the Station Log database as well
as the appropriate
wsjtx_log.adi
file.
As part of saving the log entry, Station Log 15 populates the
Digital Application Used field on the Digital Application tab as
appropriate.
JS8Call
The JTP menu also provides logging from the JS8Call application. JS8Call
communicates using an extension of FT8 called JS8
(Jordan Sherer designed 8-FSK modulation), which is an official ADIF mode.
Because JS8Call specializes in real-time conversational keyboard-to-keyboard QSOs,
store-and-forward messaging, plus automatic and manual station queries and
replies, the concept of worked-before status (whereby operators are
discouraged from making more than one contact per band and mode)
does not apply. Therefore, prepopulation of its log file is
neither required nor provided.
Logging
After making a contact that qualifies as a two-way QSO, invoke the JS8Call
Log QSO window. Type the signal reports sent and received along with
any other data you want, such as comments and transmit power used. Then
click Add to Log and JS8Call writes the log record to the
js8call_log.adi
file.
In Station Log 15, click the
JTP button ...
And then New JS8Call Log Entry to pre-fill the
Station Log window with information from the completed contact.
Note: Only your most recent JS8 contact can be logged
using this method. If desired, you can start a log entry, begin a
contact with another station, and finish logging the
previous contact before the new QSO ends. For rapid-fire and contest operations,
you might want to log in JS8Call and use Station Log's Import ADIF
Utility to import log entries after you've finished. The
Station Log 15 Help System explains how.
Finish the log entry by specifying the appropriate information in
the remaining fields on the Station Log window and clicking OK.
That's it. Contact information is in the Station Log database as well
as the
js8call_log.adi
file.
As part of saving the log entry, Station Log 15 populates the
Digital Application Used field on the Digital Application tab with
JS8Call.
Viewing WSJT-X, JTDX, and JS8Call Files
If you want to view or search an application's
All.Txt or Log file, you can click the
appropriate entry on the JT Processing menu. You might
find these functions useful to search for decoded stations, entities, or grid
squares without having to interrupt, or be interrupted by, new decodes on the
application's window. JS8Call also has a Directed.Txt file you can
view or search.
|
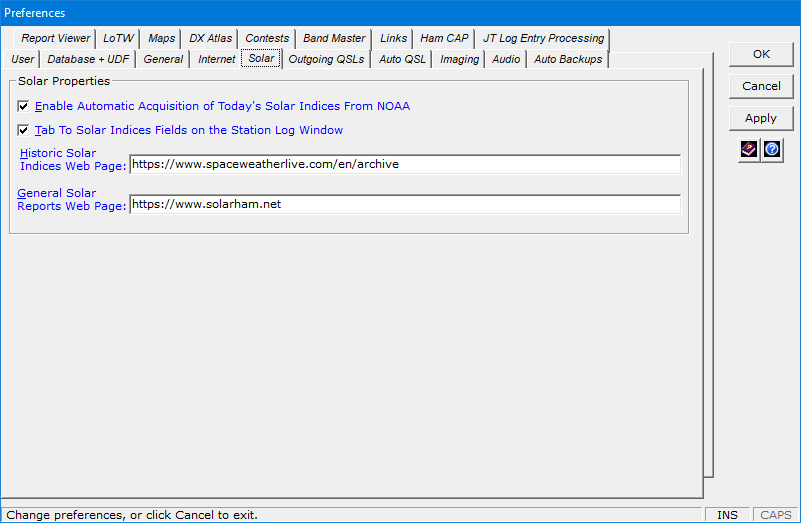
Solar Indices Acquisition
|
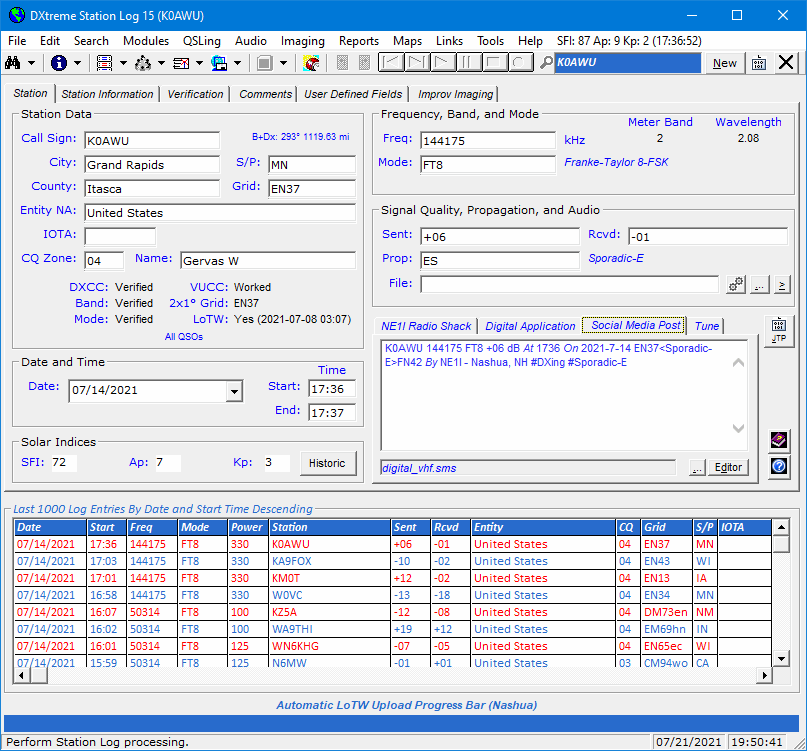
Solar Indices on the Station Log Window
On the Menu Bar
The Station Log window displays
today's current SFI (Solar Flux Index), Ap (A-Index), and Kp
(K-Index) values on the menu bar automatically every 30 minutes. Your Internet
connection must be active, the acquisition of solar indices must be enabled on
the Solar tab in Preferences, the solar information must be
available from NOAA, and the Station Log window must be in Select
mode (no log entry displayed).

You can click the display to update manually.
In the Solar Indices Area
When you click the New button or the JTP button to log
a contact, the editable Solar Indices text
boxes — entitled SFI, Ap, and Kp — display
the solar information that is valid currently — provided your
Internet connection is active, the acquisition of solar indices is enabled in
Preferences, and solar information is available from NOAA.

The current solar indices are also displayed when you double-click the
SFI, Ap, and Kp text boxes and when you tab out of
the Call Sign, Date, Start, and Freq boxes.
If server access to NOAA is slow, you might need to perform one of those
tasks to display the indices. When you click OK, the software
saves the displayed solar indices with the log entry.
If desired, you can type the solar indices manually for saving to the
log entry. If you need to find solar information that is older than
right now, you can click the Historic button to access a web page
of relevant information (one is specified in Preferences by default).
When an existing log entry is on display, you can also modify the
solar indices manually.
If you need to type solar indices often, in Preferences you can turn on
Tab access to the SFI, Ap, and Kp text boxes as well as
the Historic button.
You can run Performance, Stations, and Bands
reports against the solar data.
Solar Indices in Preferences
Fields control the enabling of the Automatic Acquisition feature,
Tab access to the controls in the Solar Indices area of the
Station Log window, and
contain the URLs of Historic and
General solar indices web pages, which are accessible from the Station Log,
DX Spot Checker, and ADIF Import Utility windows for your
convenience and research.
Historic Solar Indices Update
The Historic Solar Indices Update facility lets you update
log entries in batch with solar data valid at the time of the QSO, provided the QSO took
place on or after January 1, 1997 and the information is available from NOAA.
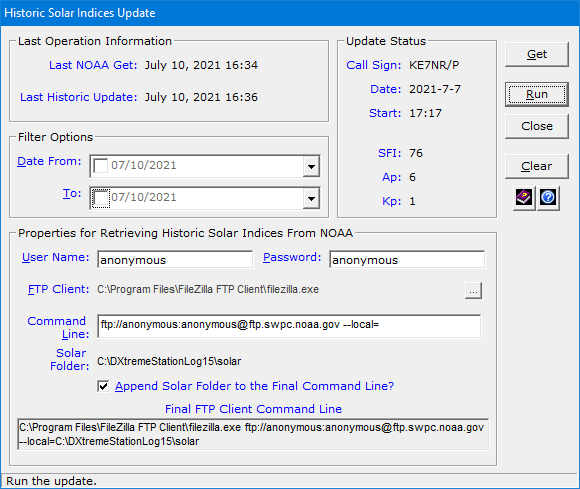
Running this update is useful after performing an ADIF Import. It
is also useful when solar values were not available from NOAA at the time you
logged your QSOs.
The solar data appears in the Solar Indices area of the Station Log
window.
Solar Indices in the ADIF Import Utility
The ADIF Import Utility has solar indices fields that mimic
those on the Station Log window.
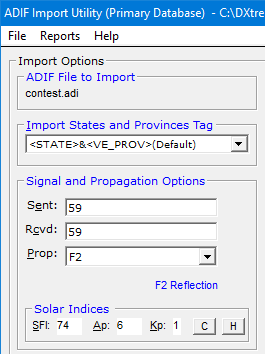
When the Station Log window is displaying solar indices in its
menu bar, you can click the C button in the
Solar Indices area to display those indices in the SFI,
Ap, and Kp boxes for writing into each imported contact record.
If the values are not available due to a NOAA outage, or
if Automatic Acquisition of Today's Solar Indices From NOAA is not
enabled in Preferences, you can type the appropriate values manually.
If you are importing contacts several hours after their QSOs occurred,
you can click the H button to access a web page of historic solar
indices information (one is specified in Preferences by default) to perform
research and type the appropriate SFI, Ap, and Kp
values for writing into each imported contact record.
Alternatively, you can run an Historic Solar Indices
Update after the import finishes.
|
Social
Media Posts
|
When adding or displaying a log entry, Station Log prepares an announcement of the contact and displays
it on the Social Media Post tab...
... where you can drag the post to your favorite social media web site(s) to share your
contact news with others.
Here's how:
- Select the social media post.
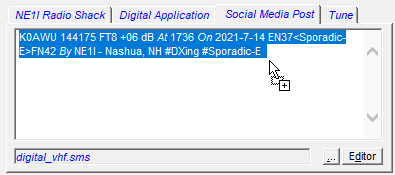
- Drag it to the appropriate text box on the social
and drop it.

- Commit your post by following the instructions on the social media web site.
The social media web site must be capable of accepting drag-and-drop operations. For sites that do not,
copy the announcement to the Clipboard and paste it into the appropriate text box.
Social Media Scripts
Using the Script Editor window, you can create and edit social media scripts that
format your social media posts. The Editor button on the Social Media Post tab
provides access to the Script Editor.
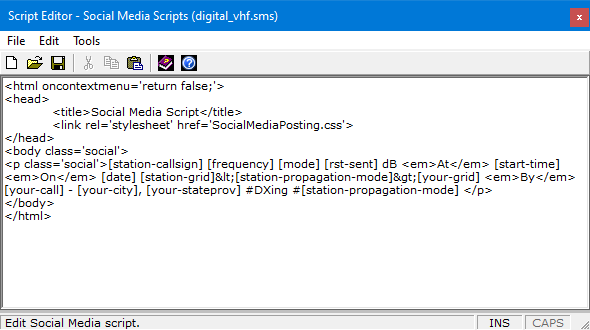
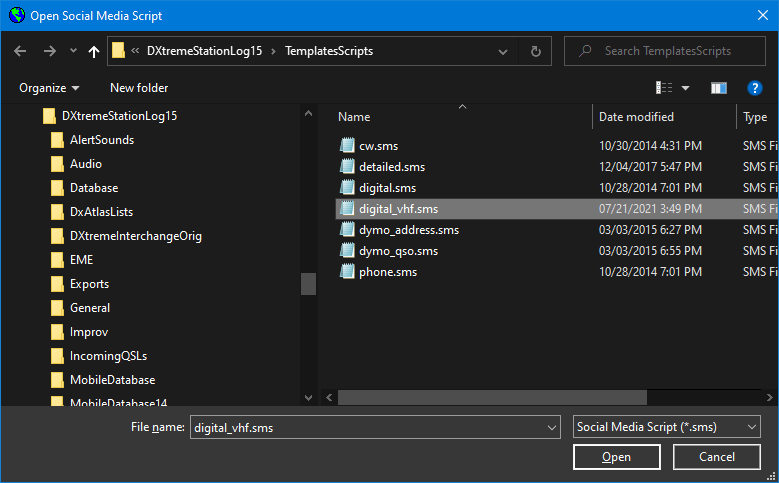
And the browse button on the Social Media Post tab lets
you select the script you want to use. Seven sample scripts come with the software.
QSL and Address Labels
You can also use the Social Media Post facility to create QSL and Address labels for printing via
DYMO® LabelWriter® printers.
Here's how:
- Start DYMO QuickPrint and select the desired label layout. (You may
have to create a specific layout for your labels within the DYMO Label application.
Some experimentation may be required. Refer to the DYMO documentation for instructions.)
- In DXtreme Station Log 15, add or display a log entry. Then click the
Social Media Post tab.
- Click browse and double-click the Dymo QSO social media script we
created.
- Select the social media post.
- Drag it to DYMO QuickPrint and drop it. Position the cursor
at the end of the label text and press Enter on your keyboard (this action is necessary so
QuickPrint registers the text). If desired, edit the label text.
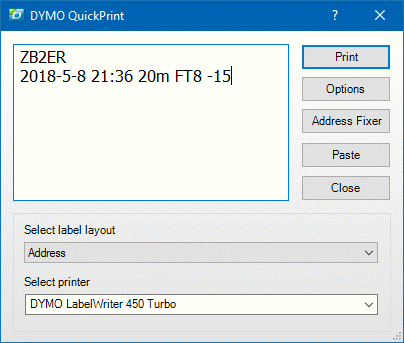
- On the QuickPrint user interface, click Print.
- To print an address label, in DXtreme Station Log 15, click browse and
double-click the Dymo Address social media script we created and follow Steps d through f.
DYMO® and LabelWriter® are registered trademarks of Newell Rubbermaid.
|
Club Log
Integration
|
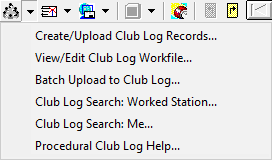
Automatic Club Log Record Creation
At your option, you can create Club Log records automatically when adding or modifying log entries.
While you're adding or modifying a log entry, the Busy indicator appears on the
Club Log toolbar button:

When the record has been created in the Club Log workfile, the Done indicator appears on the button:

Club Log records accumulate in the workfile per database until you upload them.
Only qualified modifications are allowed to an existing Club Log record, such as changes to the call sign,
DXCC entity, date, time, band/frequency, mode, and QSL status (as in Yes or No).
Note: You can also create Club Log workfile records manually by turning off automatic creation in
Preferences.
Club Log Workfile Viewing and Editing
Should you need to view or edit the Club Log workfile, you can click the arrow next to the Club Log
toolbar button and then View/Edit Club Log Workfile.
Notepad appears with the workfile loaded.
After you make ADIF-compliant changes to the workfile, on the File menu
in Notepad, click Save without changing the file name or location.
Club Log Workfile Upload
When you're ready to upload the workfile:
- On the Station Log toolbar,
click the arrow next to the Club Log toolbar button and then Create/Upload Club Log Records.
- Click Yes to confirm, and Station Log 15 creates an upload file in
the Exports folder, which by default is:
c:\DXtremeStationLog15\Exports
- When the Club Log Web site appears, upload the
{Name of Database}_ClubLog_Upload.adi file from
the Exports folder. Refer to the
Club Log Web site for upload instructions.
Batch Upload to Club Log
Batch Upload to Club Log is useful when Club Log does not contain all your
log entries. Thereafter, the automatic (or manual) method, described earlier, is recommended.
When you're ready to perform a batch upload:
- On the Station Log toolbar, click the arrow next to the Club Log toolbar
button and then Batch Upload to Club Log.
- When the Criteria window appears, specify a date, a
range of dates, or other criteria to select log entries to upload.
- Click Run. Station Log 15 creates the Club Log records and writes them
to a database- and batch-specific upload file in the Exports folder, which by default is:
c:\DXtremeStationLog15\Exports
- When the Club Log Web site appears, upload the
{Name of Database}_ClubLog_Batch_Upload.adi file from
the Exports folder. Refer to the Club Log Web site for upload instructions.
Searching Club Log
You can search another ham's Club Log by adding or displaying the desired
log entry, clicking the arrow next to the Club Log toolbar button, and then clicking
Club Log Search: Worked Station.
You can search your Club Log by clicking Club Log Search:
Me.
The Log Search page on the Club Log Web site appears. Follow Club Log
instructions to search the log.
Creating Club Log Records During ADIF Import/LoTW QSL Update
The Create Club Log Records check box lets you specify whether to create Club Log records as you import
ADIF files and update your database with LoTW QSL records.
The import/update utilities append the Club Log records to the same workfile as that used for automatic and
manual Club Log record creation on the Station Log window (as described earlier), leaving the workfile open
for the non-batch creation of additional records.
The Club Log toolbar-button menu items also appear on the main Station Log menu.
|

Find and Search
Functions
|
Quick Find
DXtreme Station Log 15 features a Quick Find box lets you type a call sign
(lower or upper-case), and then press Enter on your keyboard to search quickly for the call sign
in your log.

If the call sign is in your log, a list of log entries with
that call sign appears on the Quick Find window.
If you want to display the quick-found log entries in the
Station Log window for viewing or modification, press Enter on your
keyboard thrice or double-click the Quick Get
graphic: 

The first quick-found log entry appears on the Station Log window.
Use the next and previous buttons on the toolbar to display the log entries one-at-a-time.

We used these buttons to navigate to the second log entry in the list, as shown in this
screen shot.

To perform another quick find, press Esc to clear the log entries (the New
button gets the focus). Press Tab to move the focus to the Quick Find box,
type the call sign and press Enter.
Search
DXtreme Station Log 15 also features powerful Search
functions that make finding log entries easy, necessary for viewing or modifying
log entry information, listening to audio clips, or scanning, capturing, and
viewing QSLs.
You can access the Search functions via the:
- Search menu — On the
Station Log menu bar.
- Drop-down Search menu — On the
Station Log toolbar.
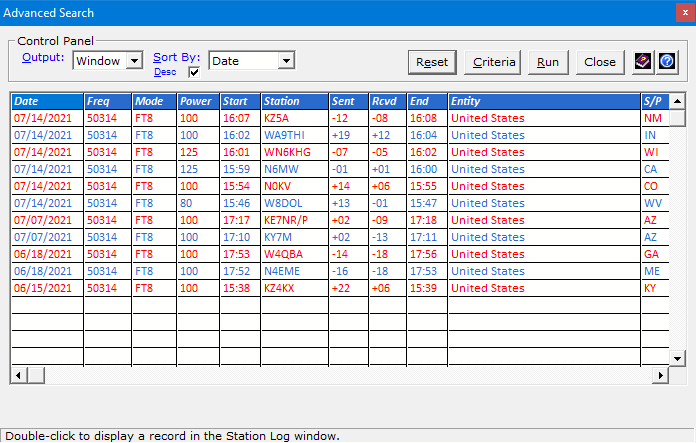
Advanced Searches
When performing an Advanced search, you can filter your searches by
entering the desired search criteria on the Criteria window. A
Preferences setting determines whether the
Set Criteria window appears automatically.
Look at the choices! Almost every field on the
Station Log window is available here.
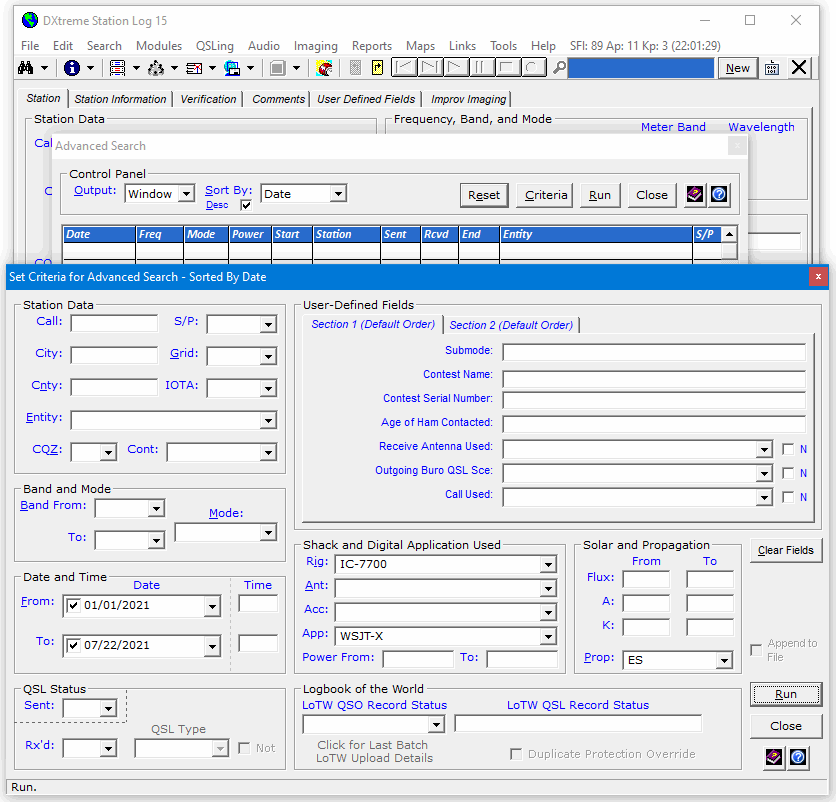
Using these fields, you can perform filtered searches. For example, the
above search results in the display of:
- Your contacts for 2021 so far
- On all bands
- Using your IC-7700
- And the WSJT-X digital application
- By means of Sporadic-E only
There are even more possibilities.
When the results appear, you can double-click records in the Search grid to
display their log entries on the Station Log window. The Sort By box and
Desc check box let you sort the result records.
All Other Searches
When performing other searches, you begin by specifying the desired search parameter
at the top of the window, based on the type of search you selected.
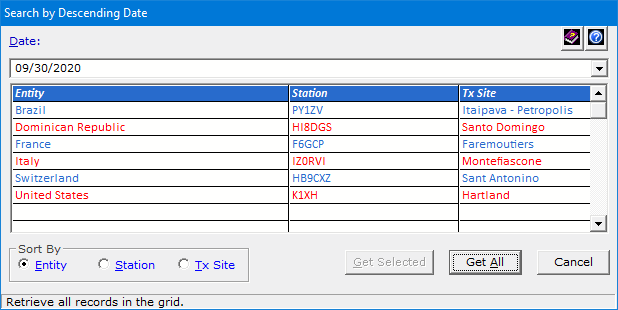
When the results appear, click Get Selected, or double-click a
record in the Search grid to display its log entry on the
Station Log window. To display all log records — one-at-a-time —
click Get All and use the
next and previous buttons on the Station Log toolbar to scroll through
the record set.

The Sort By option buttons let you sort the records in the Search grid.
Note: You can also use the Last Log Entries grid (described earlier) and
DXCC Analytics, WAS Analytics, QSL Image Explorer,
and Improv Image Explorer (all described later) to search your log.
|

Rig
Control
|
DXtreme Station Log 15 integrates with Afreet Omni-Rig, a
free-for-amateur-use rig control program available over the Web.
When Omni-Rig is installed and configured on your PC:
- You can tune your rig from the DX Spot Checker
or the Tune tab on the Station Log window.
- When you add log entries or double-click the Freq field, the
Station Log window automatically captures the frequency and mode from your rig.
How Tune Works
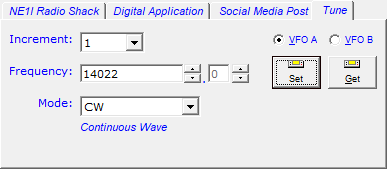
To change the frequency, type a new frequency in the Freq box and click
Set or change the mode. Or in the Increment list box, click
the desired increment and use the up/down arrows next to the Freq box to tune
incrementally in kHz. Increments of 1, 2, 3, 4, 5, 10, 100, 1000, and 10000 kHz are available.
Alternatively, you can use the up/down arrows far right of the Freq box
to tune incrementally by tenths of a kHz.
To change the mode, click the desired mode in the Mode list box.
The Get button lets you reacquire the radio's frequency if the
radio was tuned — manually or via the DX Spot Checker — to a different
frequency after the Tune tab was clicked.
If your rig works with VFO A and B tuning, the VFO A
and VFO B buttons allow you to tune the preferred VFO.
Some radios work fine with VFO A and B tuning, but others do not.
If yours does not, the VFO A button lets you tune the VFO
currently selected on your radio.
Configuring Rig Control
Using rig control is entirely optional. To enable it:
- Install a copy of Omni-Rig on your system.
- Configure it to work with your radio. Most popular radios are supported.
- In the Preferences window of DXtreme Station Log, click the
Afreet Omni-Rig option button and then select the
VFO Tuning option that works best with your radio. Some
experimentation is necessary.
Refer to the Omni-Rig Web site at http://www.dxatlas.com
for software downloads and support with their software.
Contact us for integration support.
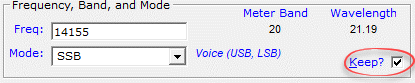
Note: If you don't want to use rig control, you can add the
Keep? check box to the Station Log window,
which, when selected, retains the frequency and mode between
log entries until you clear the check box or click Cancel.
|

Audio
Archive
|
Station Log's audio archive facility lets you record and play audio clips
of the stations you work.
Intrinsic Audio Toolbar and Sound Recorder
The audio toolbar on the Station Log window ...

... lets you quickly and easily record and play WAV audio as you are logging
a station.
Station Log also integrates with the Windows Sound Recorder to let you
edit and compress audio files.

To use Station Log's audio archive facility, your computer must have sound
capabilities that are supported by Windows® 11, 10, 8.1, 8, Windows 7, Windows Vista® or Windows XP.
Connect your radio to your computer using typical amateur practices.
Station Log saves the audio clip as a WAV file in the Audio Repository
you specify in Preferences.
Third-Party Audio Integration
Station Log 15 supports the use of a third-party audio application,
supplied by you, to provide recording, playing, and editing of
audio clips in a variety of audio formats. A third-party application, like
Audacity®, is the most convenient way of recording audio from a
USB-connected radio.
Note: For ease of playback, the executable file of the application you
select must be capable of accepting, as a command-line argument, the name of an
audio file.
To Record an Audio File and Link It to a Log Entry
After the application is specified in Preferences, click the
Access Third-Party Audio Application button in the Signal Quality,
Propagation, and Audio area of the Station Log window to invoke the
application.

When the third-party application appears, refer to
its documentation to record and process audio from the desired source.
When you have finished recording, in the third-party application, save the
audio file in the desired format into the Audio subfolder of
Station Log 15, or any other location you want.
In Station Log 15, add or display the log entry
to which the audio file will be linked. In the
Signal Quality, Propagation, and Audio area,
click the Browse for an Audio File button.

On the Select Audio File window, navigate
to and select the third-party audio file you want to link.
If the file resides outside the Audio folder specified in
Preferences, Station Log 15 copies the file into that folder.
The linked file is then backed up when you close Station Log provided automatic
audio backups are configured in Preferences.
Click OK to save the log entry with the linked
audio file.
To Play and/or Modify the Audio File
If necessary, display the desired log entry. In the Signal Quality,
Propagation, and Audio area, click the Access Third-Party Audio
Application button.
When the third-party application appears, refer to its documentation to play
and/or modify the audio file.
|

ADIF Import Utility
|
Contesting and data-mode programs (like Fldigi, JTDX, JS8Call, and WSJT-X)
let you output log entries in the Amateur Data Interchange Format (ADIF).
DXtreme Station Log has an ADIF Import Utility that lets
you import these log entries.
Note: Optional DXtreme Interchange can digitize paper
logbooks (or other non-ADIF sources) using a combination of
essential data entry; dictation, type, and paste; and
active-importation. Its resulting ADIF-based project files can be
actively imported into a DXtreme Station Log database by means of the
ADIF Import Utility. Read the
DXtreme
Interchange Data Sheet for more information.
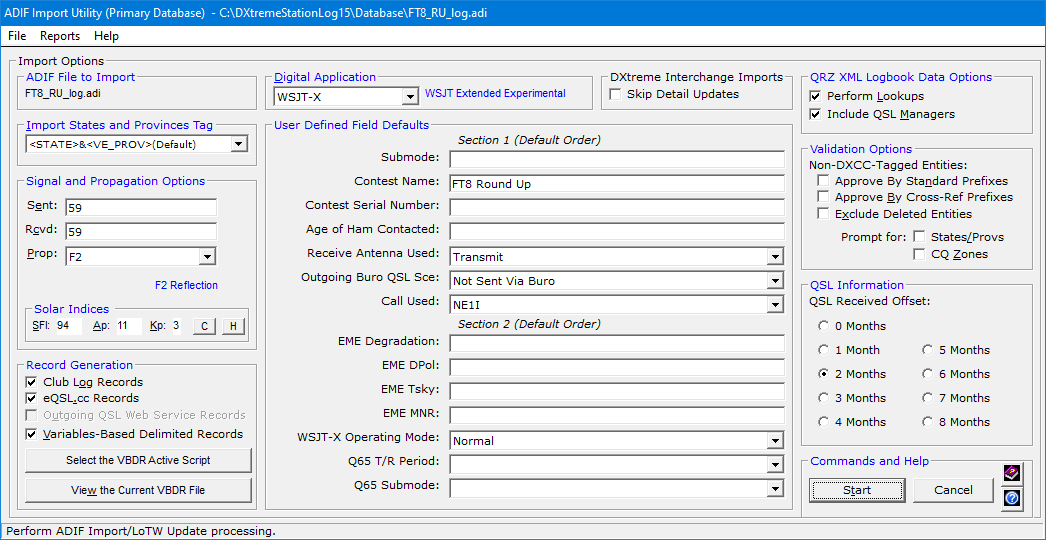
Options
Options on the ADIF Import Utility window let you specify:
- The ADIF tag from which to import states and provinces.
- The digital application used to make all contacts being
imported (if any).
- Default UDF information, signal reports, and propagation mode values
not in the ADIF.
- Whether to:
- Perform call sign lookups on each station being imported
(if you subscribe to HamQTH.com, Buckmaster HamCall, or QRZ XML Logbook Data).
- Approve each entity selection the utility makes based on
standard and special prefixes when ADIF DXCC tag numbers, which identify entities,
are not in the ADIF. If DXCC tag numbers are in the ADIF, entity selection occurs
automatically.
- Suppress deleted entities from being considered when
the ADIF does not contain DXCC tag numbers.
- Prompt you for the CQ zone when the ADIF file has no CQ zone information
and the entity has more than one CQ zone assigned. (When the entity has a single
CQ zone assigned, or when a state or province has a single CQ zone assigned, the
utility selects the appropriate zone automatically.)
- Prompt you for a state or province when the ADIF file has no state or
province information.
- Indicate the number of months it typically takes to obtain a QSL. The import utility uses
this information to set an approximate QSL received date when the ADIF file contains
QSL information but no <QSLRDATE> tags.
- Create Club Log records as you import the ADIF file. The import utility
saves the Club Log records in a special workfile, and keeps the file open for the
creation of additional Club Log records.
- Create eQSL.cc records as you import the ADIF file. The import utility
also saves the eQSL.cc records in a special workfile, and keeps the file open for the
creation of additional eQSL.cc records.
- Produce QSL labels or ADIF QSL Records
(if the Auto Bureau QSL Generator is enabled in Preferences)
for DX stations worked the first time:
-
Overall
-
Per band
-
Per mode
This feature is ideal for contest operators because it generates
bureau QSL labels or ADIF QSL Records automatically for the
stations most likely to QSL you when the contest is over.
If you optionally specify that no return card is required when
you send the cards via the bureau, you may save yourself the time
and effort of processing reciprocal QSL cards as they "trickle in"
months later. You can just as easily, of course, welcome reciprocal cards.
It's entirely up to you.
Microsoft® Word is required for the generation of physical
QSL labels.
Note: A pre-sort facility comes with ADIF Import Utility. The
facility pre-sorts the source ADIF file by call sign instead of by date and time. This action ensures
that the maximum number of multi-QSO QSL labels will be generated because the incoming log entries will
be contiguous by call sign.
More About ADIF QSL Records: When Automatic Bureau QSL Generation is enabled for the
ADIF Import Utility, the utility generates (at your option during import, and
in lieu of Microsoft Word labels) ADIF QSL Records for submission to third-party Web sites
that — for a fee — will print and mail your physical QSL cards to outgoing QSL bureaus.
This third-party Web site will likely be the Outgoing QSL Web Service you specify on the
Outgoing QSLs tab of Station Log's Preferences. At the time of this writing,
DXtreme Software recommends QDure at https://qsl.ure.es/en/.
Microsoft Word is not required for this feature.
- Create Variables-Based Delimited Records (VBDRs) as
you import the ADIF file. This facility enables you to output station reports and
delimited exports of your own design to suit your own purposes. The VBDR
facility is described later in this data sheet.
When It Runs
As the ADIF Import Utility runs, it:
- Determines the entity of each imported station in this manner:
- When a DXCC Entity Code is present in the ADIF file
for a station, the utility uses it to obtain the entity from the
Entities module.
- When a DXCC Entity Code is not present in the ADIF file
for a station, the utility polls QRZ XML Logbook Data or
HamQTH.com (if obtained by you and activated) for the entity
code. If a code is returned, the utility uses it to obtain the entity from the
Entities module.
- If neither QRZ XML Logbook Data nor HamQTH.com
are activated, or if they fail to supply the needed entity code, the utility uses
the standard prefix (if present) of the call sign to obtain the entity from the
Entities module.
- If the call sign has a non-standard (special) prefix,
the utility uses the Prefix and Call Sign Cross-Reference
modules to obtain the entity.
Note: DXtreme Software is not responsible for the accuracy of
information supplied by call sign subscription services or by the
Country.Dat
file, the source of Prefix and Call Sign Cross-References.
- Writes default information into each imported contact record, such as the rig,
antenna, accessory, power, and digital application (if any); the QSL type; the QSL Via entity; and
the return postage.
- Produces a report that indicates for each contact:
- DXCC Entity Status: overall, by band, and by mode.
- VUCC Status when the Maidenhead grid locator is included in the
ADIF file.
- Whether the amateur radio operator is a user of Logbook of the World.
ADIF Tags Recognized
The import utility recognizes the following ADIF tags:
- <ARRL_SECT>
- <BAND>
- <CALL>
- <CNTY>
- <COMMENT>
- <CQZ>
- <DXCC>
- <FREQ>
- <GRIDSQUARE>
- <IOTA>
- <PROP_MODE>
- <MODE>
- <NAME>
- <QSL_RCVD>
- <QSL_SENT>
- <QSL_VIA>
- <QSLRDATE>
- <QSLSDATE>
- <QSO_DATE>
- <QTH>
- <RST_RCVD>
- <RST_SENT>
- <STATE>
- <TIME>
- <TIME_OFF>
- <TIME_ON>
- <VE_PROV>
Sample Report
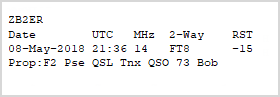
The following is a sample report generated by the utility after every import operation.
The New Entity Status, Grid/VUCC Status, Propagation Mode, and LoTW User information appear in
bold for emphasis.
Station: VE2/WA1Z
Entity: Canada
DXCC Entity Tag: 1
CQ Zone: 05
County:
State/Prov: QC
IOTA:
Grid: FN35
Date: 01/20/2020
Time: 20:05
Freq: 50150
Band: 6
Mode: Phone
Rig: Elecraft K3
Ant: 5-El Yagi
Acc: None
Power: 100
DXCC: No
Band: Yes-QSL
Mode: Yes-QSL
VUCC: New
Propagation Mode: F2
LoTW User: Yes
|

QSLs
|
Outgoing QSLs
DXtreme Station Log can help you manage your outgoing QSLs. Specifically,
you can:
- Track relevant information about the physical and electronic
QSLs you send, such as the:
- Date you sent the QSL.
- Return postage you sent with it.
- Type of QSL sent.
- Entity to whom you sent the QSL.
- Upload log entries to ARRL's Logbook of the World
for the creation of official QSLs. For more information, refer to
"Support for LoTW" next on this page.
- Upload log entries to an Outgoing QSL Web Service
for the third-party printing and distribution of official bureau QSLs.
For more information, refer to "Support for Outgoing QSL Web Service
Facilities" immediately after "Support for LoTW" on this page.
- Print official QSL labels and address labels
directly on your printer. No other
software is required for this feature.
QSL Label
Address Label
- Create official QSL labels and address labels in
Microsoft® Word templates for printing later.
Microsoft Word is required for this feature.
- Use the Social Media Post (SMP) facility to
create official QSL and Address labels on DYMO® LabelWriter®
printers. Refer to "Social Media Posts" earlier on this
page.
- Auto-Generate QSL Labels for official cards being sent via an
outgoing QSL bureau, as noted in "ADIF Import Utility" above.
- Auto-Generate ADIF QSL Records for the
printing and distribution of official bureau QSLs via third-party Web sites
that — for a fee — will print and mail your physical QSL cards
to outgoing QSL bureaus, as noted in "ADIF Import Utility" above.
- Create eQSL.cc records automatically and upload them to the eQSL.cc web
site at regular intervals. (This feature functions similarly to how Club Log Integration works.)
Address Information
The Create Direct Print QSL Labels window and
Create Word Template QSL Labels window get their address
information from the Station Information fields on
the Station Log window. If you subscribe to
HamQTH.com, Buckmaster HamCall, or QRZ XML Logbook Data, the
address information appears automatically.
If you don't subscribe to HamQTH.com, HamCall, or QRZ XML Logbook Data, you
can click the Web button on the Create Direct Print QSL Labels window or
Create Word Template QSL Labels window to perform a call sign
lookup via one of several Web-based call sign lookup sites. When the
call sign Lookup Web page appears, you can select the address information on the Web page and
drag and drop it onto the window's Address Information box, thereby making it available
for label creation. The address must be in text format on the Web page.
You can also click the Change to QSL Via button to produce a QSL-Via label for
the bureau.
Closing Expression - QSL Request - Signature Workflow
The Create Direct Print QSL Labels and
Create Word Template QSL Labels windows provide a
workflow for printing a closing expression, QSL request, and signature on the last line of
multiline labels.
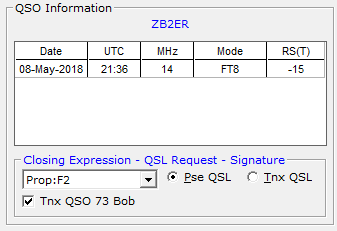
The Closing Expression list box on the Create QSL Labels window
(shown above) contains ADIF propagation modes from the ADIF Propagation Modes module.
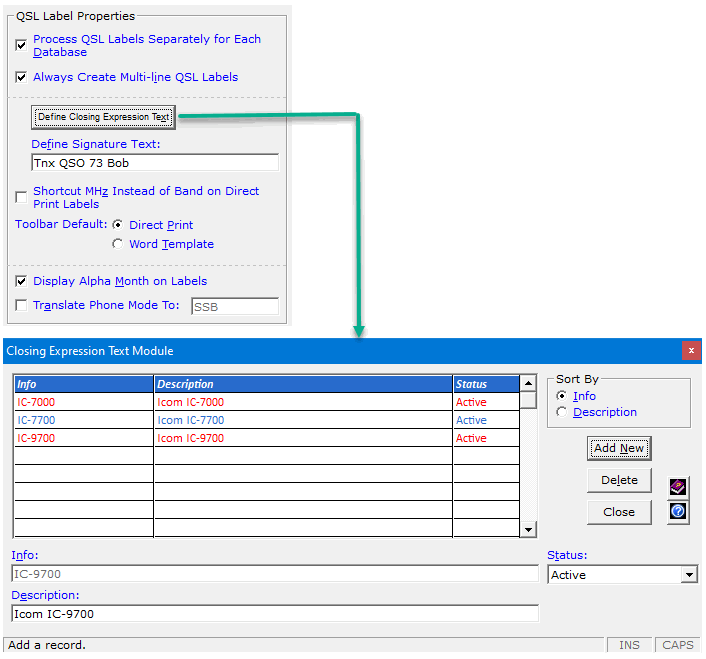
Plus it contains any custom entries you have added by means of the Closing Expression Text
module (shown below), which is accessible in Preferences.
For a given label, you can:
- Select the closing expression you want from the Closing Expression
list box.
- Click the option button representing the desired QSL Request
(Pse QSL or Tnx QSL).
- Select the check box if you want to include the Signature text,
which is also defined on the Outgoing QSLs tab in Preferences.
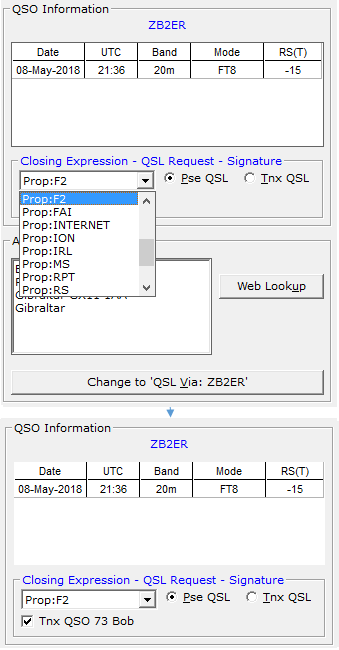
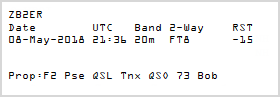
This action produces a label similar to the following:
Properties
Properties windows are available that let you set label properties for
Direct Print and Word Template
QSL Labels.
 Screenshots — Outgoing QSLs Screenshots — Outgoing QSLs
Note: Remember to click the button at the bottom of the sample window
when you've finished viewing it.
Incoming QSLs
DXtreme Station Log 15 can help you manage your incoming QSLs. Specifically,
you can:
- Track relevant information about the physical and electronic
QSLs you receive! You can track the:
- Date you received the QSL.
- Type of QSL received.
- Entity from which you received the QSL.
- Use the LoTW QSL Update Utility to update your
Station Log database with Logbook of the World (LoTW) QSLs. For more information,
refer to "Support for LoTW" next on this page.
- Scan or capture your QSLs and save them as digital images using DXtreme Software's
highly-acclaimed QSL Imaging™ facility. View them whenever you want. Refer to "QSL Imaging" on
this page for more information.
|

Support for
LoTW
|
LoTW Support includes:
- Indication of LoTW Users.
- Your choice of LoTW uploads:
- Automatic LoTW Uploads of single log entries.
- Semiautomatic LoTW Uploads of batches of log entries.
- Or both.
- Database Update of Incoming LoTW QSLs.
LoTW User Indication
Spots of hams who are LoTW users appear in unique fonts and colors
on the DX Spot Checker window, making it possible to
tell at a glance whether the ham is using LoTW.
When you add log entries, the Station Log window indicates whether the
ham you contacted is a user of LoTW.
When you import log entries using the ADIF Import Utility, a report
indicates LoTW users.
These indications help you decide whether to request a paper QSL
or rely on the anticipated LoTW QSL.1
Automatic LoTW Upload Facility
When you add a log entry, you can have Station Log 15 upload it to LoTW immediately and
automatically.
In addition, when you display an existing log entry, you can submit/resubmit it to LoTW immediately from
the Verification tab. A Warning message box appears when you're resubmitting a duplicate log entry,
giving you a chance to reconsider before uploading.
The Automatic LoTW Upload Progress caption and bar at the bottom of the Station Log window
displays progress during the upload, including the capture of LoTW QSO Record Status information from
the LoTW server (see Notes). You will not be able to perform other logging activities during the slight
delay that ensues (typically 4 to 8 seconds), but if logging contacts more quickly is important to you, you can
disable automatic uploading and upload contacts to LoTW semiautomatically in batches later
(see the next section).
Notes
- As part of the upload operation, Station Log 15
captures, displays, and saves LoTW QSO Record Status from the server, which indicates
whether the log entry made it to the LoTW server okay. If the expected status fails to appear above
the progress bar or on the Verification tab, you can attempt to recapture status and, if
necessary, resubmit the log entry and/or fine-tune the system.
- The Automatic LoTW Upload Progress caption
also displays your active station location in parentheses prior to upload.

- You can place the progress caption and bar above the
Last Log Entries grid if desired (as long as the grid is positioned at the
bottom of the window). Doing so may be preferred if you choose not to display the Last Log Entries
grid.

- When you click Properties, the LoTW tab of the
Preferences window appears so you can quickly change your
active station location if and when necessary.
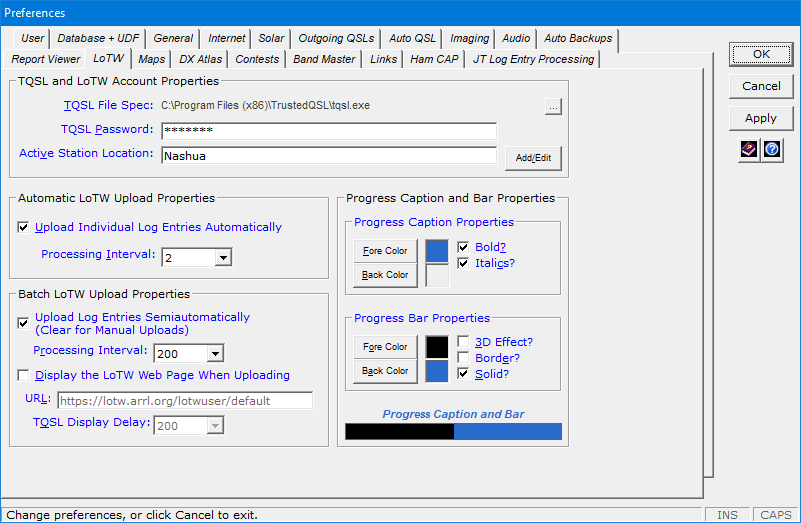
Batch LoTW Upload Facility (Semiautomatic and Legacy Manual)
The Batch LoTW Upload facility creates LoTW-specific
.adi files containing one or more log entries and
passes them to TQSL for processing.
- The facility's Semiautomatic mode not only commands
TQSL to sign and upload .adi files to the LoTW Server, but it also
captures, displays, and saves LoTW QSO Record Status from the LoTW server, which
indicates whether the batch of log entries made it to the server okay. If the expected
status fails to appear above the progress bar on the Batch LoTW Upload window, you can
attempt to recapture status from the window before closing it and, if necessary, upload the
log entries again and/or fine-tune the system.
In addition, unless you select the new Duplicate Protection Override check box
on the Criteria window, Semiautomatic mode will not let you upload log
entries indicated as "On Server" in the Station Log 15 database.

- If you prefer, you can select the facility's legacy Manual mode,
which directs TQSL to create a .tq8 file in your current
Station Log database folder. You can then upload this
.tq8 file manually via the LoTW Web site or
e-mail (following the instructions provided by ARRL). No
LoTW QSO Record Status is captured in Manual mode.
You select the mode of batch processing you want on the LoTW tab in Preferences
(displayed earlier).
Performing a batch LoTW upload is useful when you don't want to upload log entries
to LoTW automatically. It is also useful after you import ADIF files from another program, like a
contest logging program or digital mode program.
Note: The Automatic, Semiautomatic, and Manual LoTW
upload modes do not set the QSL fields on the Verification/Outgoing tab
because doing so would prevent users from running reports for other QSL Types
they may favor, such as Cards. You can set the Outgoing fields manually
to indicate a QSL Type of LoTW if you want, but if you don't and no other
type of QSL is indicated as sent and/or received on the Verification tab, the
LoTW QSL Update Utility (described next) will automatically declare LoTW as the official
Outgoing and Incoming QSL Type for matched records as part of its processing.
Incoming LoTW QSLs
When Logbook of the World indicates that you have LoTW QSL records,
you can use Station Log's LoTW QSL Update Utility to update your
Station Log database with LoTW QSLs.
The utility sets LoTW QSLs as the Official Incoming QSL Type
only in those log entries that are not already verified
by paper QSLs or eQSL.cc records. Likewise, it sets LoTW QSLs as the
Official Outgoing QSL Type only in those log entries
where a QSL has not been sent. In other words, the
utility doesn't override what you've already done.
And should your database not have corresponding log records, the utility lets
you import those LoTW QSL records as new, verified log entries.
A Create Club Log Records check box lets you specify whether to create Club Log records as you
update your database with LoTW QSL records. The update utility appends the Club Log records to the same workfile
as that used for automatic and manual Club Log record creation on the Station Log window, leaving the
workfile open for the non-batch creation of additional records.
The utility produces a verification report after every update operation. The following is
a sample.
Station: EA6/KA1BAM
Entity: Balearic Is.
CQ Zone: 14
State/Prov:
County:
IOTA: EU-004
Grid: JM08
Date: Mar 16 2021
Time: 06:44
Freq: 1812
Band: 160
Mode: CW
New Entity Status fields before LoTW QSL:
DXCC? No
Band? Yes-QSL
Mode? No
LoTW QSL Record Status Feature
As part of its processing, the LoTW QSL Update Utility automatically saves LoTW QSL status
information for each matched record.
The status information appears in the
LoTW QSL Record Status field on the Verification/Incoming
tab of the Station Log window as
LoTW <QSL DATE>
where <QSL DATE> is in the form
yyyymmdd, as derived from the
QSL field of each LoTW verification record. For example:

The LoTW QSL Record Status feature is useful for
accessing the LoTW QSL Record Status of every processed record, including those records
that have already — and Officially —
been confirmed by paper QSLs or eQSL.cc records.
Searches and Reports
On the Search menu, you can click LoTW QSL Record Status to
search for stations verified by LoTW QSL records both officially and unofficially.
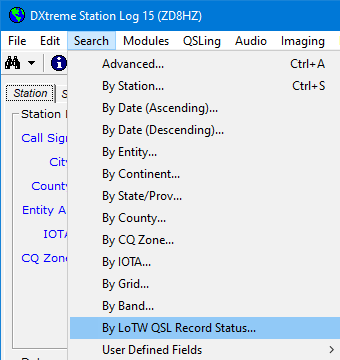
And you can perform Advanced Searches and run reports against
LoTW QSL Record Status from the Criteria window.

Click here for more
information about Logbook of the World from ARRL.
1 — The LoTW Users module helps you keep
LoTW user data up-to-date by importing the
lotw.txt file from the ARRL.
|
Outgoing
QSL Web Service Facility
|
Overview
The Outgoing QSL Web Service facility lets you send official QSL cards via a
third-party QSL bureau web site, such as "QDure" at:
https://qsl.ure.es/en/
At the time of this writing, DXtreme Software recommends QDure.
Note: As part of setting up an Outgoing QSL Web Service in
Preferences, you type the name of the service you want to use and that
name appears in menus throughout Station Log 15 (hence the name
QDure in our screen shots).
How It Works
When a Log Entry is On Display
You begin by adding, modifying, or displaying a log entry. Then, on the
Verification/Outgoing tab, make sure the Outgoing QSL Sent box
is set to Yes either manually or automatically as determined in Preferences.
If necessary, click OK.
Note: Because you will likely pay for the QSLs you send via an Outgoing
QSL Web Service, and to avoid sending QSLs by mistake, Station Log 15
requires setting the Sent box to Yes before appending QSL records
to the Service workfile.
Next, on the Station Log toolbar, click the Process Outgoing QSL
Web Service button.

Or click the arrow next to the button and then Create/Upload
{Name of Outgoing QSL Web Service} Records.

Station Log 15 creates the Outgoing QSL Web Service record and prompts
you for the next action to perform.
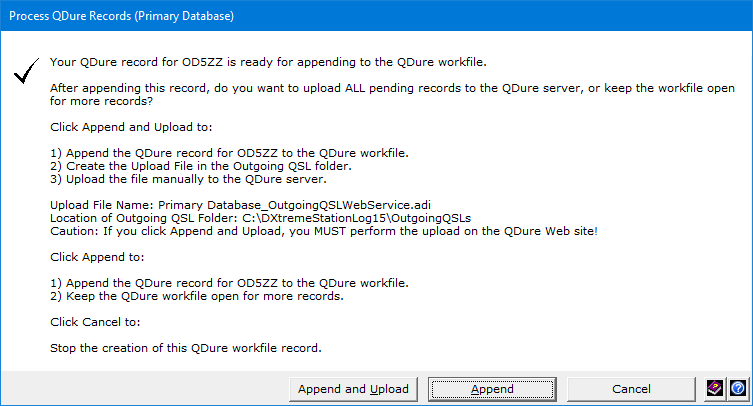
Click the appropriate button.
When a Log Entry is Not On Display
When there's no log entry on display, if desired, you can click the
Process Outgoing QSL Web Service button to upload pending
workfile records to the server.
Or click the arrow next to the button and then Create/Upload
{Name of Outgoing QSL Web Service} Records....
Station Log 15 prompts you for the next action to perform.
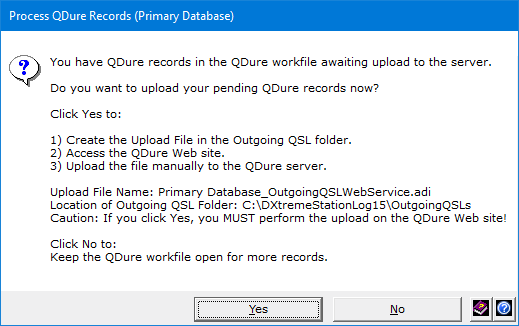
Click the appropriate button.
Whenever You Upload Records
Station Log 15 displays the Outgoing QSL Web Service site
in your web browser where you must submit the upload file manually. (The
Outgoing QSL Web Service site provides upload instructions.)
Viewing the Workfile
You can click the arrow next to the Process Outgoing QSL
Web Service button and then View/Edit the
{Name of Outgoing QSL Web Service} Workfile whenever you want to see
or edit the records in the workfile.
Preferences
On the Outgoing QSLs tab of Preferences, the Outgoing QSL
Web Service Properties area lets you specify the options you want.
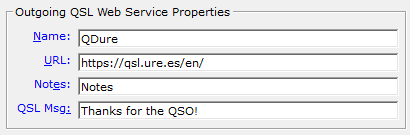
The Notes text box lets you type text that will appear on all bureau
QSLs by means of the NOTES ADIF tag.
The QSL Msg text box lets you type text that will appear on all bureau
QSLs by means of the QSLMSG ADIF tag.
Outgoing QSL Web Service functions are also accessible via the
QSLing -> Create menu on the Station Log window.
Outgoing QSL Web Service records are managed per database.
|

QSL
Imaging
|
QSL Imaging™ is a multifaceted facility that lets you scan, capture, browse, view, format,
and archive your QSL cards and electronic QSLs.
With QSL Imaging, you never again have to look through boxes or photo
albums to answer the question:
"What did that QSL look like?"
Verification Tab
You associate QSL images with log entries on the Verification tab of the
Station Log window. Once scanned or captured, the Preview QSL Image
display lets you preview images and access the resizable QSL Imaging
application to see the images full-size.
When previewing images, an arrow button at the top-right permits you to
expand (and contract) the width of the display.
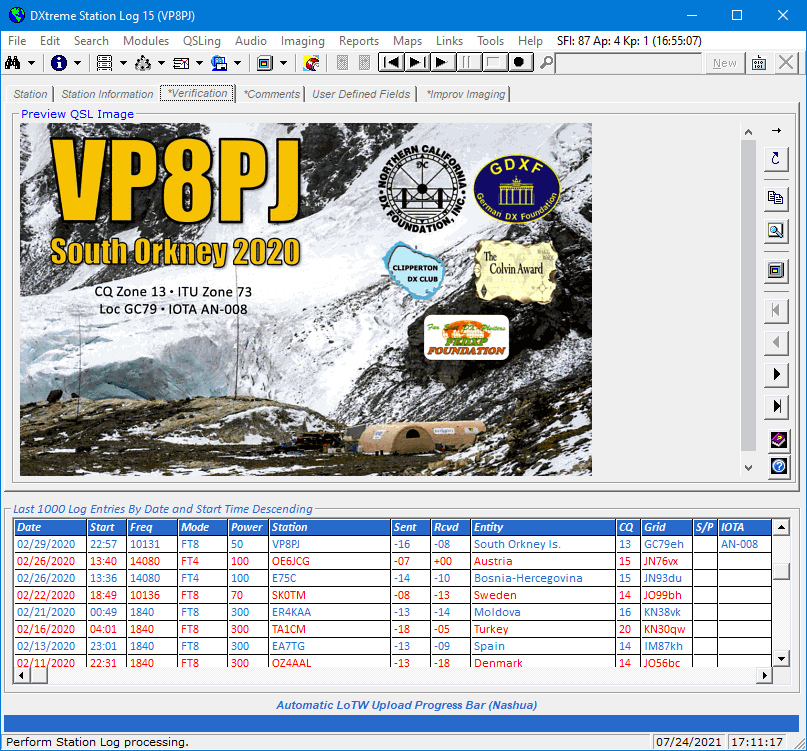
When the Preview QSL Image display is contracted, a tabbed area on the left side of the
Verification tab provides the Outgoing and Incoming QSL fields
mentioned earlier. In addition to them, Scan and screen Capture buttons make scanning
and screen-capturing .tif images convenient.
The Preview QSL Image display shows QSL images automatically whenever you display a
verified log entry. It includes a:
- Fit box for applying fit-to options to the display.
- Set of command buttons for:
- Copying QSL images to the Clipboard.
- Magnifying images.
- Displaying images full size in the QSL Imaging application.
- Navigating multipage images within the Preview QSL Image
display; this screenshot shows page 3 of the QSL image file.
QSL Imaging Application
When you associate a QSL image with a log entry, the resizable QSL Imaging application launches
automatically, showing you the full image, and giving you the opportunity to continue working with it (read the
"General Imaging" section to see what you can do). Perhaps you want to add additional image pages, for example, or
annotate, format, or print the image, etc.
A screen capture button on the toolbar makes screen-capturing additional images convenient.
When you close the application, the QSL image appears in the Preview QSL Image display on the
Verification tab of the Station Log window, where you can preview QSL images associated
with your log entries any time you want.
A command button lets you redisplay images in the QSL Imaging application, in case you want to
see them full-size or work with them again.
By default, QSL Imaging saves QSLs in the Tagged Image File Format (TIFF).
The TIFF format lets you save the front and back of each QSL as
individual pages in a single image file — similar to how a word processor lets you save
individual text pages in a single document file. If you want to save
your QSL images in other formats (such as JPEG), you can.
QSL Image Explorer
The QSL Image Explorer lets you
peruse the images in your QSL folder.

It includes a:
- Thumbnails browser in addition to the standard File List.

- Large Image display for previewing QSL images.
- Fit box for applying fit-to options to the Image
display.
- Set of command buttons for:
- Copying QSL images to the Clipboard.
- Magnifying images.
- Displaying images full size in the QSL Imaging application.
- Navigating multipage images within the Image display.
- Calling-up, in the Station Log window, the log entry associated
with a QSL image, thereby making the Explorer act like a
Search window.
By default, QSL images reside in the IncomingQSLs subfolder of the
c:\DXtremeStationLog15 tree.
Imaging Preferences
The Auto Backups tab in Preferences lets you configure up to two backup paths
for your QSL and Improv (described next) images.
The Imaging tab lets you set desired properties for your images.
|
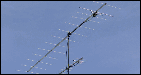
Improv
Imaging
|
Improv Imaging is a dynamic facility that lets you associate adhoc
images with log entries. This feature is independent from our popular
QSL Imaging™ facility.
Using Improv Imaging, you can Capture from your screen, Scan from
your image scanner, or Paste from the Clipboard any image you want to associate with a
displayed log entry. The image can be a single-page .jpg, or a single- or multi-page .tif. You can also browse your PC for a
.jpg or .tif image file you want to associate.
For example, you can use Improv Imaging to associate the following kinds of images with
your log entries:
- Signals on a spectrum analyzer or waterfall.
- Amateur television images.
- Facsimile images.
- Screen captures of stations received on digital applications, such as WSJT-X, JTDX,
Fldigi, and more.
- Captured or scanned photos of equipment.
- Any other images you desire.
Improv Imaging Tab
You associate Improv images with log entries on the Improv Imaging tab of the
Station Log window. Once scanned or captured, the Preview Improv Image
display lets you preview images and access the resizable Improv Imaging
application to see the images full-size.
This tab includes a:
- File box plus execute and browse buttons for associating images;
the execute button invokes the New Improv Image command box with its Capture, Scan,
and Paste functions.
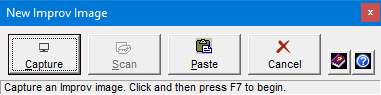
- Description box for describing images.
- Large Preview Improv Image display for previewing images associated
with log entries.
- Fit box for applying fit-to options to the Preview Improv Image
display.
- A set of command buttons for:
- Copying Improv images to the Clipboard.
- Magnifying images.
- Displaying images full size in the Improv Imaging application.
- Navigating multipage images within the Preview Improv Image
display.
An asterisk appears in the Improv Imaging tab when an Improv image is associated with
a displayed log entry.
Improv Imaging Application
When you associate an Improv image with a log entry, the Improv Imaging application launches
automatically, showing you the full image, and giving you the opportunity to continue working with it (read the
"General Imaging" section to see what you can do). Perhaps you want to add additional image pages, for example, or
annotate, format, or print the image, etc.
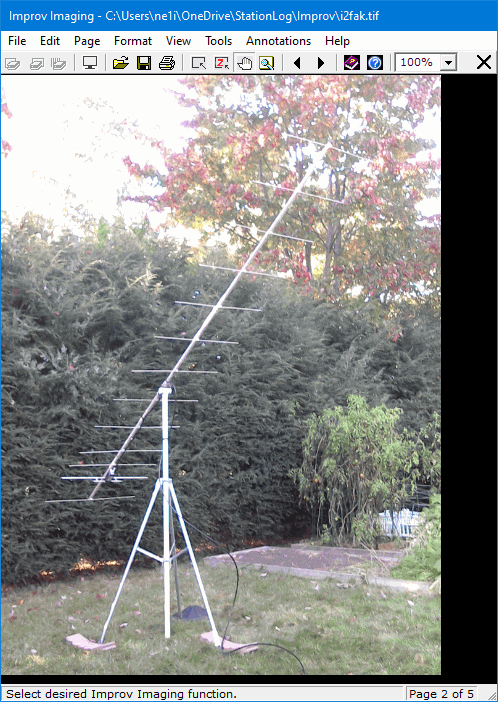
When you close the application, the Improv image appears in the Preview Improv Image display on the
Improv Imaging tab of the Station Log window, where you can preview the images associated
with your log entries any time you want.
A command button lets you redisplay images in the Improv Imaging application, in case you want to
see them full-size or work with them again.
Improv Image Explorer
The Improv Image Explorer lets you peruse the images in your Improv folder.
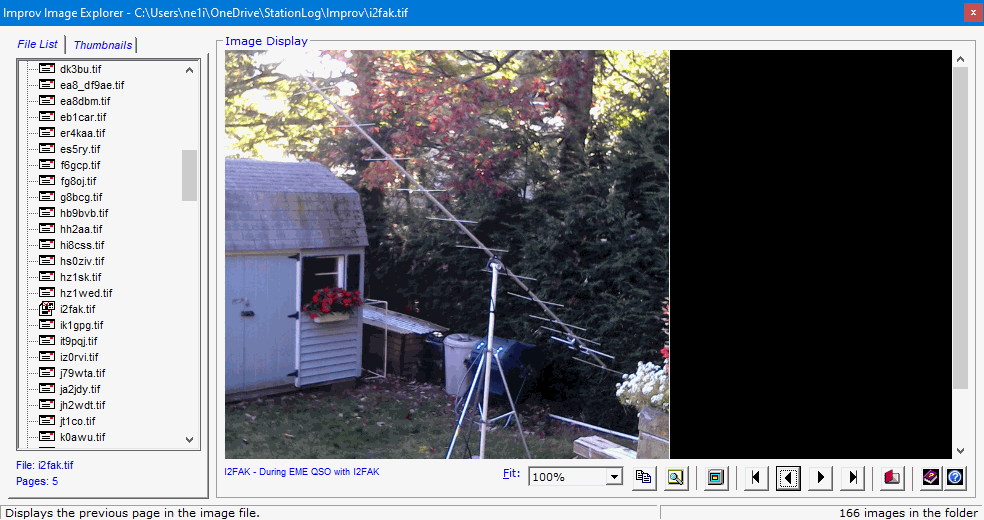
It includes a:
- Thumbnails browser in addition to the standard File List.
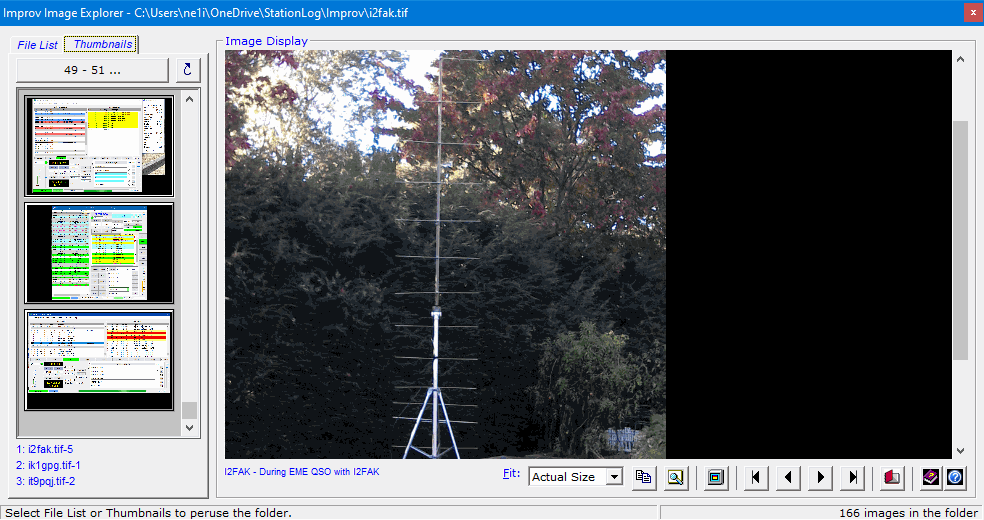
- Large Image display for previewing Improv images.
- Fit box for applying fit-to options to the Image
display.
- A set of command buttons for:
- Copying Improv images to the Clipboard.
- Magnifying images.
- Displaying images full size in the Improv Imaging application.
- Navigating multipage images within the Image display.
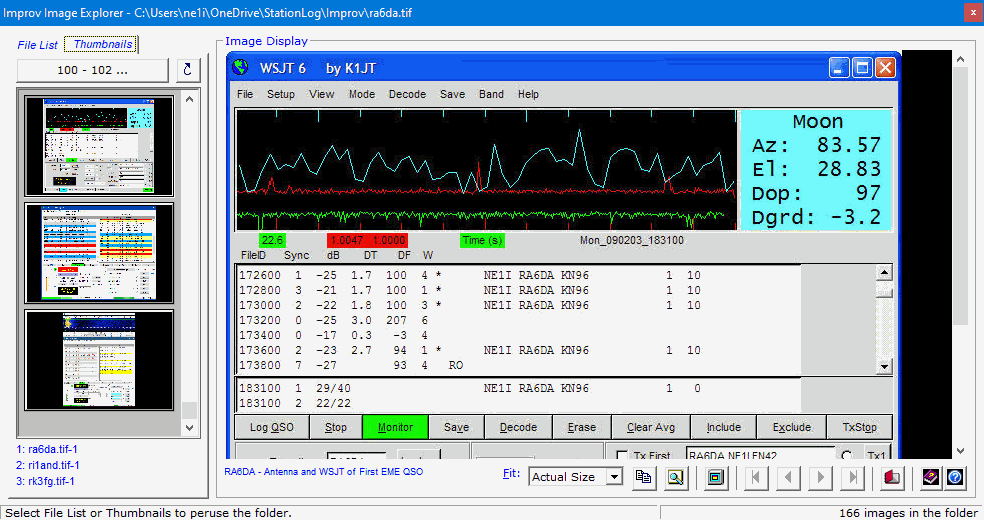
- Calling-up, in the Station Log window, the log entry
associated with an Improv image, thereby making the Explorer act like a
Search window.
By default, Improv images reside in the Improv subfolder of the
c:\DXtremeStationLog15 tree.
|
General
Imaging
|
Because many people have used QSL Imaging as their default imaging application for general
purposes — outside the scope of QSL Imaging and Improv Imaging —
we have included General Imaging™ in DXtreme Station Log 15,
callable from the Imaging menu of the Station Log window.
The General Imaging application has all of the features of the QSL Imaging and
Improv Imaging applications and vice versa ... just the thing for capturing an interesting image
on the Web for later viewing.
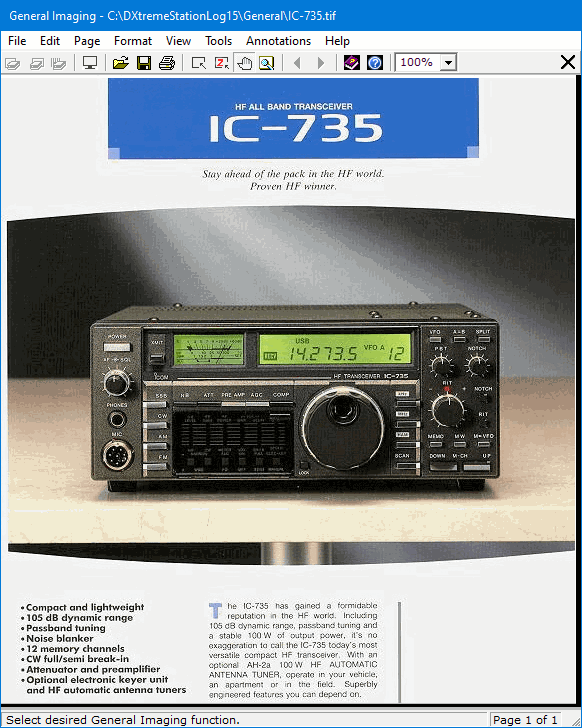
With General Imaging you can perform the following functions.
Basic Functions
- Scan images (industry-standard TWAIN scanner required).
- Capture images.
- View, magnify, and zoom images.
- Navigate the pages of multipage image files.
- Annotate images.
- Alter, crop, and delete images.
- Copy, cut, and paste images to and from the Clipboard.
Formatting Functions
- Change the brightness, contrast, hue, color saturation, and gamma of images.
- Sharpen, resize, reverse, rotate, flip, and shear images.
Filing Functions
- Print images on your printer.
- Send images to others by e-mail.
- Save images in a variety of formats, including:
- BMP
- JPG
- PCX (multipage)
- PNG
- TGA
- TIF or TIFF (multipage)
|

DXCC
Analytics
|
DXCC Analytics is a window-based tool that lets you analyze your DXCC
data and quickly access the specific log entries upon which you need to take some kind of action,
such as submitting or re-submitting a QSL or e-mailing the ham you contacted.
You begin by selecting a desired mode, or all modes. Then DXCC Analytics
goes to work, building and displaying a record set showing the number of band entities Worked,
Verified, and Worked But Not Verified (labeled Delta) for each band and
for all bands. (As an option, check boxes let you specify whether to include Deleted and
Non-DXCC entities in your analysis, and Power From and To
boxes let you filter your analysis by the output power used; you can specify a single power level, or a
range of power levels.)
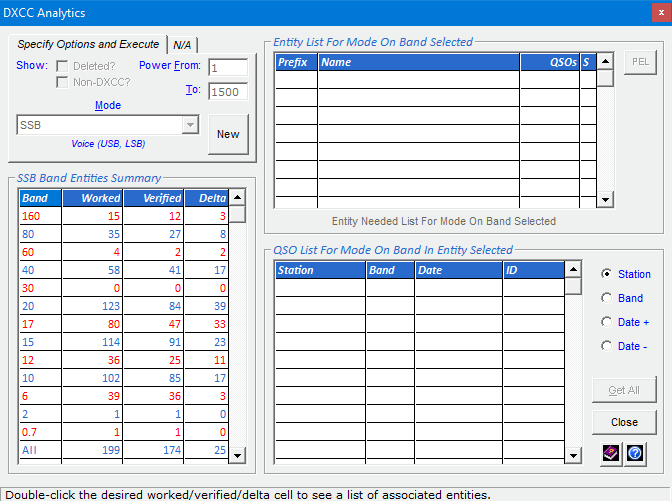
When you double-click a Worked, Verified, or Delta data element
for a desired band, or for all bands, you see a list of entities that satisfy the element you chose, along
with the number of QSOs in each entity.

When you double-click a desired entity, you see a list of its QSOs, including the band and date.
You can sort this list by Station, Band, Date Ascending, or Date Descending.
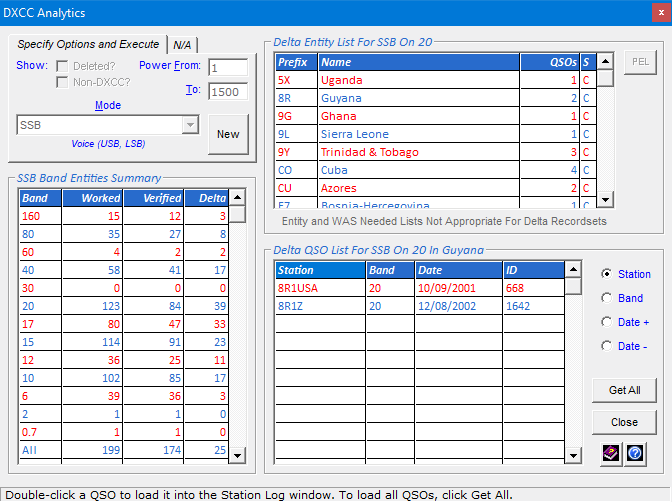
You can then Get one or Get All of the QSOs and load them into the
Station Log window so you can perform
the desired action on them ... while the DXCC Analytics window persists for further analysis.
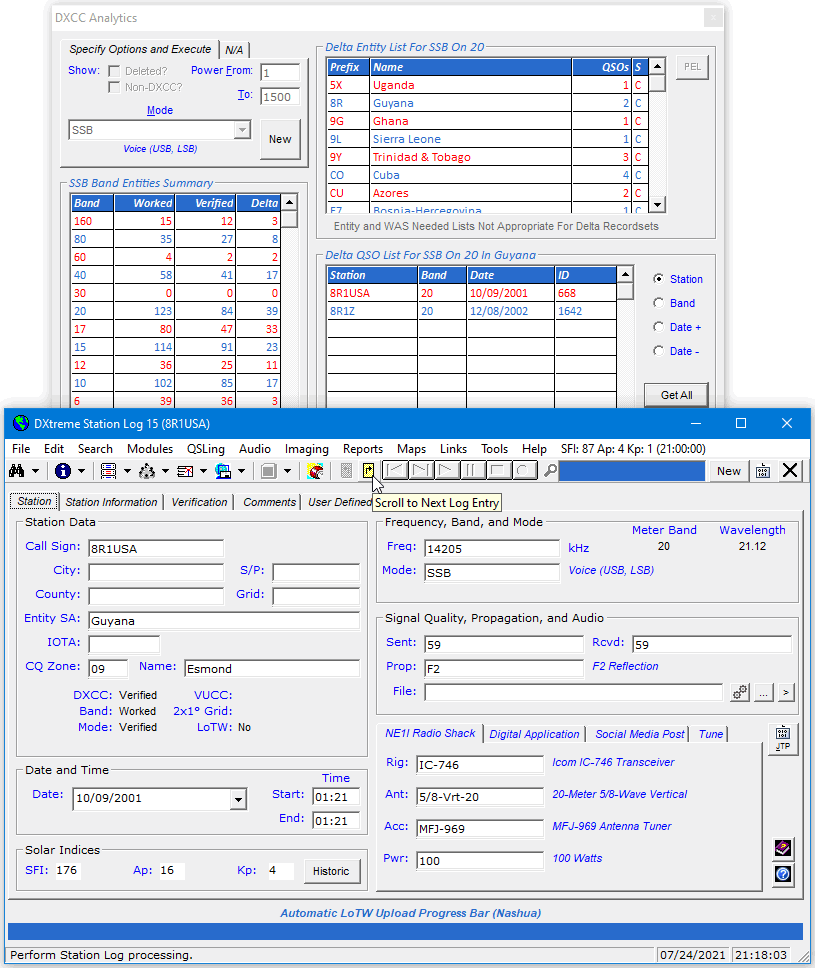
DXCC Challenge Status
When you build a record set for all modes, you can scroll down to see your
DXCC Challenge status for informational purposes.

DXCC Needed List
After double-clicking a Worked or Verified data element
for a desired band or for all bands in the Band Entities Summary area, and after
the Entity List area displays its list of entities, you can click the
Entity Needed List hyperlink to generate a list of
entities you still need for the mode, data element, and band(s) clicked.
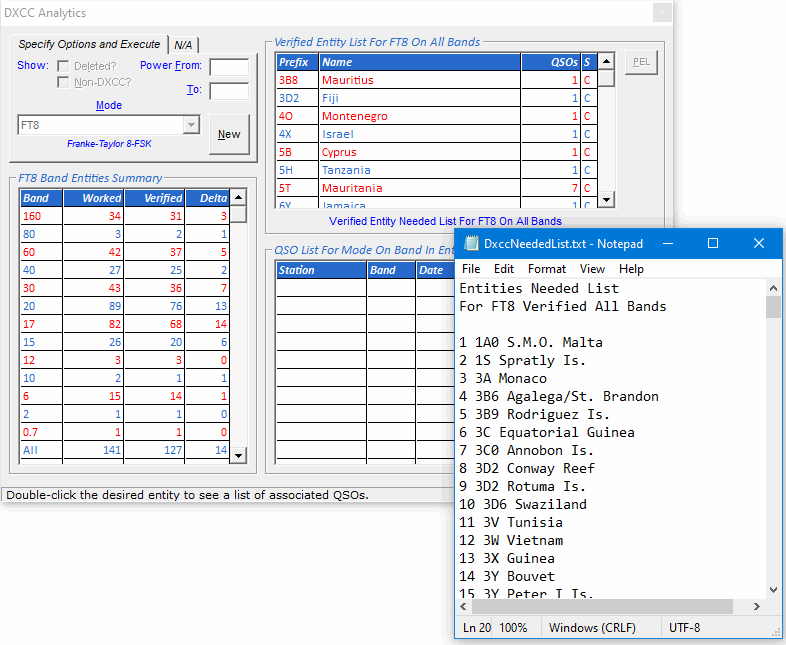
If you want to retain your DXCC needed lists, on the File menu of
Notepad, click Save As and save each list to the desired location using
a unique file name. Alternatively, you can print each list.
Previous Entity List (PEL) Feature
DXCC Analytics works with lots of data, so if your database has thousands of
QSOs, give it some time. The results are worth the wait. When you want to work with an entity list
over several days, you can use the Previous Entity List (PEL) feature, which is described next.
When you build an entity list, particularly a time-consuming one, DXCC Analytics saves
the list to a local file, enabling you to reload its data later — in seconds — to continue
working with it.
This feature is intended for users who want to work intermittently on an entity list
that took several minutes to build. They may have, for example, built an entity
list (like Delta All Modes All Bands), started to work on it, and then shut down
Station Log to go to work or school. When they return home, they can reload the
desired PEL file and pick up where they left off.
To reload a previous entity list, click the PEL button. The
Select Previous Entity List window appears to let you
select the entity list you want to reload. You can then continue to work
on it.
|
WAS
Analytics
|
WAS Analytics is a window-based tool that lets you analyze your Worked All States (WAS)
data and quickly access the specific log entries upon which you need to take some kind of action,
such as submitting or re-submitting a QSL or e-mailing the ham you contacted.
You begin by selecting a desired mode, or all modes. WAS Analytics then goes to work,
building and displaying a record set showing the number of band states Worked,
Verified, and Worked But Not Verified (labeled Delta) for each band and
for all bands. (As an option, Power From and To boxes let you
filter your analysis by the output power you used; you can specify a single power level, or a
range of power levels.)
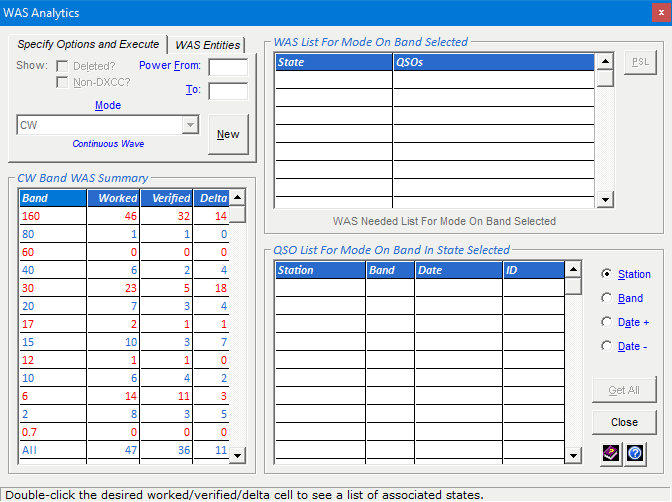
When you double-click a Worked, Verified, or Delta data element
for a desired band, or for all bands, you see a list of states that satisfy the element you chose, along
with the number of QSOs in each state.

When you double-click a desired state, you see a list of its QSOs, including the band and date.
You can sort this list by Station, Band, Date Ascending, or Date Descending.
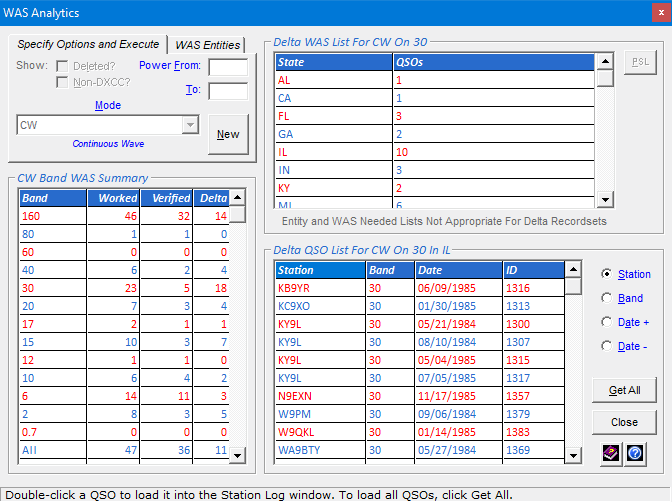
You can then Get one or Get All all of the QSOs and load them
into the Station Log window so you can perform
the desired action on them ... while the WAS Analytics window persists for further analysis.
WAS Needed List
After double-clicking a Worked or Verified data element
for a desired band or for all bands in the Band WAS Summary area, and
after the WAS List area displays its list of states, you can click the
WAS Needed List hyperlink to generate a list of
states you still need for the mode, data element, and band(s) clicked.
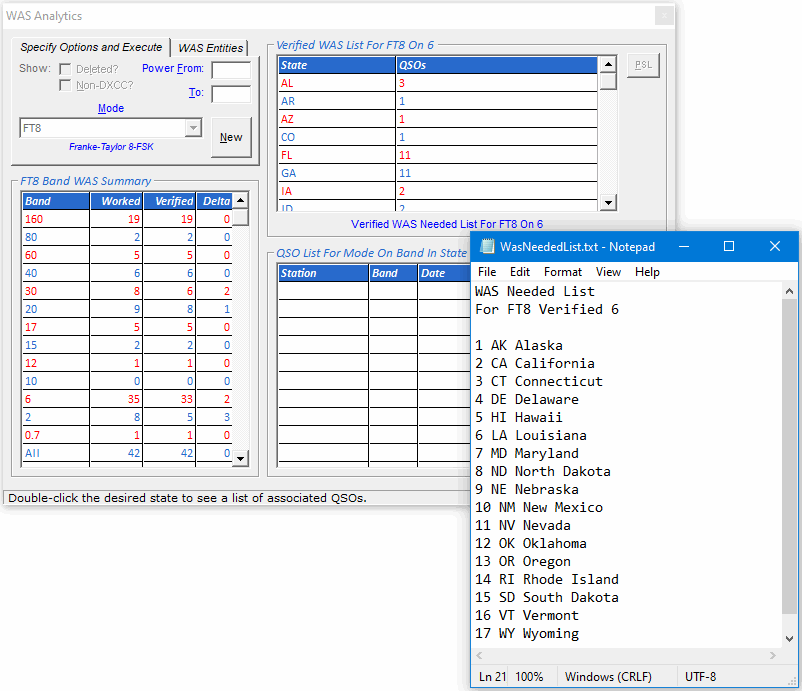
If you want to retain your WAS needed lists, on the File menu of
Notepad, click Save As and save each list to the desired location using
a unique file name. Alternatively, you can print each list.
Previous State List (PSL) Feature
WAS Analytics works with lots of data, so if your
database has thousands of QSOs, give it some time. The results are worth the
wait. When you want to work with a WAS list over several days, you can use
the Previous Entity List (PEL) feature, which is described next.
When you build a state list, particularly a time-consuming one,
WAS Analytics saves the list to a local file, enabling
you to reload its data later to continue working with it.
This feature is intended for users who want to work intermittently on a
state list that took several minutes to build. They may have, for example,
built a state list (like Delta All Modes All Bands), started to work with it,
and then shut down Station Log to go to work or school. When they return
home, they can reload the desired PSL (previous state list) file and pick up
where they left off.
To reload a previous state list, click the PSL button. The
Select Previous State List window appears to let you select the
state list you want to reload.
You can then continue to work with it.
|

Performance,
Bands,
and
Stations
Reports
|
DXtreme Station Log has an array of reports that let you
track the performance of your station.
You can run the following types of reports:
- Performance — Lets you track the overall performance
of your station.
The report shows the number of contacts per subject and whether the subject is
worked or verified overall and on each mode and band. You can produce
a Performance report for each of the following subjects:
- Entities
- Continents
- US-CA Counties
- CQ Zones
- Grid locators
- IOTA numbers
- Propagation Modes
- States and Provinces
- Digital Applications
- User-defined fields (UDFs)
- Bands — Lets you analyze the performance of your
station from a bands perspective. The report shows the number of contacts
you have made per band, overall and on each mode. The report also
shows grand totals for all bands and for each mode.
- Stations — Lets you see a list of the stations
in your log.
Filter Reports
Station Log lets you filter your Performance, Bands, and
Stations reports. You can run a report that contains:
- All of the information in your log, or
- Specific information from your log that satisfies criteria you specify.
For example, you can run a report that shows results for a particular:
- Band
- Mode
- Date range
- Rig, antenna, and/or power range
- Digital Application
- Propagation mode
- LoTW QSO Record Status

- LoTW QSL Record Status
- And so on ...
Just the thing for seeing how well a particular rig, antenna, amplifier, or digital application is performing;
for producing QRP reports; or for analyzing the effects of specific propagation conditions.
Output Devices
You can output the reports to the following devices:
1 — Requires an Internet connection with available Web space.
View a Sample Report
Active Report Viewer in Action (Animated GIF)
Standard Report Viewer (Live)
 Click here to view a sample Performance report in the Standard Report Viewer.
Microsoft Edge, Google Chrome, Firefox, Safari, or Vivaldi. See Standard Report Viewer Notes.
Active Report Viewer Notes
Standard Report Viewer Notes
- You must be using Microsoft Edge, Google Chrome,
Firefox, Safari, or Vivaldi and have cookies enabled.
- Report section hyperlinks appear on the upper-left side of the Standard Report Viewer.
If you cannot see the report hyperlinks, place your mouse cursor just above the scroll bar on the left side
of the browser until you see a double-arrow cursor. Hold down the left mouse button and drag the mouse to
adjust the size of the top frame.
- A report hyperlink invites IE users to view an active version of the report in the
Active Report Viewer.
DX Atlas Integration
The following reports integrate with DX Atlas:1
- Grids — When you run a Performance report
for Grids, Station Log integrates with DX Atlas to produce a map showing the grids you've
worked and verified. Different colors indicate verification status (black background for
verified, blue background for worked but not verified). The colors are controlled
by DX Atlas and do not appear to be editable.
This map shows grid status for two-meter, meteor-scatter contacts from New Hampshire. You
can pan and resize and zoom the map as desired.
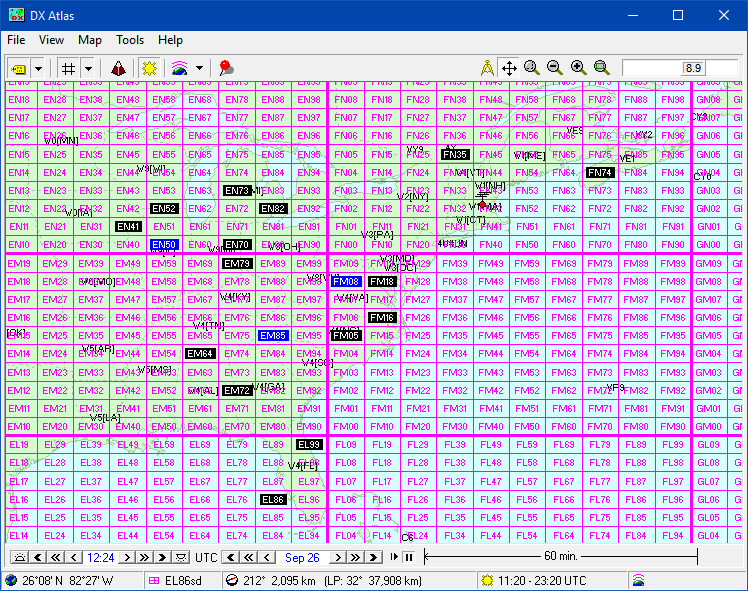
- Entities — When you run a Performance report
for Entities, Station Log integrates with DX Atlas to produce a map of pins; one color for
worked entities, another color for verified entities. You can set the colors in
Station Log's Preferences module.
This map shows overall entity status. You can change the projection and rotate and resize and zoom the map as desired.

- Stations — When you run a Stations report,
Station Log integrates with DX Atlas to produce a map of pins; one color for worked stations, another
color for verified stations. You can set the colors in
Station Log's Preferences module.
This map shows two-meter, moonbounce entity status from New Hampshire. You can change the
projection and rotate and resize and zoom the map as desired.
1 — A software license for DX Atlas is required only if you want to use DX Atlas. You can
obtain a license from Afreet Software, Inc.
|

Variables-Based Delimited Records Facility
|
The Variables-Based Delimited Records (VBDRs) facility allows you to create and output
station reports and exports of your own design to suit your own
purposes. For example, you can use the VBDR facility to:
- Output unique station reports in addition to the standard reports
DXtreme Station Log 15 provides.
- Generate delimited files for import by applications that
do not import ADIF files. These applications can include database
managers, QSL generators, spreadsheets, word processors, etc.
Automatic and Manual Writing
You can have Station Log write Variables-Based Delimited Records (VBDRs)
automatically each time you add a log entry. You can also write VBDRs manually any
time a log entry is displayed on the Station Log window.
In addition, when performing an ADIF import, you can set the
ADIF Import Utility so it writes VBDRs automatically as stations are
imported.
Scripts Allow You to Design Your Own VBDR Output
The Script Editor is where you design and edit your VBDR scripts.
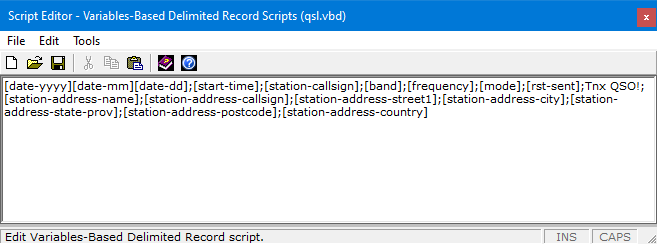
VBDR scripts include log variables — like [date-yyyy] — and can,
at your discretion, include delimiter characters and boilerplate text.
Each log variable contains data from its corresponding field on the
Station Log or Preferences window. For example, the [date-yyyy]
log variable contains the year of the log entry currently on display on the
Station Log window while [frequency] contains the frequency in kHz.
The easiest way to add log variables is to use the Log Variables Lookup,
which describes each variable and lets you drag and drop — or copy and paste —
log variables into your script.
(A Log Variables Lexicon in the Help system also describes each variable.)
To add delimiter characters, you simply type the ones you plan to use when
you import the VBDR output file into another application. Be sure to use only one kind
of delimiter character per file (like the semicolon in the previous screen
shots), typing each one between the desired log variables and, optionally,
boilerplate text. To add boilerplate text, you can type just about
whatever you want.
Delimiter characters and boilerplate text will appear amidst
the data in each record of the output file.

Scripts must be saved with a .vbd extension in the
Templates and Scripts folder specified in Preferences.
There is no limit to the number of scripts you can create. The
qsl.vbd script
comes with Station Log 15.
Prior to writing VBDRs, a script must be activated by selecting it on the
File menu of the Station Log window. We refer to this script as the
active script. The file name of the active script appears in
parentheses next to Active Script on the File menu.
When using the VBDR facility in the ADIF Import Utility, a script can
be activated by clicking the Select the VBDR Active Script button
and selecting the desired script file.
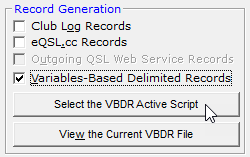
The file name of the active script appears on the button.
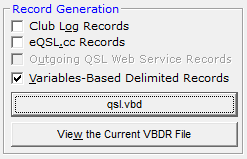
The name of the VBDR output file is the same as the name of the script file
selected, except that its extension is
txt. The output
file resides in the Exports folder specified in Preferences.
For example, if you select a script file named
qsl.vbd,
the VBDR output file will be named
qsl.txt.
There is no limit to the number of scripts and output files you can create;
you can switch between them by changing the Active Script on the File menu of the
Station Log window or on the ADIF Import Utility window.
VBDR Files: Viewing, Editing, Exporting/Importing
When you click View the Current Variables-Based Delimited Records File
on the File menu of the Station Log window (or on the
ADIF Import Utility window), Notepad appears with the current VBDR file loaded.
At your discretion, you can view and edit this file whenever you wish. If you
want to import it into another program, you can leave it in the same location on your
drive, or save it elsewhere.
If you want to clear the file of "old" records and start over, you can simply
delete its records and save the blank file using the same file name in the
Exports folder specified in Preferences.
|
Maintenance Modules
|
DXtreme Station Log has 25 maintenance modules to let you enter and
maintain the information that appears in the list box fields of the
system.
Maintaining module information enables you to make consistent entries when
you manage your log, import ADIF files, or run reports.
Station Log has the following modules:
- Abbreviations
- Accessories
- ADIF Import States and Provinces Tags
- ADIF Propagation Modes
- Antennas
- Bands (access screenshot below)
- Call Sign Cross-Reference1
- Closing Expressions
- Digital Applications
- Define List Commands
- Entities
- Grids
- HTML Elements
- IOTA2
- LoTW Users Update3
- Modes
- Postage
- Power
- Prefix Cross-Reference1
- QSL Type
- QSL Via
- Rigs
- States and Provinces
- Suppress DXCC Exceptions
- Symbols and Special Characters
Where applicable, DXtreme Software populates these maintenance
modules with pertinent information prior to shipment.
1 — Lets you import the country.dat file you download
from the AD1C Web site.
2 — Lets you import, add, modify, and delete the list of IOTA™ numbers you've obtained for personal use, after
having formatted the list in compliance with our rules
(IOTA-Number<space>Description<crlf>,
one record per line). DXtreme Software cannot distribute the IOTA list.
3 — Lets you import the lotw.txt file you download
from the ARRL.
Screenshot — Bands Module
Note: Remember to click the button at the bottom of the sample window
when you've finished viewing it.
|

Preferences
|
The Preferences window lets you specify information that controls
the overall operation of Station Log.
You can set preferences in the following functional areas:
- User
- Database + UDF
- General
- Internet
- Outgoing QSLs
- Auto QSL
- Imaging
- Audio
- Auto Backups
- Report Viewer
- LoTW
- Maps
- DX Atlas
- Contests
- Band Master
- Links
- Ham CAP
- JY log Entry Processing
Multiple-Database Management
If desired, you can maintain multiple, discrete databases in DXtreme Station Log 15.
Switching Databases in Preferences
You define the names and locations of your secondary databases once.

And then switch between them (and the Primary Database) by selecting the name of
the desired database in Preferences.

Switching from one database to another backs up the previous database automatically (if backups have been configured in
Preferences).
When defining a new secondary database, a virgin database file is automatically
placed into the new location (unless a database file is already there).
Database-Specific Fields
The following Preferences fields are database-specific; you
can set them differently per database:
- All fields on the User tab
- All fields on the Auto QSL tab
- All fields on the Contests tab
- UDF labels and definitions on the Database + UDF tab
- Database fields on the Auto Backups tab
- FTP Subdirectory Assignment fields on the Report Viewer tab
- Log Table Has All Log Entries check box on the Database + UDF tab
In Preferences, you can choose whether to process QSL labels separately for
each database or across all databases. (Auto QSL Generation always applies to the current database.
Residual QSL labels accumulate across databases.)
Club Log and eQSL.cc Records Are Managed Per Database
The generation of Club Log and eQSL.cc workfile records is performed per database.
Screenshots — Preferences
|

On-Line
Help
|
 Procedural Help Procedural Help
If you don't know how to perform a task, click the new Procedural Help
button and the first relevant Procedural Help
topic for the window or dialog box you're on appears. If there's more than one relevant topic, you can click an adjacent topic
on the help system's Contents tab to navigate to the help you need, but you'll be
in the neighborhood.
 Field Help Field Help
For help with the fields of a window or dialog box you're on, click the Field Help
button and the relevant Field Help topic
appears.

Help on Shortcut Menus
When you right-click window controls throughout the system, a shortcut menu appears with a
link to Field Help (and sometimes Procedural Help as well).
Microhelp
If you want to view status information as you perform a task, you can
read the messages that appear in the microhelp panel at the bottom of
every window in Station Log.
Information Center
For even more help when using Station Log, you can click Information Center
on the Help menu. The Information Center is a
users-only area on the Web where you can learn more about
Station Log.
Getting Started Guide
For additional help when starting to use Station Log, we deliver a comprehensive
Getting Started Guide and Installation/Upgrade Instructions in PDF format.
Click here to download the DXtreme Station Log 15 Getting Started Guide right now! Then view the PDF
file in the appropriate PDF viewer.
|
|
Pricing
More
Information
and
Pricing
|
More Information
If you'd like more information...
Pricing
Worldwide Internet Download
- Internet Download for New Users Worldwide — Only $92.99 USD
- Internet Download for Upgrading DXtreme Station Log V14.0 Users Worldwide — Only $41.99 USD
- Internet Download for Upgrading DXtreme Station Log V11.0 and V12.0 Users Worldwide — Only $51.99 USD
CD By Mail — United States Orders Only
- CD for New Users — Only $102.99 USD
- CD for Upgrading DXtreme Station Log V14.0 Users — Only $51.99 USD
- CD for Upgrading DXtreme Station Log V11.0 and V12.0 Users — Only $61.99 USD
All prices include e-mail support. CD prices include shipping and handling. There is no sales tax.
Note: There was no DXtreme Station Log 13. Why? Well, we're not superstitions or anything,
but we didn't want to jinx the new solar cycle. Why take chances?
Upgrading Users: What's New in Station Log 15
Click Here See Release Notes for DXtreme Station Log 15!
Buy It Now!
Click Here to Buy DXtreme Station Log 15 Now!
|