DXtreme Software On the Web

DXtreme Interchange

Data Sheet

DXtreme Interchange helps you digitize your paper logbooks.

Overview


DXtreme
Interchange

Our answer to getting paper logs into
your PC.

What DXtreme Interchange Does

DXtreme Interchange digitizes your paper logbooks (or other non-ADIF1 sources) as quickly as possible using a combination of essential data entry; dictation, type, and paste; and active-importation.

What is Essential Data Entry?

Put simply, essential data are those fields that are required — at a minimum — to constitute a viable log record (or log entry).

It is also a strategy, enabling you to digitize your paper logbook as quickly as possible using a combination of dictation, type, and paste while adhering to the idiom less is more: the less data you enter, the more quickly your logs will be digitized into ADIF-based project files that can be actively imported into:

  • DXtreme Station Log 14 (and later releases)
  • DXtreme Monitor Log 12 (and later releases)

What is Dictation, Type, and Paste?

Dictation, type, and paste are the three actions you can perform to create essential-data log records. You can perform each action by itself, or you can perform each in combination. Ideally, you should perform dictation, type, and paste in the manner which provides the quickest and easiest way for you to get each log entry into the Dictation-Type-Paste box. So, from there, DXtreme Interchange can create an ADIF project record out of each one.

What is Active Importation?

It's the addition of more data into each log entry during the import process.

Before importing Interchange project files into a DXtreme application, you can configure DXtreme Station Log and DXtreme Monitor Log to fill in the blanks automatically with default values from their many modules as you import (modules like Rigs, Antennas, Accessories, Preferences, etc.). Plus, the import routines in DXtreme Station Log and DXtreme Monitor Log inspect the incoming data and prompt you for corrections if necessary.

Moreover, you can visit your imported log entries in DXtreme applications later to add even more data if desired.

Note: You can also import project files containing amateur radio logs into ADIF-compliant, non-DXtreme logging programs. However, these logging programs may not provide the active-importing support that DXtreme Station Log does.

This Data Sheet

Tells you everything about DXtreme Interchange. The links on the left let you hop around if you want.


Features


Themes

Themes

Three themes are available. You can choose:

System (displays the colors set for desktop applications in Windows 10 Settings)

Sepia

Dark


DXCC Entities Module

DXCC Entities Module

The DXCC Entities Module lets you maintain a table of DXCC entities — complete with their Name, DXCC Tag number, Standard Prefix, Latitude, and Longitude. It comes populated with the 340 current entities that were in existence at the time of release.

What's It For?

As you dictate, type, and paste log entries, DXtreme Interchange uses the name of the entity in the Dictation-Type-Paste box to insert the likely DXCC Tag number into the <DXCC> Tag of the ADIF project record. (For example, "291" for "United States.") As you might have guessed, the software obtains the DXCC Tag number from the DXCC Entities Module.

Conveniently, even incorrect and partial entity names can resolve to a likely DXCC Tag number. And it is important to make sure the likely number is the correct one. The Entities grid on the DXtreme Interchange window, populated from the DXCC Entities Module, lets you verify the likely number and, should you need to change it, lets you double-click the correct number to insert it into the <DXCC> Tag of the project record.

Note: For dictating, typing, and pasting older log entries, those for entities that have been deleted from the ARRL's DXCC List, the DXCC Entities Module is where you can add those deleted entities. The ADIF Specification is where current and deleted DXCC Tag numbers are documented.

DXtreme Station Log (and other logging applications) use DXCC Tag numbers to identify DXCC entities when project files are imported.

DXtreme Monitor Log uses DXCC Tag numbers to identify DXCC entities or NASWA countries as project files are imported.


Project Record Schemas

Project Record Schemas

Project record schemas impose a field structure on project files.

The Project Record Schema Designer lets you define your fields by creating and editing one or more project record schema files to fit your needs. From top to bottom, their ADIF Tag and Field pairings let you match the field order that appears, from left to right, in your paper logbooks (or other non-ADIF sources).

Matching the field order of each logging source as closely as possible makes dictation, type, and paste convenient and quick as can be, enabling you to keep your eyes glued to the paper log book or other non-adif source. The Activate for Use button lets you activate the schema you want to use right now.

To create or edit a schema, in the ADIF Tags column, click the desired ADIF Tag to pair with each field. Then in the Fields column, type or accept the desired field name. Depending on the ADIF Tag selected, some field names appear automatically and you cannot change them. These are constant fields that control system logic for constants (more on these later). Otherwise, you may type any name you wish.

If you don't want to define all 12 pairings, select NO_TAG in the ADIF Tags list boxes you don't want to use and type the desired text in the corresponding Fields boxes. We recommend Stop because dictation, type, and paste stops at the first NO_TAG field encountered. As such, all NO_TAG pairings must be grouped at the bottom of the list. Further, you cannot select NO_TAG in place of required fields.

Note: Tables in the "Essential Data Entry: How It's Done" section describe constants and fields.

The following schemas come with DXtreme Interchange.

Amateur Radio Default

Amateur Radio Contest

Monitor Default

Monitor Ham Stations

And you can define your own schemas, like the following one.

Monitor With No Program Content Description

You can define as many schemas as you want.

Project Files

Project files are ADIF files containing project records (log entries) you dictate, type, and paste into Interchange from your logging sources. You can populate a single project file, or several project files.

Note: Users of DXtreme Monitor Log must populate one or more project files separately for each station class maintained in DXtreme Monitor Log.

When you're ready, you can actively import project files containing amateur radio logs into DXtreme Station Log and project files containing monitoring logs into DXtreme Monitor Log. Using Project files provides a convenient way of organizing your project records.

Note: You can also import project files containing amateur radio logs into ADIF-compliant, non-DXtreme logging programs. However, these logging programs may not provide the active-importing support that DXtreme Station Log does.


Essential Data Entry

Essential Data Entry: How It's Done

After making sure you've activated the appropriate project record schema, set any constant values you want to use. Up to four Constants are available to quicken the log-entry process.
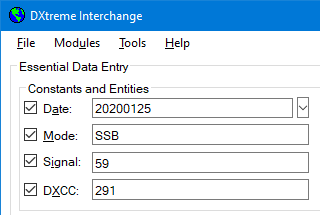
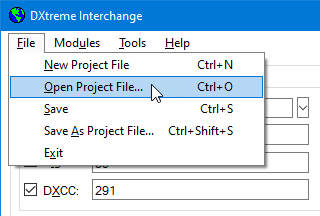
Next, if you're going to add log entries to an existing project file, on the File menu, click Open Project File and double-click the project file you want. Otherwise, you'll be prompted to create a project file later.
Give the Dictation-Type-Paste box the focus, then dictate, type, and/or paste your paper log records (or other non-ADIF source records) into the box one record at a time. For each field, say, type, or paste the actual data (or for fields supporting constants, an optional constant keyword or mnemonic) followed immediately by saying, typing, or pasting a comma, which is the official delimiter (or separator) between fields. (No commas can appear in the actual field data).

Review the record in the Dictation-Type-Paste box and make any changes needed. Then click Create and DXtreme Interchange creates an ADIF record in the Project Record box.
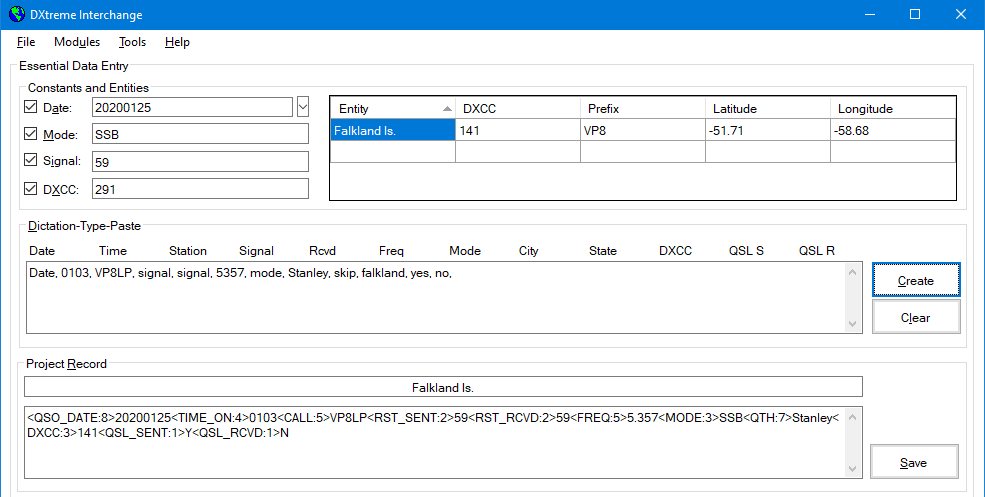
Review the record in the Project Record box. At your option, make any changes needed in the Dictation-Type-Paste box and click Create again, or if you're comfortable editing ADIF records, make changes in the Project Record box.

When you're sure the project record is accurate, click Save. If you're saving the log entry to a new project file, or if you forgot to select an existing project file earlier, the software helps you create a new project file or select an existing one. Then the software writes the record to the project file and enters key information about it in the Project Records Saved This Session box.
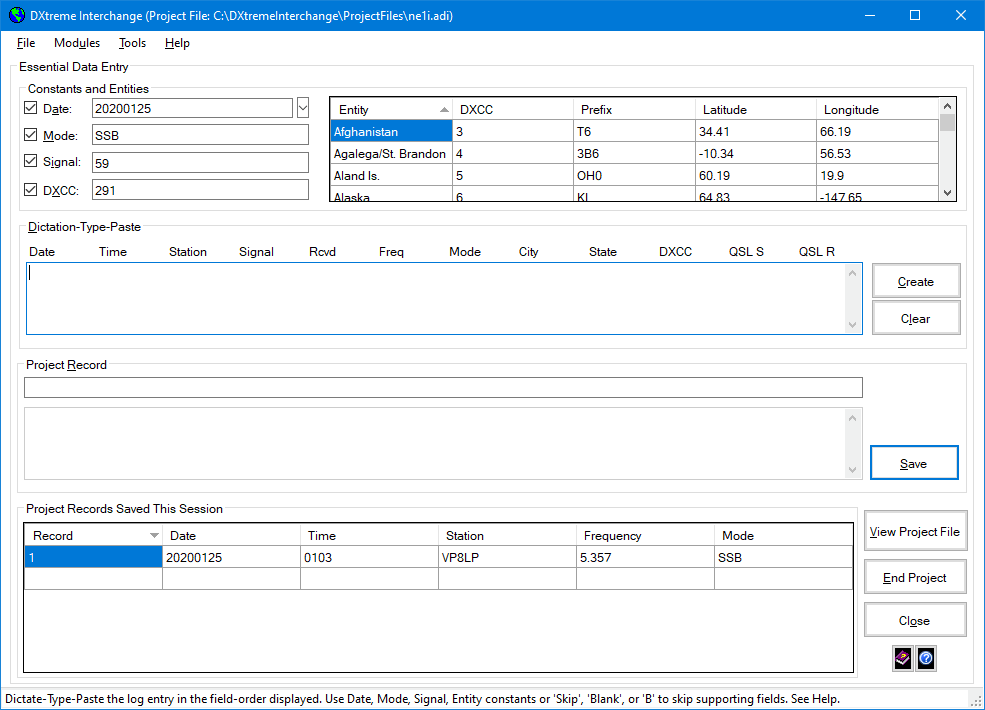
Continue adding log entries to the current project file, adjusting constants as needed.

When the project file contains all intended log entries and you're ready to import it into your copy of DXtreme Station Log (or other ham radio logging program) or your copy of DXtreme Monitor Log, end the project by clicking End Project. (More on this later).

About Constants

Using constants saves syllables and keystrokes. When several paper log entries have the same information, you can activate and define constant values for Date, Mode, Signal, and/or DXCC fields and insert those values into each log record by means of a quick keyword or mnemonic in the appropriate fields of the Dictation-Type-Paste box.

For more information: See More About Constants at the end of this section.

About Dictation

Windows 10 offers a serviceable dictation facility that learns your voice as you use the facility. You invoke dictation by pressing the Windows Logo Key + H.

Note: Sometimes we've found it necessary to press Windows Logo Key + H twice before dictation kicks in. Plus, zeroes in call signs are a challenge for Microsoft dictation, as are some state abbreviations. Expect to correct them as dictation learns your patterns. Once started, however, Windows 10 dictation operates well even with an inexpensive microphone. If desired, access https://support.microsoft.com and search for more information about "Dictation."

About Skipping

If a field is not required and therefore eligible for skipping, you can say, type, or paste Skip, Blank, or B in place of its data followed by a comma. The field will then be skipped when the project record is created. For example, the State field is eligible for skipping. You can either spell the official state or province abbreviation (like NH for New Hampshire), or if there is no state/province or you don't want to specify one, say, type, or paste Skip, Blank, or B followed by a comma.

For more information: See More About Fields at the end of this section.

Log Entry Examples for DXtreme Station Log Import

Example 1: Entering Full Data

The following screen shot shows full data entry in the Dictation-Type-Paste box and how the software applies title case to the city name when it creates the project record.

Example 2: Skipping the State Field

The following screen shot shows the dictation of "skip" in the State field within the Dictation-Type-Paste box (England has no states) and how the software applies upper case to the call sign and title case to the city name when it creates the project record.

Example 3: Entering a Partial Entity Name

The following screen shot shows the dictation of a partial entity name ("trin") in the DXCC field of the Dictation-Type-Paste box and how the software attempts to find matching entities for "trin" in the Entities grid, ultimately selecting the first entity in alphabetic order as the likely number when it creates the project record.
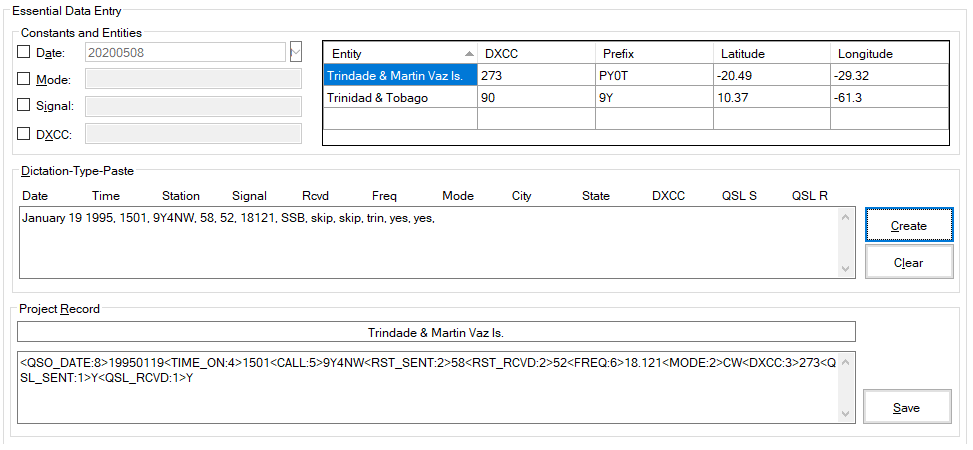
Upon review, you notice the likely number is not correct and the entity needs to be changed. Simply search the Entities grid for the correct entity record — in this case Trinidad & Tobago — and double-click it. The software adjusts the <DXCC> Tag, accordingly, as shown in the following screen shot.
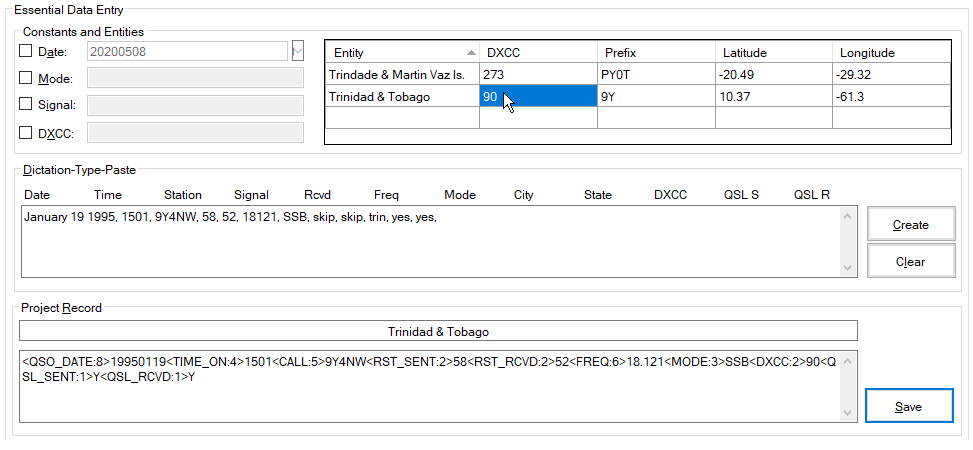
Note: The previous screen shot also shows the entry of "skip" in the City and State fields because the city was not in the paper logbook and there are no states in Trinidad & Tobago.

Example 4: Bare Minimum Data Entry and Copy and Paste of Repetitive Data

The following screen shot shows the dictation of a bare minimum, contest-style log entry for a 160-Meter CQ WW SSB QSO, the field order of which determined by a contest-style project record schema. Note the last three fields labeled Stop. These are <NO_TAG> fields within the schema. Dictation stops before the first Stop field encountered. Notice the dictation of the constant Date for the Date field, the constant sign for the Signal and Rcvd fields, the constant DXCC for the DXCC field, and the constant mode for the Mode field, and how Interchange inserts the corresponding constant values when it creates the project record.
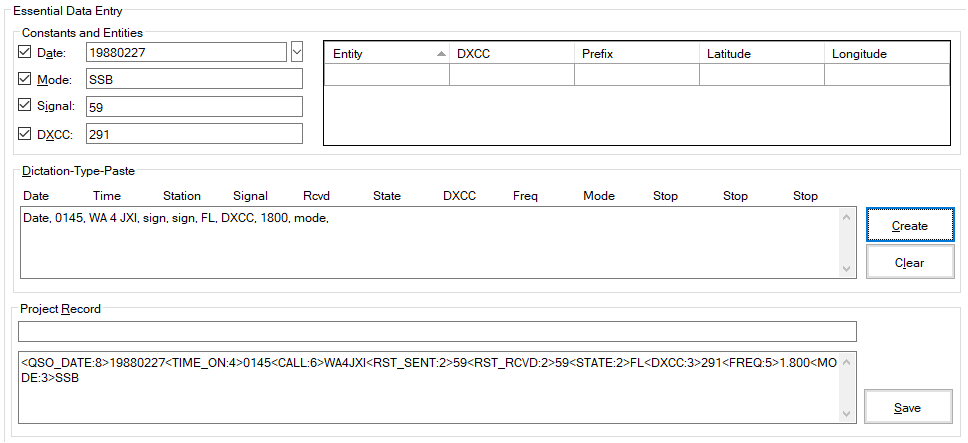
Further, the following screen shots show the copying and pasting of repetitive data not provided by a single constant — in this case, the copying and pasting of the band frequency and the mode constant, which will be the same for all 160-Meter CQ WW SSB QSOs.

After dictating the Date, Time, Station, Signal report sent, signal report Rcvd, State, DXCC, Freq, and Mode for the first QSO, the user copies the band frequency and mode constant, complete with commas, to the Clipboard.
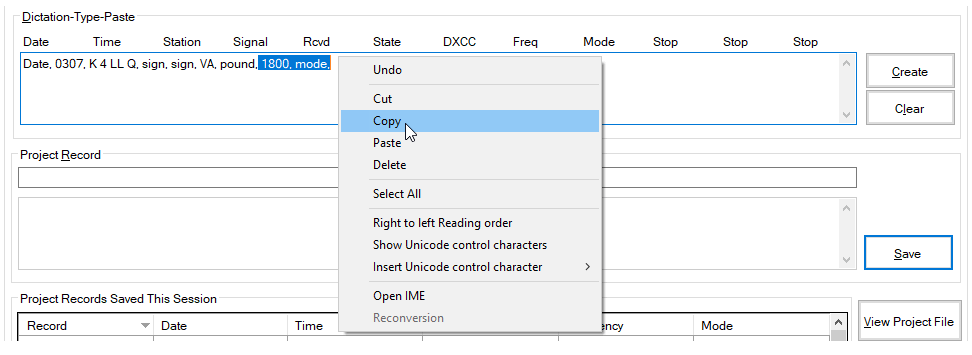
In subsequent log entries, after dictating the Date, Time, Station, Signal report sent, signal report Rcvd, State, and DXCC, the user pastes the band frequency and mode constant with commas from the Clipboard.
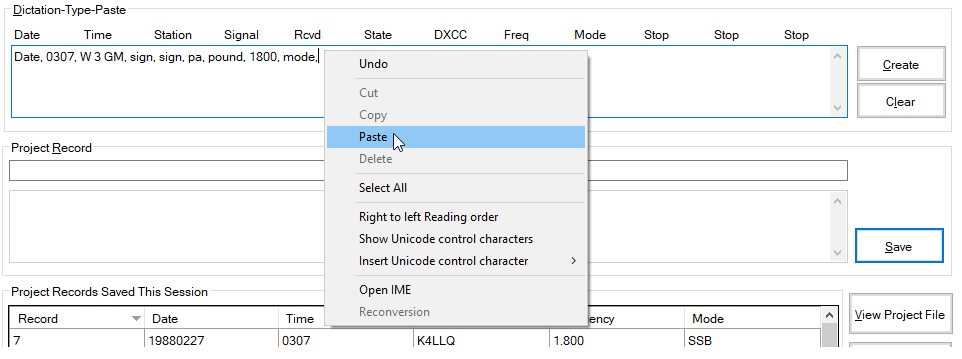
This action saves 5 syllables.

Log Entry Examples for DXtreme Monitor Log Import

Example 1: Entering Full Data

The following screen shot shows the dictation of "skip" in the State field (Sudan has no states) and the constant signal in the REPsent field of the Dictation-Type-Paste box. Notice how Interchange inserts the constant value for the report sent and applies the sentence case to the Program detail when it creates the project record.
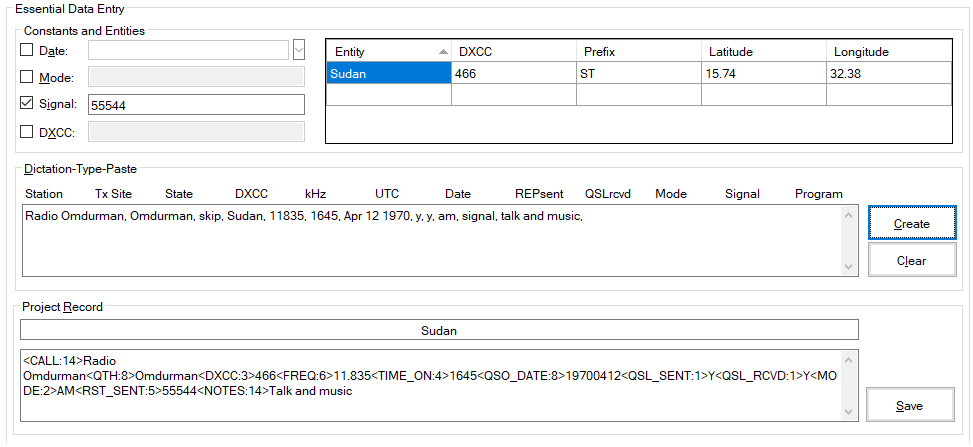
Note the different field order and definitions above the Dictation-Type-Paste box for Monitor Log import as compared to the amateur radio import examples presented earlier; necessary because:

  1. A radio monitor's paper logbook has a different field order than an amateur's paper logbook.
  2. Radio monitors send reception reports (i.e. REPsent field) instead of QSLs (for the most part).
  3. Radio monitors specify program details in reception reports and maintain them in the log.

Example 2: Entering a Partial Entity Name and Using Constants to Save Time

The following screen shot shows the entry of a partial entity name ("Mart") in the DXCC field of the Dictation-Type-Paste box along with the entry of date, mode, and signal constants to save dictation syllables. Notice how Interchange selects the entity from the Entities grid and applies the corresponding constant values when it creates the project record.
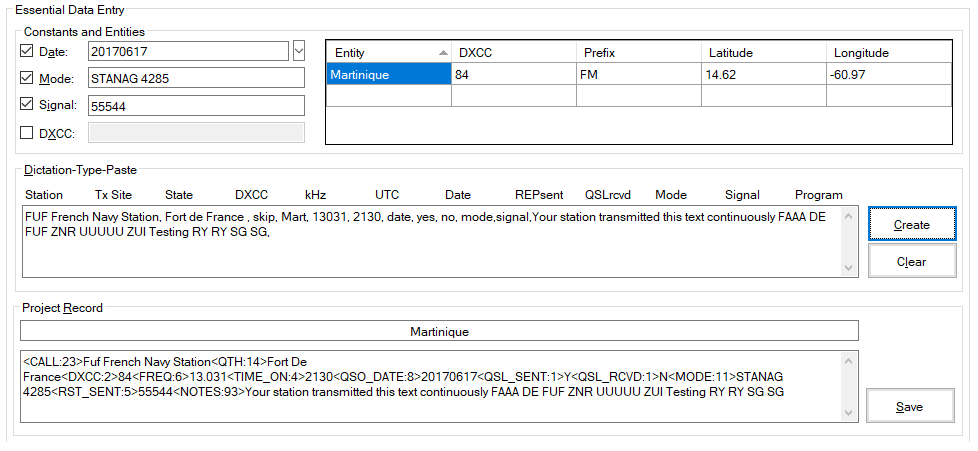
The entry of Mart instead of Martinique saved 2 syllables, date instead of June 17 2017 saved 8 syllables, mode instead of STANAG 4285 saved 5 syllables, and signal instead of 55544 saved 3 syllables ... for a total savings of 18 syllables.

More About Constants

Refer to the following table for more information about constants.

Constant Name Constant Value To Enter DTP* Fields Keyword Mnemonic ADIF Tag

Date

The desired numeric date in the format YYYYMMDD. As an alternative, click the down arrow to the right of the text box to select the date from a pop-up calendar.

Date

Date

D

QSO_DATE

Mode

For eventual import into DXtreme Station Log: The desired alphanumeric Mode from the Modes Module of DXtreme Station Log (or its equivalent in other logging applications). Can be a mode or a sub-mode from the Amateur Data Interchange Format specification.

For eventual import into DXtreme Monitor Log: The desired alphanumeric Mode from the Modes Module of DXtreme Monitor Log. Can be a mode or sub-mode from sites such as Amateur Data Interchange Format, Utility DXers Forum, The Spectrum Monitor, etc.

Mode

Mode

M

MODE

Signal

The appropriate alphanumeric signal report or exchange.

Signal

Rcvd

Signal

Sign

S

RST_SENT

RST_RCVD

DXCC

The appropriate numeric DXCC tag value from the adjacent grid, which is maintained using the DXCC Entities Module.

DXCC

Country

DXCC

Entity

Pound

#

DXCC

More About Fields

Refer to the following table for more information about fields.

ADIF
TAG
Suggested or Constant Field Names Possible Data Values to
Say, Type, or Paste
Constant
Keyword
Constant
Mnemonic
Required
Field

CALL

Station

For eventual import into DXtreme Station Log:
Call Sign (Example: "NE1I")

For eventual import into DXtreme Monitor Log:
Station Name (Example: "All India Radio")

N/A

N/A

Yes

DXCC

DXCC

ADIF Tag Number (Example: "291")

Full Entity Name (Example: "United States")

Partial Entity Name (Example: "United")

Note: Full and partial entity names resolve to ADIF Tag numbers in the project record (Example: "291" for "United States").

DXtreme Monitor Log Users:
If your country list format is NASWA, dictate, type, or paste the DXCC entity closest to the NASWA country of each log entry.

Country

DXCC

Entity

Pound

#

Yes

FREQ

Freq

kHz (Example: "7125")

Note: Express frequencies as integers only. kHz frequencies resolve to MHz in the project record (Example: "7125" becomes 7.125 with a period decimal symbol regardless of location).

N/A

N/A

Yes

MODE

Mode

Mode or Sub-Mode (Examples: "FT8", "MIL-STD-188-141A", "OLIVIA 4/125")

Mode

M

Yes

NAME

Name

Name (Example: "Dave")

For eventual import into DXtreme Monitor Log:
NAME is not supported.

N/A

N/A

No

NOTES

Comments

QSO With

Content

For eventual import into DXtreme Station Log:
Comments (Example: "Nice QSO")

For eventual import into DXtreme Monitor Log:
Either of:

  • QSO With — The call sign of the ham radio operator the monitored ham was in QSO With when adding Ham-Class log entries (Example:"WA1Z")
  • Content — Program details when adding non-Ham-Class log entries (Examples: "News, Commentary, Music, Aviation weather, Coded 5-figure group message")

N/A

N/A

No

QSL_SENT

QSL S

REPsent

For eventual import into DXtreme Station Log:
QSL Sent (Example: "Y" or "N" [Yes or No])

For eventual import into DXtreme Monitor Log:
Report Sent (Example: "Y" or "N" [Yes or No])

N/A

N/A

No

QSL_RCVD

QSL R

QSL Received (Example: "Y" or "N" [Yes or No])

N/A

N/A

No

QSO_DATE

Date

Numeric Date of QSO or reception in the following format: YYYYMMDD (Example: "19800601")

Alphanumeric Date of QSO or reception in the following format: Month Day Year (Example: "June 1 1980")

Date

D

Yes

QTH

City

Tx Site

For eventual import into DXtreme Station Log:
City or Town (Example: "Nashua")

For eventual import into DXtreme Monitor Log:
Tx Site (Example: "Gander")

N/A

N/A

No

RST_SENT

Signal

Signal Report Sent or contest exchange
(Examples: "559", "FN42", "-01", "+04", "55544")

Signal

Sign

S

No

RST_RCVD

Rcvd

Signal Report Received or contest exchange
(Examples: "559", "FN42", "-01", "+04")

For eventual import into DXtreme Monitor Log:
RST_RCVD is not supported.

Signal

Sign

S

No

STATE

State

State or Province Official Abbreviation
(Example: "NH")

N/A

N/A

No

TIME_ON

Time

Start Time numeric only, no colon
(Example: "2302")

Note: TIME_OFF is not supported. Upon import of the project file, DXtreme Station Log and DXtreme Monitor Log set the TIME_OFF equal to the TIME_ON.

N/A

N/A

Yes


Active Importing

Active Importing

When a project file contains all intended log entries and you're ready to import it into your copy of DXtreme Station Log or DXtreme Monitor Log, click End Project. Then select the folder into which the software will move the completed project file. This is the ADIF file you'll import into the logging program.

For Active Importing into DXtreme Station Log

For Active Importing into DXtreme Monitor Log

When you click OK, DXtreme Interchange moves the project file to the folder specified and removes its session record from the database.

Active Importing into DXtreme Station Log

Interchange project files are actively imported into DXtreme Station Log by means of Station Log's ADIF Import Utility. Two import strategies are available, use the one best suited to your requirements:

  • Import with Entity and Band Detail Updating engaged
  • Import with Entity and Band Detail Updating disengaged

By default, Entity and Band Detail Updating is engaged in the ADIF Import Utility. Disengaging Entity and Band Detail Updating is useful under a special implementation strategy (explained later).

How Entity and Band Detail Updating Works

When importing ADIF files (including Interchange project files), the ADIF Import Utility updates Station Log's Entities and Bands modules with entity-, band-, and mode-detail information from each and every log entry to provide instant DXCC, Band, and Mode status indications to all current and future log entries.

These status indications are present in reports produced by the ADIF Import Utility and are displayed on the Station Log window as users add, modify, and display log entries manually. Indications include the following:

  • New — Indicates the log entry represents the first contact with someone in the entity.
  • Worked — Indicates the log entry does not represent the first contact with someone in the entity, but that the entity is not verified.
  • Verified — Indicates the entity is verified.

Implementation Options

There are two implementation options available to new users of DXtreme Station Log wanting to digitize their log entries from paper logbooks and other non-ADIF sources. They can:

  1. Type all log entries into Station Log manually.
  2. Enter known DXCC and Band summary totals per entity and band in Station Log's Entities and Bands modules and log thereafter.

Option 1 lets users enjoy the full suite of edit, search, and reporting functions within DXtreme Station Log.

Option 2 lets users avoid typing all log entries. And while they cannot make use of all edit, search, and reporting functions, they are able to run a subset of those functions plus all other functions.

Enter DXtreme Interchange

With the release of DXtreme Interchange:

Option 1 users can more quickly dictate, type, and paste essential data log entries into DXtreme Interchange and digitize them into Interchange project files for import.

Option 2 users can:

  1. Enter known DXCC and Band summary totals per entity and band in Station Log's Entities and Bands modules, and log thereafter in DXtreme Station Log, making sure to first clear the Log Table Has All Log Entries check box on the Database + UDF tab of Preferences.
  2. Then, over time, they can dictate, type, and paste essential data log entries of earlier contacts — currently missing in Station Log's database — into DXtreme Interchange and digitize them into Interchange project files for import at desired intervals.

    Because DXCC and Band summary totals for these essential data log entries are already reflected in Station Log's Entities and Bands modules, Option 2 users must disengage Entity and Band Detail Updating during each Interchange project file import. This is accomplished by selecting the DXtreme Interchange Imports: Skip Detail Updates check box as shown below.

    When all missing log entries have been digitized and imported into Station Log, users gain full use of Station Log's features after selecting the Log Table Has All Log Entries check box on the Database + UDF tab of Preferences.

Active Importing into DXtreme Monitor Log

Interchange project files are actively imported into DXtreme Monitor Log by means of Monitor Log's Import Log From ADIF utility.

Monitor-based imports must be performed per station class from station-class-specific Interchange project files — with the appropriate class selected for each import operation on the Import Log From ADIF utility window. For example, SWBC-class project files must be imported separately from BCB-class project files with the SWBC class selected in the Class list box on the Import Log From ADIF window, as shown above.

Station classes typically include the following:

  • BCB (Broadcast Band)
  • Ham (Amateur Radio)
  • Pirate (Pirate Radio)
  • SWBC (Shortwave Broadcast)
  • UTE (Utility)


Documentation

Documentation

Several documentation form factors come with the software.

Procedural Help

If you don't know how to perform a task on whatever window you're on, you can click the Procedural Help button , which is available on all windows. The first relevant topic on the Contents tab for the window you're on appears. For related information, you can navigate to a nearby topic on the Contents tab because you'll be in the neighborhood.

Field Help

If you want field-specific instructions for the window you're on, click the Field Help button .

Note: To access the Procedural Help absent context, on the Help menu of the DXtreme Interchange window, click Procedural Help. To access the Field Help absent context, click Field Help.

Microhelp

If you want to view status information as you perform a task, you can read the messages that appear in the microhelp panel at the bottom of every window in DXtreme Interchange.

Information Center

For even more assistance when using Interchange, you can click Information Center on the Help menu. The Information Center is a users-only area on the Web where you can learn more about the software.

Post-Sale Documentation

DXtreme Interchange ships with an Installation Guide and a Getting Started Guide in PDF format.


Pricing

Pricing By Category

Worldwide Internet Download

  • New Users Worldwide — Only $29.99 USD

CD Distribution — United States Orders Only

  • New Users — Only $39.99 USD

All prices include e-mail support.

CD prices include shipping and handling.

There is no sales tax.

Click Here to Buy DXtreme Interchange Now!