16) Read the DXtreme Station Log 15 Datasheet in this Web site to learn
more about the software. Presented here are a few additional
noteworthy features.
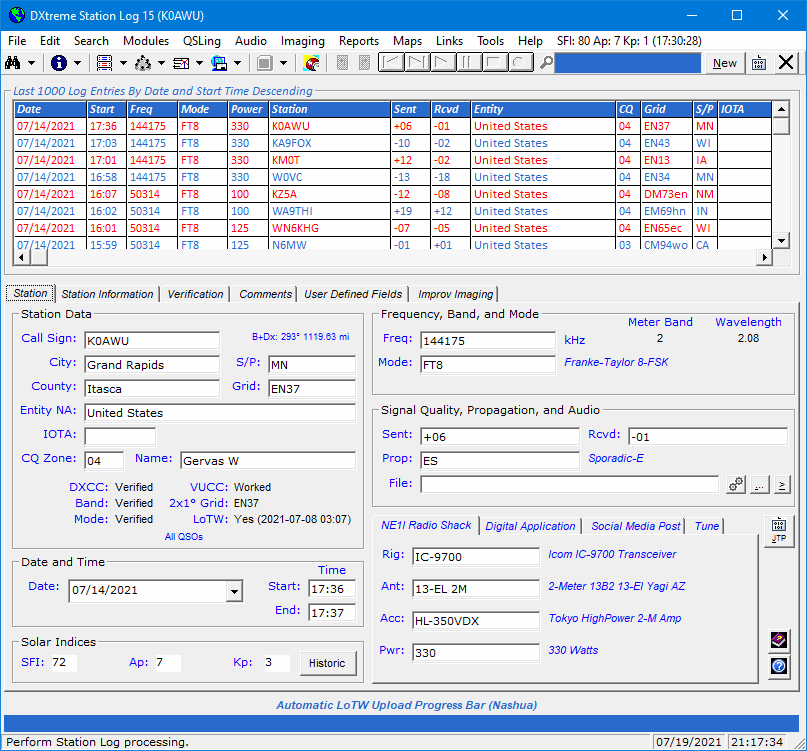
Automatic LoTW Upload: Progress Caption and Bar Additional Features
The Automatic LoTW Upload Progress caption also displays
your active station location
in parentheses prior to upload.

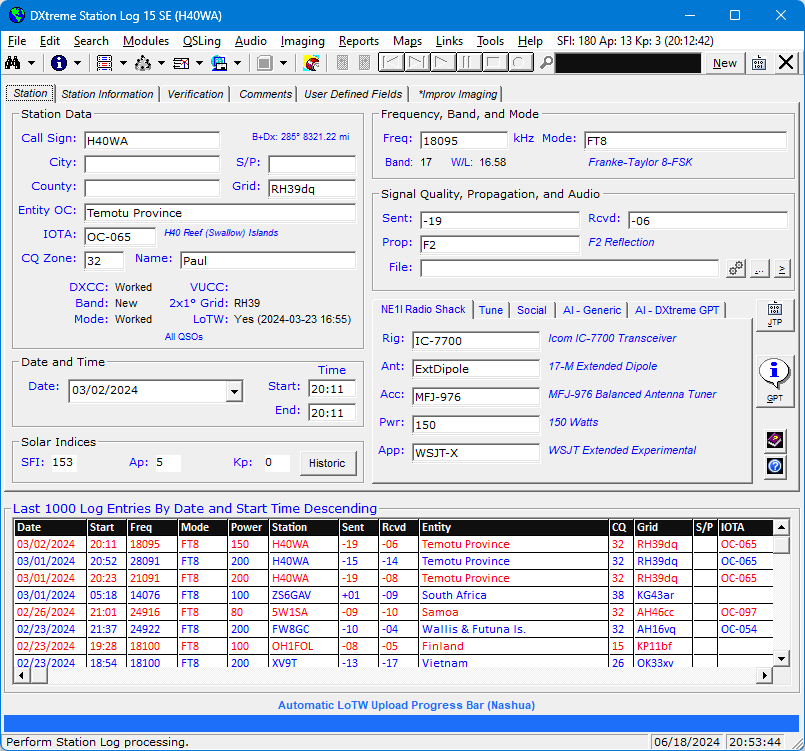
If desired, you can reposition the progress caption and bar so it's above the Last Log Entries grid
(as long as the grid is positioned at the bottom of the window).
Doing so may be preferred if you choose not to display the Last Log Entries grid.

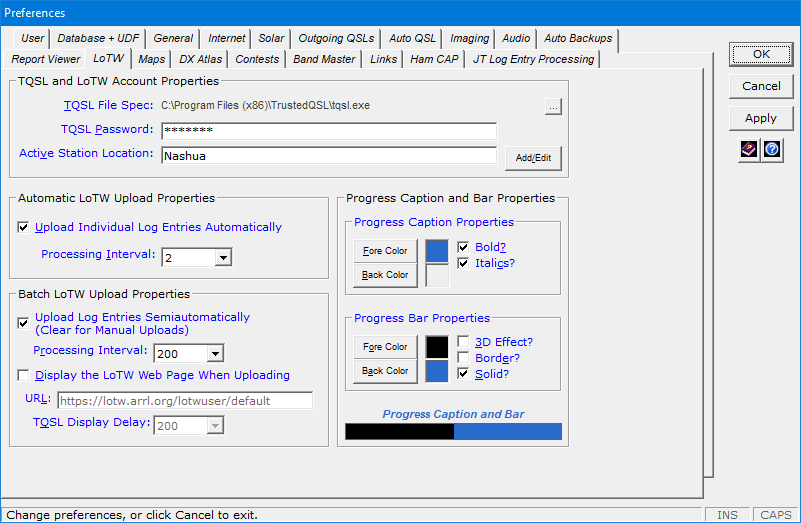
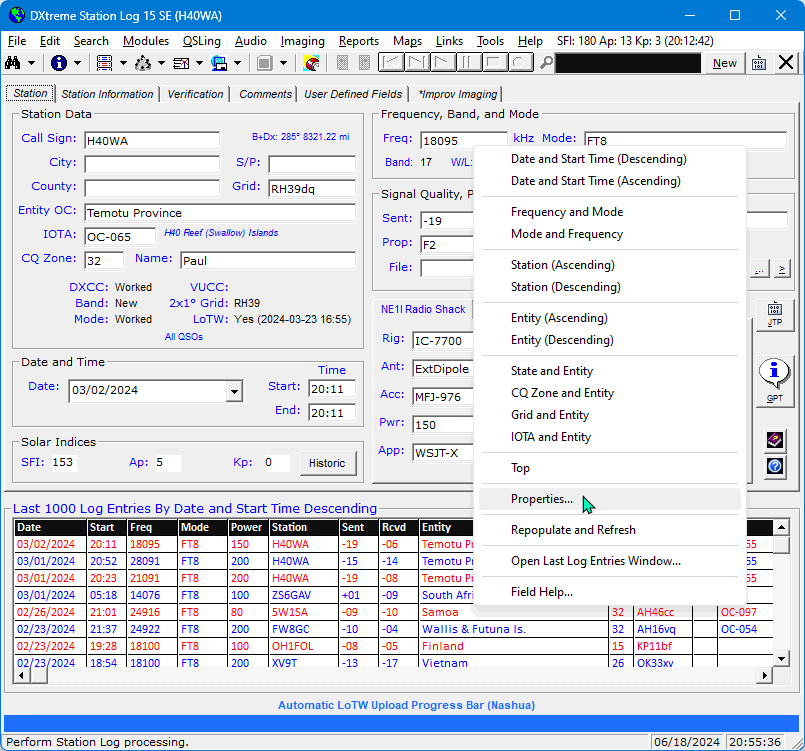
When you click Properties on the shortcut menu shown above, the LoTW
tab of the Preferences window
appears so you can quickly change your
active station location
if and when necessary.
Last Log Entries Grid: Additional Features
As you know, you can display a grid on the Station Log window that shows
up to 5000 of the most recent log entries you've added.
The grid can be placed above the tabbed set of fields.
Or below the tabbed set of fields.
You can resize the Station Log window
to make the grid disappear and reappear any time you want.
The grid's shortcut menu lets you sort its records in a variety of ways,
and gives you access to the grid's Properties dialog box ...

|
Where you can:
- Change the order of columns.
- Set the maximum number of last log entries displayed (from 7 to 5000).
- Add or remove a border.
- Set font attributes for the grid's frame plus heading
and data rows — one format for odd data rows, and another format for even
data rows — not just for the Last Log Entries grid, but for all
grids in the system plus the Quick Find box.
|
Quick Find
The Quick Find box lets you type a call sign (lower or upper-case)
and press Enter on your keyboard to search quickly for log entries
containing that call sign.
Results appear in the Quick Find window.
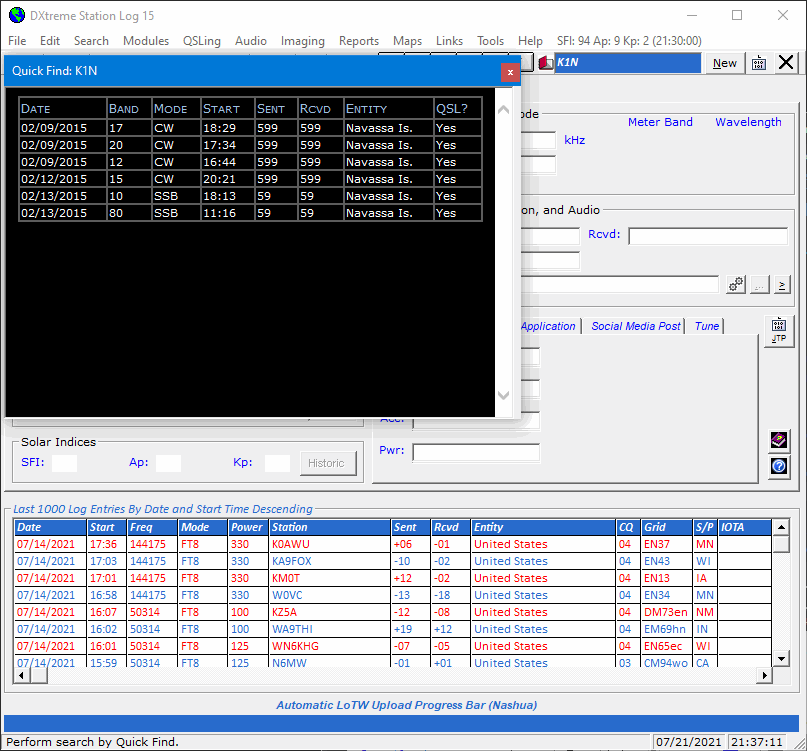
If you want to display the quick-found log entries in the
Station Log window for viewing or modification,
press Enter on your
keyboard twice or double-click the Quick Get
graphic: 

The first quick-found log entry appears on the Station Log window.
Use the next and previous buttons on the toolbar to display the log entries one-at-a-time.

Third-Party Audio Integration
Station Log 15 supports the use of a third-party audio application,
supplied by you, to provide recording, playing, and editing of
audio clips in a variety of audio formats. A third-party application, like
Audacity®, is the most convenient way of recording audio from a
USB-connected radio.
Note: For ease of playback, the executable file of the application you
select must be capable of accepting, as a command-line argument, the name of an
audio file.
To Record an Audio File and Link It to a Log Entry
After the application is specified in Preferences, click the
Access Third-Party Audio Application button in the Signal Quality,
Propagation, and Audio area of the Station Log window to invoke the
application.

When the third-party application appears, refer to
its documentation to record and process audio from the desired source.
When you have finished recording, in the third-party application, save the
audio file in the desired format into the Audio subfolder of
Station Log 15, or any other location you want.
In Station Log 15, add or display the log entry to which the audio file will be linked. In the
Signal Quality, Propagation, and Audio area, click the Browse for
an Audio File button.

On the Select Audio File window, navigate
to and select the third-party audio file you want to link.
If the file resides outside the Audio folder specified in
Preferences, Station Log 15 copies the file into that folder.
The linked file is then backed up when you close Station Log provided automatic
audio backups are configured in Preferences.
Click OK to save the log entry with the linked
audio file.
To Play and/or Modify the Audio File
If necessary, display the desired log entry. In the Signal Quality,
Propagation, and Audio area, click the Access Third-Party Audio
Application button.
When the third-party application appears, refer to its documentation to play
and/or modify the audio file.
WAS Analytics
Earlier in the tour, you read about DXCC Analytics.
WAS Analytics works pretty much the same way, letting you analyze your
Worked All States (WAS) data and quickly access the
specific log entries upon which you need to take some kind of action, such as
submitting or re-submitting a QSL or e-mailing the ham you contacted.
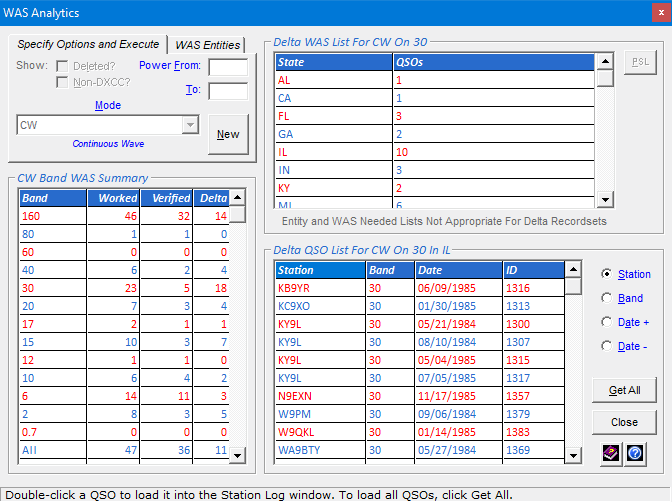
WAS Needed Lists
After double-clicking a Worked or Verified data element
for a desired band or for all bands in the Band WAS Summary area, and
after the WAS List area displays its list of states, you can click the
WAS Needed List hyperlink to generate a list of
states you still need for the mode, data element, and band(s) clicked.
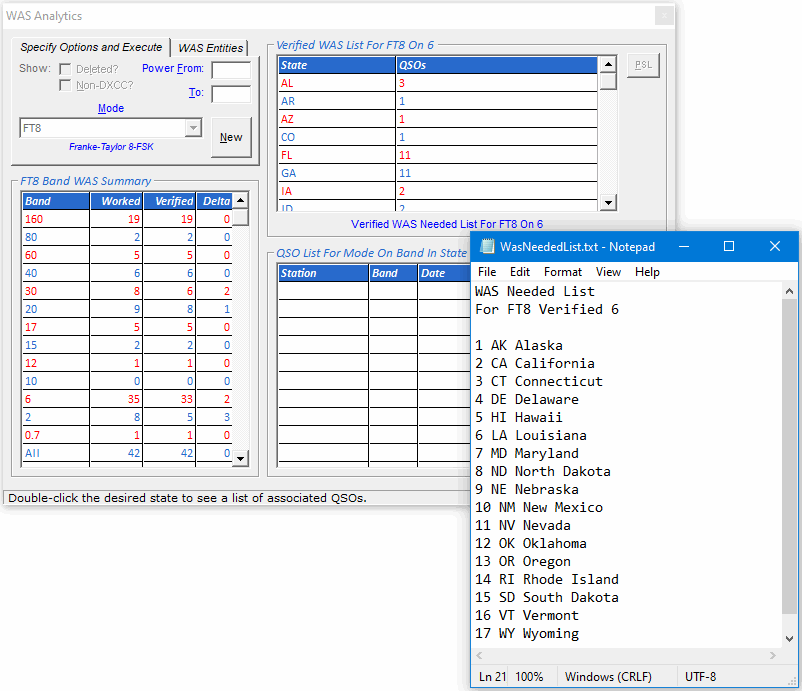
If you want to retain your WAS needed lists after viewing them, on the File menu of
Notepad, click Save As and save each list to the desired location using
a unique file name. Alternatively, you can print each list.
Previous State List (PSL) Feature
When you want to work with a WAS list over several days, you can use
the Previous Entity List (PEL) feature, which is described next.
When you build a state list, particularly a time-consuming one,
WAS Analytics saves the list to a local file, enabling
you to reload its data later to continue working with it.
To reload a previous state list, click the PSL button. The
Select Previous State List window appears to let you select the
state list you want to reload.
You can then continue to work with it.
Tune
When Omni-Rig is installed and configured on your PC, you can tune your rig
from the Tune tab on the Station Log window
(in addition to tuning within the DX Spot Checker).
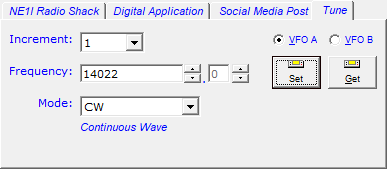
How Tune Works
To change the frequency, type a new frequency in the Freq box and click
Set or change the mode. Or in the Increment list box, click
the desired increment and use the up/down arrows next to the Freq box to tune
incrementally in kHz. Increments of 1, 2, 3, 4, 5, 10, 100, 1000, and 10000 kHz are available.
Alternatively, you can use the up/down arrows far right of the Freq box
to tune incrementally by tenths of a kHz.
To change the mode, click the desired mode in the Mode list box.
The Get button lets you reacquire the radio's frequency if the
radio was tuned — manually or via the DX Spot Checker — to a different
frequency after the Tune tab was clicked.
If your rig works with VFO A and B tuning, the VFO A
and VFO B buttons allow you to tune the preferred VFO.
Some radios work fine with VFO A and B tuning, but others do not.
If yours does not, the VFO A button lets you tune the VFO
currently selected on your radio.
Report Publishing
When you create a Performance, Bands, or Stations report for display
in the Active Report Viewer or Standard Report Viewer, you can access a dialog box
that presents you with several publishing options.
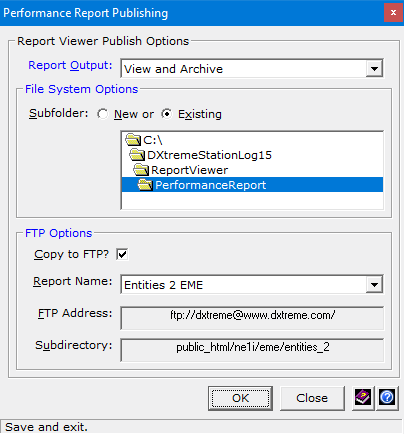
Using this dialog box, you can designate the report for Viewing only,
for Archiving to a new or existing subfolder on your drive,
or for FTPing2 to your Web server for remote viewing.
You can even choose all three!
2 — Requires an Internet connection with available Web space.
Automatic Backups
Let's be honest ... we all forget to back up our files from time to time.
But not anymore! Station Log's Auto Backup feature has
got you covered, making it easy to back up your database,
Improv imaging, QSL imaging, and audio files to two locations
automatically when you close the program!
Just specify the locations in Preferences ... and you're done!
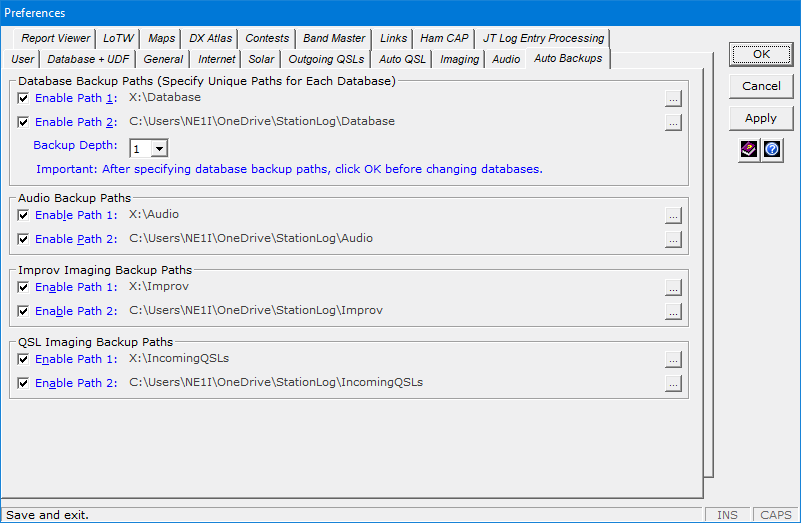
I like to use a shared drive on my Windows file server as Drive R
and Microsoft's OneDrive for cloud storage. When I switch databases or close Station Log,
the file server keeps a backup copy of my files at home and OneDrive
keeps a backup copy of my files offsite.
Club Log Integration
Hams like Club Log a lot. And with Station Log 15 you can create Club Log records automatically
when adding or modifying log entries.
While adding or modifying a log entry, a Busy indicator appears on the
Club Log toolbar button to let you know
the record will be created when
you finish:

And when the record has been created in the Club Log workfile,
a Done indicator appears on the button: 
Club Log records accumulate in a workfile per database until you upload them.
Note: You can also create Club Log workfile records manually by turning
off automatic creation in Preferences.
Club Log Workfile Viewing and Editing
When you want to view or edit the Club Log workfile, you can click the arrow next to the Club Log
toolbar button and then View/Edit Club Log Workfile.
Notepad appears with the workfile loaded.
If you make ADIF-compliant changes to the workfile,
on the File menu in Notepad,
you can simply click Save.
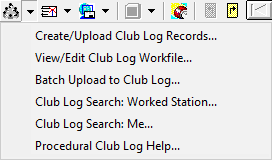
Club Log Workfile Upload
And when you're ready to upload the workfile:
Click the arrow next to the Club Log toolbar button
and then Create/Upload Club Log Records.
Station Log 15 creates an upload file in the Exports folder,
which by default is:
c:\DXtremeStationLog15\Exports
After Station Log 15 displays the Club Log Web site, simply upload the
{Name of Database}_ClubLog_Upload.adi file from
the Exports folder. That's it!
Batch Upload to Club Log
If Club Log does not yet contain your log entries,
you can use Batch Upload to Club Log
to upload them.
Thereafter, you might want to rely on the automatic method, described earlier.
To perform a batch upload:
On the Station Log toolbar, click the arrow next to the Club Log toolbar
button and then Batch Upload to Club Log.
When the Criteria window appears, specify a range of dates to select the
log entries to upload.
Click Run. Station Log 15 creates the Club Log records and writes them
to a database- and batch-specific upload file in the Exports folder, which by default is:
c:\DXtremeStationLog15\Exports
After the Club Log Web site appears, upload the
{Name of Database}_ClubLog_Batch_Upload.adi file from
the Exports folder. That's it!
Searching Club Log
You can search another ham's Club Log for a specific call sign by adding or displaying the desired
log entry, clicking the arrow next to the Club Log toolbar button, and then
Club Log Search: Worked Station.
You can also search your Club Log by clicking Club Log Search:
Me.
The Log Search page on the Club Log Web site appears.
Follow Club Log
instructions to search the log.
Creating Club Log Records During ADIF Import/LoTW QSL Update
The Create Club Log Records check box lets you specify whether to create
Club Log records as you import ADIF files and update your database with LoTW QSL records.
The import/update utilities append the Club Log records to the same workfile
as that used for automatic and manual Club Log record creation on the
Station Log window (as described earlier), leaving the workfile open
for the non-batch creation of additional records.
eQSL.cc Integration
eQSL.cc integration works similar to Club Log integration.
Automatic eQSL.cc Record Creation
At your option, you can create eQSL.cc records automatically when adding or modifying log entries.
While you're adding or modifying a log entry,
the Busy indicator appears on the
eQSL.cc toolbar button:
When the record has been created in the eQSL.cc workfile,
the Done indicator appears on the button:
eQSL.cc records accumulate in the workfile per database until you upload them.
Only qualified modifications are allowed to an eQSL.cc record, such as changes to the
call sign, date, time, band, and mode.
Note: You can also create eQSL.cc workfile records manually
by turning off automatic creation in
Preferences.
eQSL.cc Workfile Viewing and Editing
Should you need to view or edit the eQSL.cc workfile, you can
click the arrow next to the eQSL.cc toolbar button and then
View/Edit eQSL.cc Workfile.

Notepad appears with the workfile loaded.
After you make ADIF-compliant changes to the workfile, on the File menu
in Notepad,
click Save without changing the file name or location.
eQSL.cc Workfile Upload
When you're ready to upload the workfile:
On the Station Log toolbar, click the arrow next to the eQSL.cc toolbar button
and then Create/Upload eQSL.cc Records.
Click Yes to confirm, and Station Log 15 creates an upload file in
the Outgoing QSLs folder, which by default is:
c:\DXtremeStationLog15\OutgoingQSLs
When the eQSL.cc Web site appears, upload the {Name of Database}_eQSLcc.adi
file from the OutgoingQSLs folder. Refer to the eQSL.cc Web site for upload instructions.
Batch Upload to eQSL.cc
Batch Upload to eQSL.cc is useful when eQSL.cc does not contain all your
log entries.
Thereafter, the automatic (or manual) method, described earlier, is recommended.
When you're ready to perform a batch upload:
On the Station Log toolbar, click the arrow next to the eQSL.cc toolbar
button and then Batch Upload to eQSL.cc.
When the Criteria window appears, specify a date, a range of dates,
or other criteria to select log entries to upload.
Click Run. Station Log 15 creates and writes the eQSL.cc records
to a database- and batch-specific upload file in the OutgoingQSLs folder,
which by default is:
c:\DXtremeStationLog15\OutgoingQSLs
When the eQSL.cc Web site appears, upload the {Name of Database}_eQSL.cc_Batch_Upload.adi
file from the OutgoingQSLs folder. Refer to the eQSL.cc Web site for upload instructions.
Creating eQSL.cc Records During ADIF Import
The Create eQSL.cc Records check box lets you specify whether to
create eQSL.cc records as you import ADIF files.
The ADIF Import Utility appends the eQSL.cc records to the same workfile
as that used for automatic and manual eQSL.cc record creation on the
Station Log window (as described earlier), leaving the workfile open for the non-batch
creation of additional records.
The LoTW QSL Update utility can perform the same action, but
only for the import of unmatched log entries.
Home |
Checking DX Spots |
Adding the Log Entry and Automatically Uploading to LoTW |
Using JT Log Entry Processing
Using the Outgoing QSL Web Service |
Creating QSL and Address Labels |
Printing QSL and Address Labels |
Capturing an Improv Image
Managing Paper QSLs |
Managing LoTW QSLs |
Monitoring Performance |
Analyzing Your DXCC Status |
Other Fine Features |
Implementation and More
Click Here to Return Home